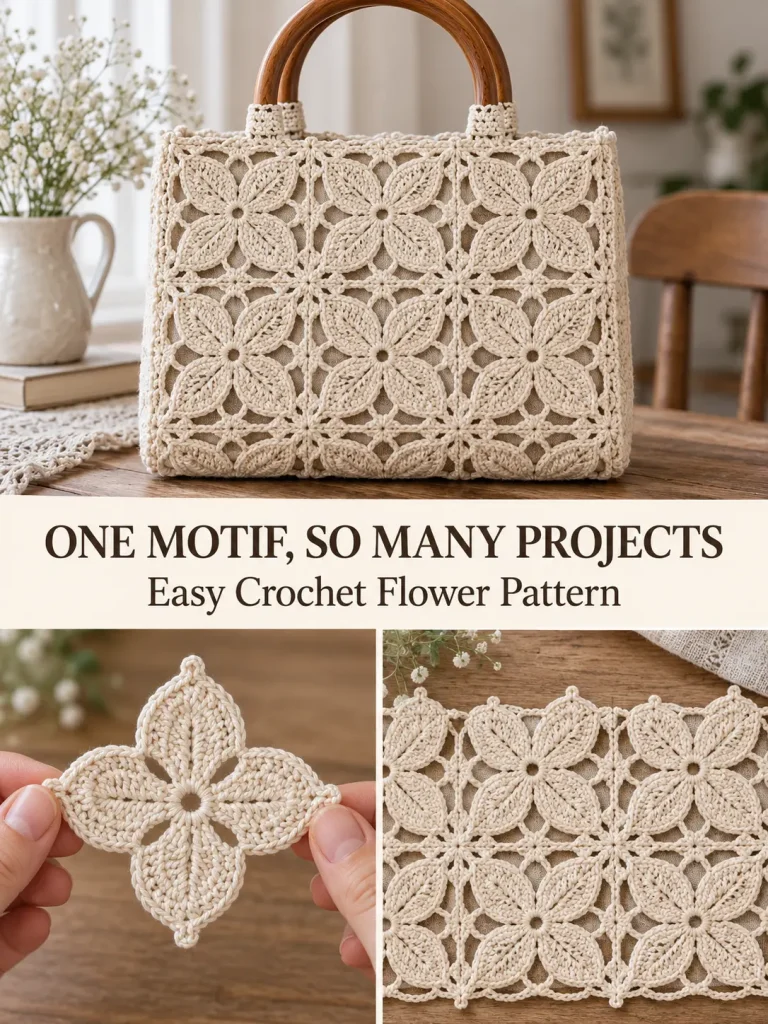
This dimensional four-petal crochet motif combines a small open center, four pointed leaf-like petals, and delicate spaces between the petals. Once several motifs are joined together, the individual flowers create a beautiful lace-style fabric that can be used for bags, table runners, tablecloths, cushion covers, bedspreads, and decorative blankets.
The construction below is an original four-petal motif designed around the visual idea in the inspiration. The petals are created with graduated tall stitches so they become broad near the center and finish with a distinct point.
Skill Level
Confident Beginner to Intermediate
The motif uses basic crochet stitches plus treble and double treble crochet. The most important part is placing the stitches correctly into the center anchors and keeping all four petals the same size.
Materials
- DK / light #3 cotton or cotton-blend yarn
- 3.5 mm crochet hook
- Yarn needle
- Scissors
- Stitch markers, optional
- Blocking mats and pins, optional
For a structured bag, choose a firm mercerized cotton or cotton-blend yarn.
For a tablecloth, runner, or decorative bedspread, a finer cotton yarn and smaller hook will create a more delicate lace effect.
Abbreviations — US Terms
ch – chain
sl st – slip stitch
sc – single crochet
hdc – half double crochet
dc – double crochet
tr – treble crochet
dtr – double treble crochet
st(s) – stitch(es)
sp – space
ch-sp – chain space
Special Stitches
Treble Crochet
Yarn over twice, insert the hook into the indicated stitch or space, yarn over and pull up a loop.
Yarn over and pull through 2 loops three times.
Double Treble Crochet
Yarn over three times, insert the hook into the indicated stitch or space, yarn over and pull up a loop.
Yarn over and pull through 2 loops four times.
These taller stitches create the elongated outer section of each petal.
Finished Motif Size
Using DK cotton and a 3.5 mm hook, one blocked motif measures approximately:
4½–5 inches from point to point
Finished size will vary with yarn thickness, hook size, and tension.
Gauge
Exact gauge is not critical.
What matters is that every motif is made with the same:
- yarn
- hook
- tension
- number of stitches
Block all motifs to the same measurements before joining them.
Pattern Notes
The motif is worked from the center outward.
The center contains four open chain spaces.
Between those spaces are four pairs of single crochet stitches.
Each pair of single crochet stitches becomes the foundation for one large petal.
The four petals are identical.
The motif can be used in two ways:
- Leave the four-petal flower as it is and sew neighboring motifs together at selected points.
- Add the optional square-up round, which creates convenient joining spaces for bags, blankets, runners, and tablecloths.
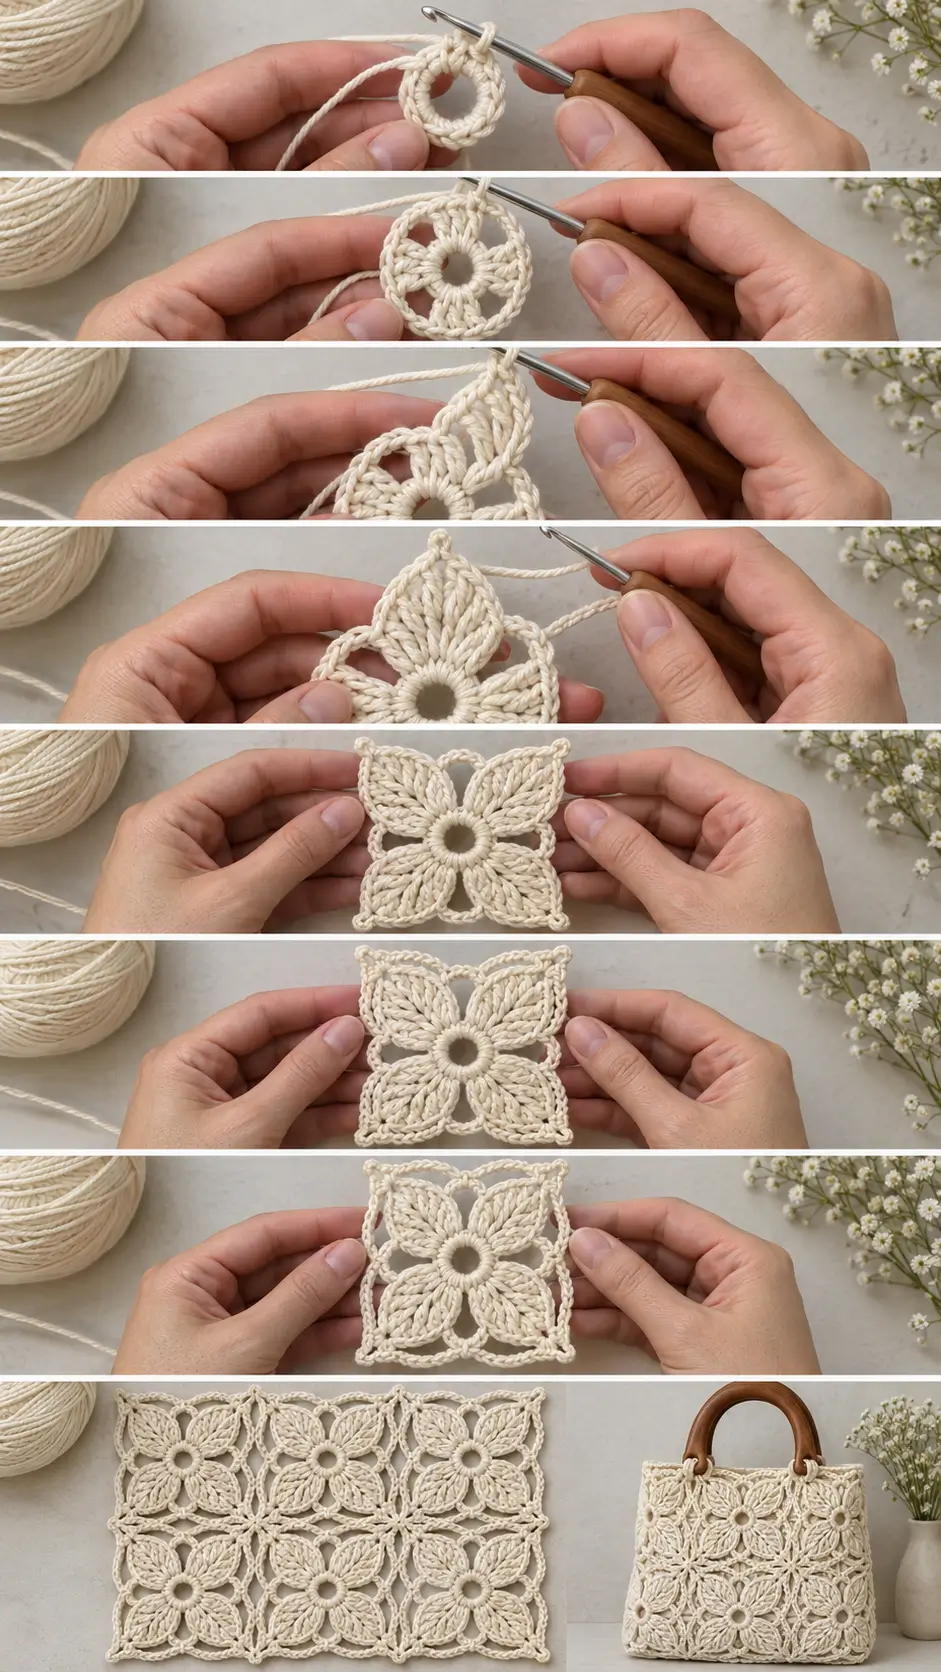
PART 1 — Crochet the Center
Using your main color:
Foundation Ring
Chain 6.
Slip stitch into the first chain to form a ring.
Make sure the chain is not twisted.
Round 1
Chain 1.
Work:
2 sc into the center ring, ch 4
Repeat this sequence three more times:
2 sc in ring, ch 4
Join with a slip stitch to the first sc.
You should now have:
- 8 sc total
- four groups of 2 sc
- four ch-4 spaces
The four chain spaces should be distributed evenly around the center.
These open spaces will remain visible between the petal bases.
PART 2 — First Petal
The petals are worked over each pair of single crochet stitches from Round 1.
Slip stitch into the first sc of the first 2-sc group.
In that same first sc, work:
1 sc, 1 hdc, 1 dc, 1 tr, 1 dtr
These stitches gradually increase in height.
Now:
ch 2
This ch-2 space creates the pointed top of the petal.
In the second sc of the same 2-sc group, work:
1 dtr, 1 tr, 1 dc, 1 hdc, 1 sc
The stitch heights now decrease again.
You have completed one petal.
The petal contains:
- 5 stitches rising in height
- one ch-2 tip
- 5 stitches decreasing in height
The result should resemble a broad pointed leaf.
Move to the Next Petal
Chain 3.
Skip the existing ch-4 center space from Round 1.
Continue into the first sc of the next 2-sc group.
PART 3 — Remaining Three Petals
In the first sc of the next pair, work:
sc, hdc, dc, tr, dtr
Ch 2.
In the second sc of the pair, work:
dtr, tr, dc, hdc, sc
Ch 3.
Repeat the same construction over the third pair of sc.
Then repeat again over the fourth pair.
After the fourth petal, ch 3 and join with a slip stitch to the first stitch of the first petal.
You should now have exactly:
4 identical pointed petals
with open spaces visible between them.
PART 4 — Define the Petal Edges
This round gives the petals a cleaner shape and makes the motif easier to block.
Slip stitch until you reach the first stitch of a petal.
Chain 1.
Work 1 sc into each of the first 5 stitches along the petal.
When you reach the ch-2 space at the pointed tip, work:
1 sc, ch 2, 1 sc
into the same ch-2 space.
Continue with:
1 sc in each of the next 5 stitches
You have now outlined one complete petal.
Between Petals
When you reach the ch-3 space between petals, work:
1 sc, ch 4, 1 sc
into the ch-3 space.
This recreates a decorative open valley between neighboring petals.
Continue around the next petal:
- sc in each of the first 5 stitches
- sc, ch 2, sc in the petal tip
- sc in each of the next 5 stitches
Then work:
sc, ch 4, sc
in the next valley.
Repeat around all four petals.
Join with a slip stitch to the first sc.
Fasten off if you want to use the flower motif without an outer joining round.
What the Motif Should Look Like
At this stage you should have:
- one small open center
- four large pointed petals
- four open spaces close to the center
- four larger open valleys between petals
- four defined ch-2 petal tips
The motif should lie mostly flat.
The petals may curve slightly before blocking.
Optional Raised Center Rib
For a more leaf-like appearance, add a subtle raised line through the center of each petal.
Thread matching yarn onto a yarn needle or use a crochet hook for surface slip stitches.
Beginning close to the center ring, work a line of loose surface slip stitches toward the pointed end of the petal.
Follow the visual center between the two halves of the petal.
Stop just below the ch-2 point.
Repeat on all four petals.
Keep these stitches loose.
If they are pulled tightly, the petals will curl.
This optional detail gives each petal a stronger ribbed leaf appearance.
PART 5 — Optional Square-Up Joining Round
Add this round if you want to connect many motifs into a runner, bag, tablecloth, cushion, or blanket.
The four petal tips will act as the four corners of the motif.
Attach yarn in any petal’s ch-2 tip.
Chain 1.
In the same tip space work:
sc, ch 2, sc
This forms the first corner.
Chain 4.
In the ch-4 valley between the first and second petals, work:
1 sc
Chain 4.
In the ch-2 tip of the next petal work:
sc, ch 2, sc
You have completed one side.
Continue around:
ch 4, sc in next valley, ch 4, sc-ch 2-sc in next petal tip
Repeat until all four sides have been formed.
For the final side:
Ch 4.
Sc in the final valley.
Ch 4.
Join with a slip stitch to the first sc of the starting corner.
Fasten off.
Finished Square-Up Structure
After this round, each motif has:
- four ch-2 corners
- two ch-4 spaces along each side
- one valley anchor in the center of each side
Block the motif so the four petal tips form the corners of a square or diamond.
This outer structure makes joining much easier.
Blocking the Motifs
Blocking is especially useful for this pattern.
Gently dampen the completed motif according to the care instructions for your yarn.
Pin the four petal tips first.
Then straighten the spaces between the petals.
If using the square-up round, pin each corner so the motif forms an even square.
Measure your first motif.
Block every additional motif to the same dimensions.
Allow everything to dry completely.
How to Join the Motifs
Method 1 — Sewn Join
Place two blocked motifs beside each other.
Match:
- corner to corner
- first ch-4 space to first ch-4 space
- center valley to center valley
- second ch-4 space to second ch-4 space
Thread matching yarn onto a yarn needle.
Whip stitch or mattress stitch through corresponding chain spaces.
Keep the seam slightly loose so the fabric remains flexible.
Fasten securely.
Method 2 — Slip Stitch Join
Place two motifs with right sides together.
Insert your hook through corresponding chain spaces on both motifs.
Slip stitch through both layers.
Continue along the side.
Do not pull the slip stitches tightly.
Open the motifs afterward and check that the seam lies flat.
Method 3 — Join As You Go
On the final square-up round of a new motif, replace the center chain of each joining ch-4 space with a slip stitch into the corresponding chain space of the neighboring completed motif.
For example, instead of:
ch 4
work:
ch 2, sl st into matching space of neighboring motif, ch 2
At a joining corner, replace the middle of the ch-2 corner with a slip stitch into the neighboring corner.
This creates a flatter, more decorative join with fewer ends to weave in.
How to Make a Crochet Motif Bag
This motif is especially striking when several flowers are joined into a structured handbag.
Front Panel
Make 9 motifs.
Arrange them:
3 motifs across × 3 motifs high
Join them together using the square-up edges.
Back Panel
Make another:
9 motifs
and join them into an identical 3 × 3 panel.
You now have two matching lace panels.
Add a Fabric Lining
Because the motif fabric contains open spaces, a lining is strongly recommended for a handbag.
Cut two pieces of fabric slightly larger than the crochet panels.
Sew them together along the sides and bottom.
Fold the upper raw edge inward and sew it securely.
Insert the lining inside the crochet bag.
Hand sew the lining around the upper edge.
A lining helps:
- prevent small objects from falling through
- reduce stretching
- protect the crochet stitches
- give the bag more structure
Join the Bag Panels
Place the two crochet panels with wrong sides together.
Join along:
- first side
- bottom
- opposite side
Leave the top completely open.
You can use:
- single crochet
- slip stitch
- mattress stitch
For a more structured edge, single crochet through both layers.
Optional Bag Gusset
For extra depth, add a narrow crocheted strip between the front and back panels.
Make a strip approximately:
2½–3 inches wide
and long enough to run down one side, across the bottom, and up the opposite side.
Use firm single crochet.
Sew one long edge of the gusset to the front panel.
Sew the opposite long edge to the back panel.
This creates a roomier handbag.
Add Wooden Handles
The rounded wooden handles shown with this style of motif work especially well.
Position one handle at the center of the front panel.
Use matching yarn to sew or crochet the upper edge firmly around the handle attachment points.
Repeat with the second handle on the back panel.
Reinforce every attachment point several times.
Do not attach a heavy handle to only one chain space.
Spread the attachment over several stitches.
Crochet Handle Alternative
If you do not want wooden handles, crochet two straps.
Chain until the strap reaches your preferred length.
Work 4–6 rows of single crochet.
Fasten off and sew one strap securely to each side of the bag.
For a non-stretching strap, add cotton webbing underneath.
Make a Table Runner
Join motifs into a long rectangle.
A simple arrangement is:
2 motifs wide × 8 motifs long
or:
3 motifs wide × 10 motifs long
The exact number depends on your table.
After joining, add a simple single crochet or picot border around the outside.
Make a Tablecloth
For a square tablecloth, arrange the motifs into an equal grid.
For example:
8 × 8 motifs = 64 motifs
For a rectangular table:
8 × 12 motifs = 96 motifs
Measure one blocked motif first.
Then calculate:
motif width × number of motifs
to estimate the final dimensions.
Remember that joining can slightly change the total measurement.
Make a Bedspread or Blanket
The same construction can create an impressive floral bedspread.
For example, if one blocked motif measures approximately 5 inches:
Baby Blanket
7 × 9 motifs
Approximately 35 × 45 inches before the outer border.
Lap Blanket
9 × 11 motifs
Approximately 45 × 55 inches.
Throw
10 × 12 motifs
Approximately 50 × 60 inches.
Always calculate your size from your own blocked motif measurement.
Optional Outer Border
After joining all motifs, add a simple border.
Border Round 1
Attach yarn at any corner.
Sc evenly around the complete project.
At each outside corner work:
3 sc
Join with a slip stitch.
Border Round 2
Chain 1.
Sc in every stitch around.
At each corner work:
3 sc in the center corner stitch
Join.
For a decorative finish, add a picot round.
Picot Edge
Repeat around:
sc in next 3 sts, ch 3, sl st in first ch
Continue around.
Fasten off and weave in all ends.
How to Change the Motif Size
The easiest way to resize the motif is to change your yarn and hook.
Smaller Motifs
Use:
- fingering or crochet thread
- approximately 2–2.5 mm hook
This works especially well for:
- tablecloths
- delicate runners
- lace curtains
Medium Motifs
Use:
- DK cotton
- approximately 3–4 mm hook
Good for:
- bags
- cushion covers
- lightweight blankets
Larger Motifs
Use:
- worsted weight yarn
- approximately 4.5–5 mm hook
Good for:
- blankets
- throws
- larger home decor
Make a test motif before committing to a large project.
Color Ideas
Natural Linen
Cream, ivory, or flax-colored cotton creates an elegant monochrome result.
Vintage Floral
Dusty rose, sage, cream, and muted gold.
Coastal
White, sand, soft blue, and navy.
Modern Neutral
Cream, camel, chocolate, and black.
Colorful Scrap Version
Make every flower in a different color and use one neutral color for the optional square-up round.
This can turn leftover yarn into a dramatic patchwork blanket.
Tips for Consistent Motifs
Count Every Petal
Each petal must contain the same graduated stitch sequence.
One missed tall stitch can make a petal noticeably smaller.
Keep the Double Treble Stitches Even
The dtr stitches create most of the petal’s height.
Try to pull each loop to the same tension.
Do Not Tighten the Petal Tip
The ch-2 tip should remain open enough to accept the edging stitches.
Use Stitch Markers
Mark the four pairs of center single crochets before beginning the petals if necessary.
Block Before Joining
Do not join dozens of unblocked motifs and hope they straighten afterward.
Blocking first produces much cleaner seams.
Common Problems
One Petal Is Smaller
Count the graduated stitches.
Each half of every petal must contain:
sc, hdc, dc, tr, dtr
with the sequence mirrored on the opposite side.
The Motif Ruffles
Your tall stitches may be too loose or your hook may be too large.
Try reducing the hook size slightly.
The Motif Curls Into a Bowl
Your stitches may be too tight.
Try a slightly larger hook or loosen the dtr stitches.
Petal Tips Look Rounded
Make sure you work:
sc, ch 2, sc
into each tip during the edging round.
The ch-2 space creates the pointed appearance.
Joined Motifs Pucker
The joining stitches are probably too tight.
The join should have enough flexibility to allow neighboring motifs to lie flat.
Open Spaces Become Uneven
Block the four center spaces and four outer valleys consistently before joining.
Finishing
Once all motifs are assembled:
- weave in every yarn tail
- inspect every join
- reinforce bag-handle attachments if applicable
- gently block the complete project
- straighten the outer edges
- shape the petal points
- allow the project to dry completely
For bags, insert the lining only after the crochet panel has been blocked.
Four-Petal Crochet Motif
One small motif can become many completely different projects.
Used alone, the four pointed petals create a decorative flower or applique. Joined into rows, the motifs become an airy table runner. Joined into larger panels, they can become a tablecloth, bedspread, cushion cover, or blanket. With firm cotton yarn, lining, and sturdy handles, the same motif can even become a distinctive handmade crochet bag.
The combination of an open center, graduated tall stitches, pointed petals, and optional joining spaces gives the motif plenty of visual detail while keeping the underlying construction repeatable.



