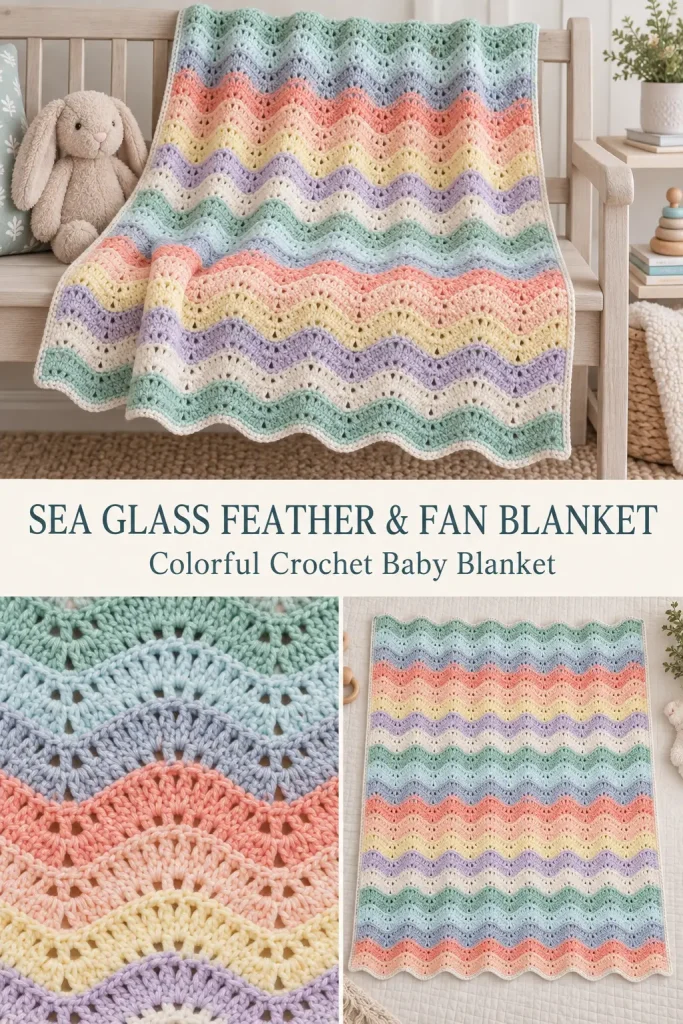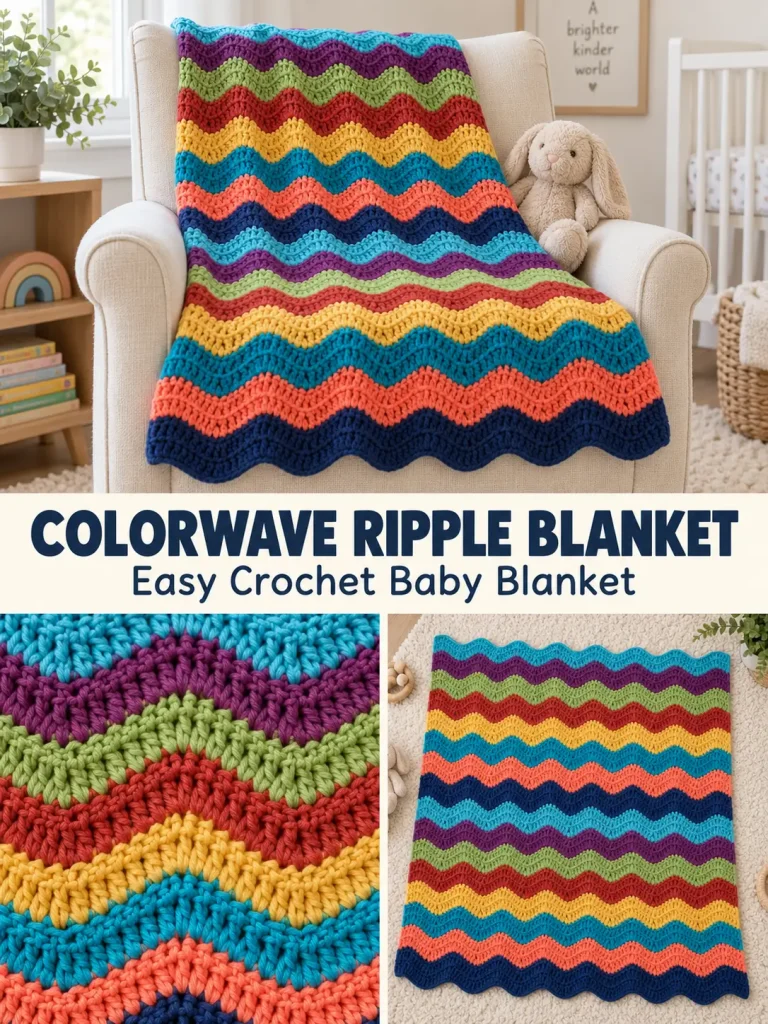
This colorful crochet blanket uses a simple repeating increase-and-decrease pattern to create smooth waves across the fabric. The peaks rise gradually, the valleys dip evenly, and changing colors every few rows turns the basic stitch pattern into a bright striped blanket.
The construction below is an original ripple pattern based on the general chevron/ripple concept rather than a reproduction of the linked pattern.
It works especially well for baby blankets because there are no separate motifs to join, and once the first few rows are established, the same ripple sequence repeats throughout the entire project.
Skill Level
Confident Beginner
You should know how to:
- chain
- single crochet
- double crochet
- work 2 double crochet stitches together
- increase by working multiple stitches into one stitch
- change yarn colors
- count stitches
The most important part is keeping every increase and decrease in the correct position.
Finished Size
The sample version measures approximately:
32–34 inches wide × 39–41 inches long
The blanket can easily be made wider or longer.
Materials
- Medium weight #4 yarn
- Approximately 1,000–1,200 yards total
- 5 mm crochet hook
- Yarn needle
- Scissors
- Stitch markers
- Measuring tape
For a colorful version, use 6–8 coordinating colors.
Suggested Palette
- Turquoise
- Apple green
- Plum
- Mustard yellow
- Rust red
- Coral orange
- Navy blue
- Bright teal
A mix of warm and cool colors gives the blanket the lively patchwork-striped appearance.
Abbreviations — US Terms
ch – chain
sc – single crochet
dc – double crochet
dc2tog – double crochet 2 together
sl st – slip stitch
st(s) – stitch(es)
Special Stitch
Double Crochet 2 Together — dc2tog
Yarn over.
Insert hook into the next stitch.
Yarn over and pull up a loop.
Yarn over and pull through 2 loops.
Yarn over and insert hook into the following stitch.
Yarn over and pull up a loop.
Yarn over and pull through 2 loops.
You should have 3 loops remaining on the hook.
Yarn over and pull through all 3 loops.
Two stitches have now been decreased into one.
Gauge
Approximately:
14 dc = 4 inches
and approximately:
7 ripple rows = 4 inches
Exact gauge is not critical unless you want to match the suggested finished size.
The most important thing is maintaining even tension throughout all color changes.
Stitch Multiple
The ripple section uses:
a multiple of 12 stitches
For the sample blanket, the foundation contains:
120 working stitches
That gives:
10 complete ripple repeats across
Because the initial chain includes one extra chain for the first single crochet row, begin with:
121 chains
Understanding the Ripple
Each 12-stitch repeat contains:
- a decrease
- three regular stitches
- two increases
- three regular stitches
- another decrease
Written as:
dc2tog, dc in next 3, 2 dc in each of next 2, dc in next 3, dc2tog
The stitch count stays the same because the increases replace the stitches removed by the decreases.
The increases create the peaks.
The neighboring decreases create the valleys.
Foundation
With your first color:
Ch 121.
Foundation Row
Sc in the second chain from the hook.
Sc in every remaining chain across.
You should have:
120 sc
Ch 2 and turn.
The turning ch-2 does not count as a stitch throughout the pattern.
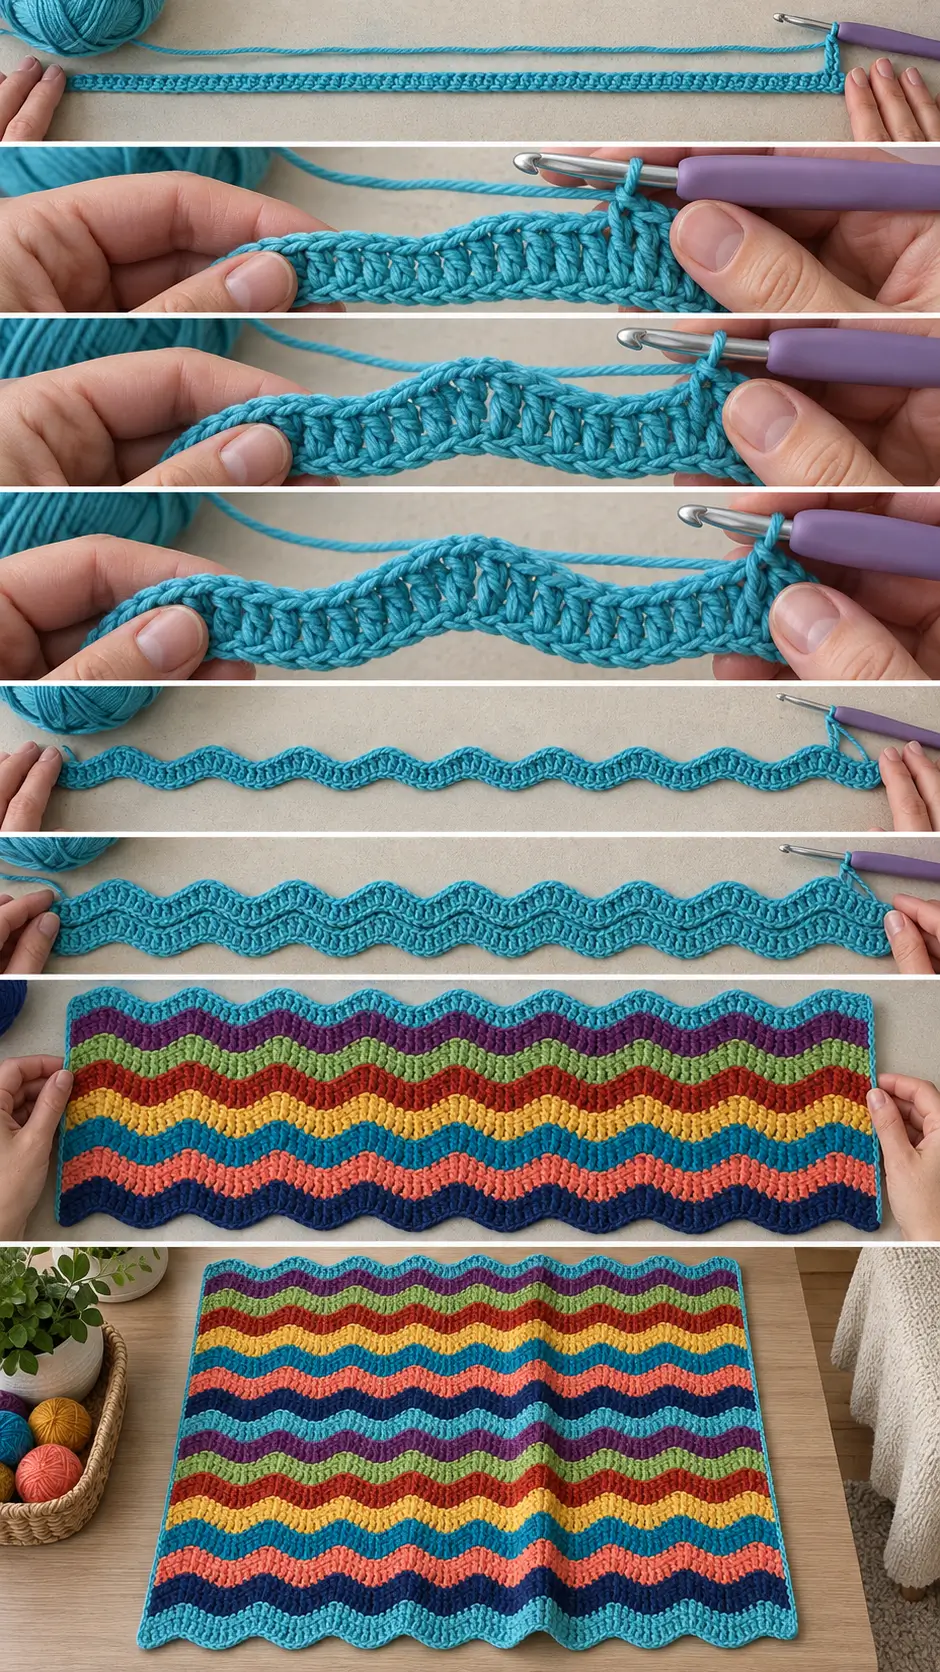
Row 1 — Establish the Ripple
Work:
dc2tog over the first 2 sts
Dc in each of the next 3 sts.
Work 2 dc in the next st.
Work 2 dc in the following st.
Dc in each of the next 3 sts.
Work dc2tog over the next 2 sts.
One complete 12-stitch ripple section is finished.
Repeat this entire sequence across:
*dc2tog, dc in next 3 sts, 2 dc in next st, 2 dc in next st, dc in next 3 sts, dc2tog*
Repeat from * to * until the end of the row.
You should complete:
10 ripple sections
and still have:
120 stitches
Ch 2 and turn.
What You Should See
The fabric will already begin forming shallow peaks and valleys.
The middle two increases form the top of each peak.
The two decreases sitting beside the neighboring repeat form each valley.
Row 2
Repeat the exact same ripple sequence:
*dc2tog over next 2 sts, dc in next 3 sts, 2 dc in next st, 2 dc in next st, dc in next 3 sts, dc2tog over next 2 sts*
Repeat across.
120 sts
Ch 2 and turn.
Row 3 and All Following Ripple Rows
Repeat Row 2.
After approximately 5–6 rows, the wave shape should become very obvious.
The increases should stack above the previous peaks.
The decreases should remain aligned above the previous valleys.
Color Changes
For the colorful striped version, change yarn every 2 rows.
A suggested sequence is:
Rows 1–2
Turquoise
Rows 3–4
Plum
Rows 5–6
Apple Green
Rows 7–8
Rust Red
Rows 9–10
Mustard Yellow
Rows 11–12
Teal
Rows 13–14
Coral
Rows 15–16
Navy
Then repeat the color sequence.
You can rearrange the colors during later repeats so identical colors do not always sit in the same order.
How to Change Colors Neatly
On the final dc of the old color, stop before completing the final yarn over.
You should have 2 loops remaining on the hook.
Drop the old color.
Yarn over using the new color.
Pull the new color through the final 2 loops.
Turn and continue with the new yarn.
This places the color change directly at the edge.
Random Stripe Variation
For a more playful blanket similar to a scrap-yarn project, vary the stripe widths.
For example:
- 2 rows turquoise
- 1 row red
- 3 rows green
- 2 rows purple
- 1 row mustard
- 2 rows teal
- 3 rows orange
The ripple construction does not change.
Only the color sequence changes.
If using single-row stripes, remember that you will alternate which side of the blanket the yarn ends appear on.
Suggested Blanket Length
Continue until the blanket measures approximately:
39–41 inches
For the suggested gauge, this will usually require approximately:
68–72 ripple rows
However, measuring the actual blanket is more reliable than following an exact row count.
Finish after completing a full row.
Keeping the Ripple Accurate
The stitch count should remain:
120 stitches in every row
If the count changes, the peaks will begin drifting.
Use stitch markers while learning the pattern.
A useful method is to place a marker after each 12-stitch repeat.
You should have:
10 sections across the sample blanket
Identifying the Peaks
The peak is created by:
2 dc in next st, 2 dc in next st
This produces four stitches over two stitches from the previous row.
On following rows, make sure the two increases remain centered above the existing peak.
Identifying the Valleys
A valley is created where one 12-stitch repeat ends with:
dc2tog
and the next repeat begins with another:
dc2tog
The two neighboring decreases pull the fabric downward and create the V-shaped dip.
Finishing the Blanket
After reaching the desired length, fasten off.
Leave a yarn tail approximately 6 inches long.
Thread it through a yarn needle.
Weave it through several stitches on the wrong side.
Change direction once and weave through another section.
Trim the remaining yarn.
Repeat for every color-change tail.
Optional Side Border
The ripple design naturally produces attractive wavy top and bottom edges, so you can leave those edges untouched.
A simple border can be added only along the two long sides.
Use one neutral color or one of the colors already used in the blanket.
Side Border Row 1
Attach yarn at the lower corner.
Ch 1.
Work sc evenly along the entire long edge.
Aim for approximately:
2 sc for every 3 dc row ends
Adjust slightly as needed.
The edge should lie flat.
Fasten off.
Repeat on the opposite side.
Side Border Row 2
For a slightly stronger edge, work one additional row of sc along each side.
Fasten off.
This keeps the top and bottom ripple shape visible while giving the long edges a cleaner finish.
Optional Full Border
If you prefer a completely framed blanket, begin with one sc round around the entire piece.
Along the ripple peaks and valleys, follow the existing contour rather than trying to force the edges straight.
At each outer peak, work:
3 sc
At each deep valley, skip one stitch if necessary to prevent the border from ruffling.
Continue evenly around the blanket.
How to Make the Blanket Wider
The ripple uses:
12 stitches per repeat
Add or remove 12 working stitches for each complete wave.
Because the foundation chain includes one extra chain, useful starting chains include:
Small
97 chains
96 working stitches
8 ripple repeats
Medium
121 chains
120 working stitches
10 ripple repeats
Wider
145 chains
144 working stitches
12 ripple repeats
Large Throw
181 chains
180 working stitches
15 ripple repeats
Always begin with:
multiple of 12 + 1 foundation chains
How to Make the Blanket Longer
Simply continue repeating the ripple row.
Nothing changes as the blanket grows.
Stop when the blanket reaches your desired length.
Small Baby Blanket
For a smaller stroller blanket:
Chain 97
Work 96 sc across the foundation row.
You will have:
8 ripple repeats
Continue until the blanket measures approximately 32–36 inches long.
Larger Baby Blanket
For a wider baby or toddler blanket:
Chain 145
Work:
144 stitches
This gives:
12 ripple repeats
Continue until approximately 42–46 inches long.
Lap Blanket
For a lap blanket, begin with:
145 or 157 chains, adjusting to a valid multiple of 12 + 1.
Work until approximately:
48–55 inches long
Throw Blanket
For a generous sofa throw:
Chain 181
This gives:
180 working stitches
and:
15 ripple repeats
Work until approximately:
55–65 inches long
Make a gauge swatch before beginning a large blanket because the amount of yarn required can increase quickly.
Choosing Yarn
A smooth medium-weight yarn is especially useful for this pattern because it clearly shows the wave shape.
Good options include:
- washable acrylic
- cotton-acrylic blends
- soft wool blends
- washable baby yarn
For a baby blanket, choose yarn that feels soft and is practical to wash.
Scrap-Yarn Version
Ripple blankets are especially useful for leftover yarn.
Instead of planning an exact palette, collect several yarns of the same approximate weight.
Arrange them into groups:
- warm colors
- cool colors
- neutrals
- accent colors
Then alternate them as you crochet.
Try not to place extremely similar colors directly beside each other unless you want a subtle blended effect.
Color Planning
For a lively blanket, combine:
Bright
Turquoise + red + purple + lime + yellow + orange
Woodland
Forest green + moss + rust + mustard + brown + cream
Ocean
Navy + teal + aqua + pale blue + white
Baby Pastels
Blush + lavender + mint + pale yellow + cream
Modern
Terracotta + sage + mustard + cream + charcoal
Rainbow
Red + orange + yellow + green + blue + purple
Tips for Straight Side Edges
Count Every Row
Most ripple problems begin with accidentally adding or losing stitches.
Do Not Work Into the Turning Chain
The ch-2 does not count as a stitch.
Begin directly in the first actual stitch.
Keep the Final Decrease Consistent
Every row ends with the final dc2tog.
Do not add an extra dc afterward.
Mark the Repeats
Place stitch markers after every 12 stitches until you become familiar with the pattern.
Common Problems
Peaks Start Moving Sideways
One of the increases has probably been worked into the wrong stitch.
Check that each peak contains:
2 dc in each of 2 neighboring stitches
and that it sits directly above the previous peak.
Valleys Are Uneven
Make sure every valley contains two neighboring decreases:
dc2tog, dc2tog
one from each adjacent repeat.
Stitch Count Increases
The most common cause is working both increases correctly but forgetting one of the decreases.
Count the row.
Every 12-stitch section must still produce exactly 12 stitches.
Stitch Count Decreases
You may have worked one decrease too many or forgotten one of the peak increases.
Check each repeat individually.
Blanket Pulls Tightly at the Foundation
The starting chain may be too tight.
Use a hook 0.5–1 mm larger for the foundation chain, then switch back to the main hook.
Blanket Ruffles
Your peak stitches may be too loose or you may be adding extra increases.
Confirm that there are exactly two increase stitches per repeat.
Color Changes Create Loose Edges
When changing colors, gently tighten both yarn tails before working the second stitch of the new row.
Do not pull so tightly that the edge puckers.
The optional side border will hide small irregularities.
Blocking
Blocking can make the waves look cleaner and help the blanket lie flat.
After weaving in the ends:
- Wash or lightly dampen according to the yarn label.
- Lay the blanket flat.
- Straighten the side edges.
- Shape each peak and valley gently.
- Allow the blanket to dry completely.
Do not stretch the ripple aggressively.
The natural wave should remain visible.
Why Ripple Crochet Works So Well With Color
The stitch pattern itself is simple, so the yarn colors become the main visual feature.
Every stripe follows the same peaks and valleys, creating continuous bands of color that travel across the blanket.
Changing color every two rows produces bold stripes.
Changing every row creates finer stripes.
Using irregular stripe widths creates a more playful scrap-blanket effect.
Easy Colorful Ripple Crochet Blanket
A ripple blanket is one of those projects that becomes easier after only a few rows.
The entire design depends on repeating the same balanced sequence of decreases, straight stitches, and increases. Once the peaks and valleys are established, they show exactly where the following row should be worked.
Add bright color changes, and the simple repeating crochet structure becomes a lively blanket that works beautifully for babies, children, sofa throws, gifts, and leftover-yarn projects.