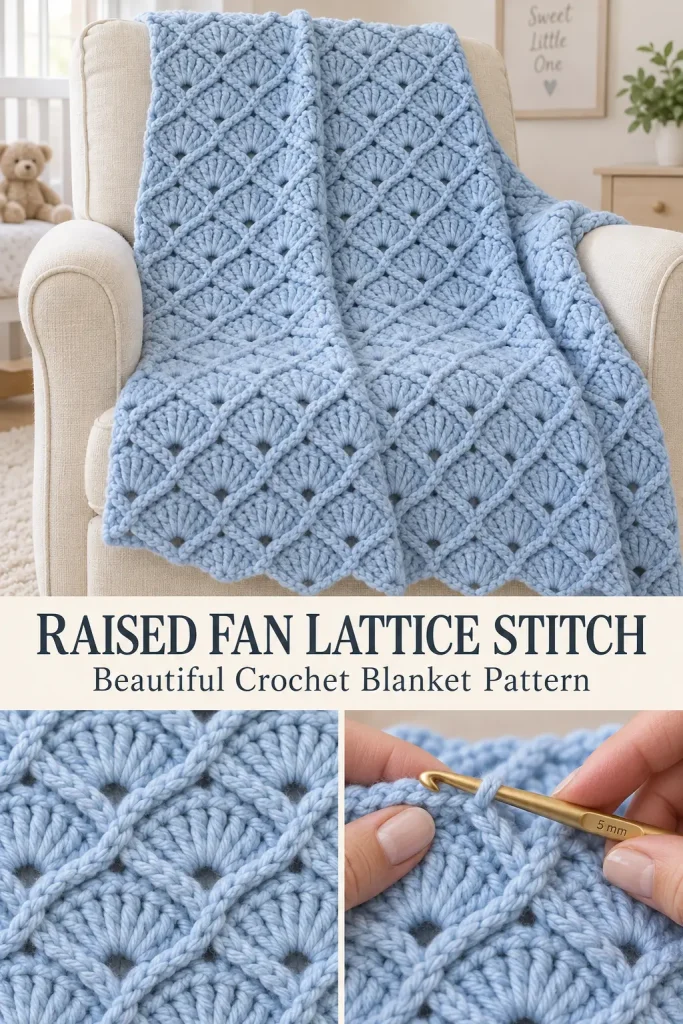
This eye-catching crochet texture combines large rounded fan stitches with an offset lattice structure, creating repeating shell-shaped sections that look almost like small overlapping tiles.
The most distinctive features are:
- rounded fan motifs
- small openings at the base of each fan
- staggered rows
- raised diagonal lines between motifs
- softly scalloped outer edges
The exact original stitch sequence cannot be confirmed from the image alone, so the pattern below is an original construction designed to reproduce the same overall fan-and-lattice appearance without copying an unknown source pattern.
It works beautifully for:
- baby blankets
- throws
- tote bags
- cushion covers
- scarves
- runners
- decorative panels
- lightweight cardigans
Skill Level
Confident Beginner / Intermediate
The main shell repeat is straightforward. The raised lattice detail requires a little more attention because surface slip stitches are added along the valleys between the fans.
You should know how to:
- chain
- single crochet
- double crochet
- slip stitch
- work multiple stitches into one stitch
- identify the center stitch of a shell
- work surface crochet
Materials
For a practice swatch:
- Medium weight #4 yarn
- 5 mm crochet hook
- Yarn needle
- Scissors
- Stitch markers, optional
- Measuring tape
A smooth yarn with good stitch definition works best because it allows the fan stitches and raised lattice to remain clearly visible.
Abbreviations — US Terms
ch – chain
sc – single crochet
dc – double crochet
sl st – slip stitch
st(s) – stitch(es)
RS – right side
WS – wrong side
Special Stitch
7-Double-Crochet Fan
Work:
7 dc into the same stitch
The fourth double crochet is the center stitch of the fan.
When the following row asks you to work into the center of a fan, work into:
the 4th dc
of that 7-dc group.
Edge Half-Fan
At the alternating row edges, work:
4 dc into the same stitch
This creates half of a 7-dc fan and keeps the side edge balanced.
Stitch Multiple
The foundation chain is:
multiple of 6 + 2
Examples:
- 26 chains
- 32 chains
- 38 chains
- 44 chains
- 62 chains
- 98 chains
- 122 chains
For a practice swatch:
Chain 32.
This creates 5 full fan repeats across.
PART 1 — Main Fan Fabric
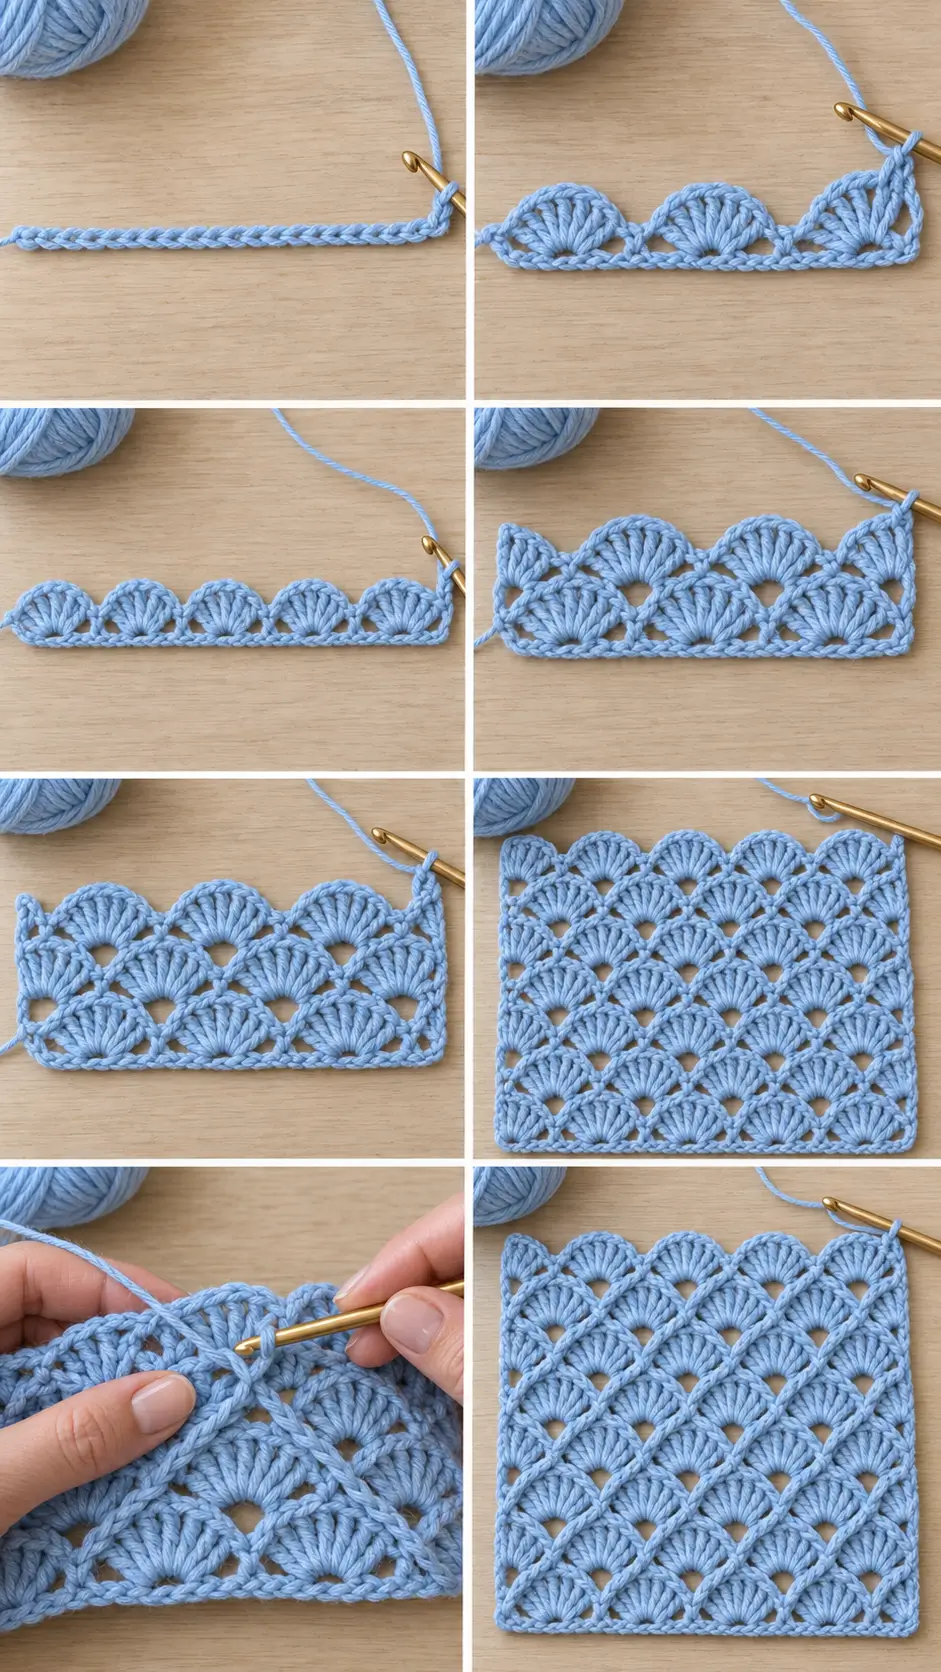
Row 1 — First Fan Row
Sc in the second chain from the hook.
Now repeat across:
*skip 2 chains, 7 dc in next chain, skip 2 chains, sc in next chain*
Repeat from * to * across.
Turn.
What You Should See
You should have a row of large rounded fans separated by single crochet anchor stitches.
The skipped chains create tiny open sections beneath each fan.
These openings will become part of the decorative texture.
Row 2 — Offset Fan Row
Ch 3.
The ch-3 counts as the first dc.
Work 3 more dc in the first sc.
You now have an edge half-fan containing 4 dc.
Work:
sc in the 4th dc of the next 7-dc fan
Then:
7 dc in the next sc
Repeat across:
*sc in center dc of next fan, 7 dc in next sc*
Continue until you reach the final fan.
Work:
sc in the 4th dc of the final fan
Then work:
4 dc in the final sc
Turn.
Visual Check
The fans in Row 2 should sit between the fans from Row 1.
This staggered placement begins creating the overlapping scale or tile effect.
Row 3 — Return to Original Alignment
Ch 1.
Sc in the first stitch.
Work:
7 dc in the next sc
Then work:
sc in the 4th dc of the next full 7-dc fan
Repeat across:
*7 dc in next sc, sc in center dc of next fan*
At the opposite edge, work the final sc into the top of the turning ch-3 from the previous row.
Turn.
The fan placement should now match Row 1 again.
Pattern Repeat
Repeat:
Rows 2–3
until the fabric reaches your desired length.
The motif rows will alternate:
- Row A: fans aligned in one position
- Row B: fans offset between them
- Row A
- Row B
As the pattern grows, the fans naturally form diagonal pathways across the fabric.
Keeping the Fans Even
Every full fan must contain exactly:
7 dc
The center stitch is always:
the 4th dc
If you accidentally work the next sc into the 3rd or 5th dc, the pattern will begin drifting sideways.
Count the fan stitches carefully while learning the repeat.
PART 2 — Raised Lattice Detail
The main fabric can be used exactly as it is.
However, to create the stronger raised diagonal framework visible in the inspiration, add surface slip stitches after completing the panel.
Use the same yarn color.
Do not fasten the surface stitches tightly.
They should rest on the front of the fabric rather than pulling it together.
First Diagonal Ridge
Place the fabric with the RS facing.
Look for the single crochet anchor stitches between the fans.
These anchors naturally form diagonal lines because the fans alternate position every row.
Insert the hook from front to back beside the first lower anchor.
Hold the working yarn behind the fabric.
Pull up a loop.
Insert the hook at the next diagonal anchor one row above and slightly to the right.
Pull the yarn through the fabric and immediately through the loop already on the hook.
You have made one surface slip stitch.
Continue following the anchor points diagonally upward.
Keep every surface stitch loose.
Reverse the Direction
When you reach the next high point in the motif arrangement, begin following the valley anchors diagonally in the opposite direction.
This creates a repeating:
*/ \ / \ / *
path across the surface.
The raised lines should visually frame the rounded fans.
Continue the Surface Lattice
Repeat additional zigzag lines across the fabric until each fan section appears surrounded by raised diagonal ridges.
The result should resemble a series of soft diamond or leaf-shaped frames containing the fan motifs.
Important
Do not surface crochet through random places in the fan.
Follow the natural single crochet joins between motifs.
This keeps the lattice symmetrical.
What the Finished Stitch Should Look Like
The finished fabric should contain:
- rounded 7-dc fans
- small triangular openings beneath the fans
- alternating offset motif rows
- strong diagonal visual movement
- raised zigzag lines between fan sections
- a softly textured, dimensional surface
The fabric is dense enough for blankets and bags while still having small decorative openings.
Practice Swatch
For a useful sample:
Chain 32
Work approximately:
16–20 rows
of the fan repeat.
Then add the raised surface lattice.
Block lightly.
This gives you enough fabric to judge:
- yarn choice
- hook size
- fan definition
- surface ridge tension
before committing to a larger project.
Example Baby Blanket
For a baby blanket approximately 32–34 inches wide, begin with a foundation chain that follows:
multiple of 6 + 2
A useful starting point with medium #4 yarn may be:
Chain 122
This gives 20 fan repeats across.
Because yarn thickness and tension vary, work several rows and measure before continuing.
Repeat Rows 2–3 until the blanket measures approximately:
38–40 inches long
Then add the surface lattice if desired.
Simple Blanket Border
Because the fan pattern already has strong texture, keep the border simple.
Border Round 1
Attach yarn at any corner.
Ch 1.
Work sc evenly around all four sides.
At each corner:
3 sc
Join with a sl st.
Border Round 2
Ch 1.
Sc in every stitch around.
At each corner:
3 sc in the center corner stitch
Join.
Fasten off.
A plain border frames the motif without competing with the raised texture.
Optional Scalloped Border
If you want the outer edge to echo the fan shapes, add one decorative round.
Repeat around:
skip 2 sts, 5 dc in next st, skip 2 sts, sl st in next st
Adjust the spacing slightly around corners so the border lies flat.
How to Make the Fabric Wider
Add foundation chains in groups of:
6
For example:
- Chain 32
- Chain 38
- Chain 44
- Chain 50
- Chain 56
all preserve the pattern.
Do not add only one or two random chains or the final fan repeat will not line up.
How to Make the Fabric Longer
Simply continue repeating:
Rows 2–3
until you reach the desired length.
There is no additional shaping required.
Crochet Bag Version
This stitch makes an especially attractive bag because the raised surface texture looks decorative even in one solid color.
Make:
2 identical rectangular panels
using the fan pattern.
For a medium tote, aim for approximately:
12 inches wide × 11 inches tall
Add the raised surface lattice to both panels before assembly.
Strengthen the Bag Panels
Because the stitch contains small open spaces, a lining is recommended.
A cotton lining:
- supports the crochet
- prevents small objects from poking through
- reduces stretching
- helps the bag maintain its shape
Join the Bag
Place both panels with wrong sides together.
Using matching yarn, sc through both layers along:
- first side
- bottom
- second side
Leave the top open.
Fasten off.
Add the Top Edge
Attach yarn at one side seam.
Work:
2–3 rounds of sc
around the opening.
This gives the bag a firmer edge for attaching handles.
Crochet Handles
Make 2.
Chain until each handle reaches your preferred length.
For a shoulder tote, approximately:
24–28 inches
is a useful starting range.
Row 1
Sc in second chain from hook and across.
Ch 1 and turn.
Rows 2–5
Sc across.
Fasten off.
Sew the handles firmly to the bag.
For a bag that will carry weight, reinforce the straps with cotton webbing or ribbon.
Color Ideas
The pattern looks especially strong in a single solid shade because the texture remains easy to see.
Baby Blue
Creates a soft nursery blanket similar to the inspiration.
Cream
Shows every raised line clearly.
Sage Green
Works beautifully for modern home decor.
Dusty Rose
A soft choice for baby blankets or bags.
Mustard
Creates a bold vintage texture.
Charcoal
Makes the lattice appear especially dramatic.
Two-Color Variation
Use one color for the main fan fabric and another for the surface lattice.
For example:
- cream fabric + camel ridges
- sage fabric + dark green ridges
- pale blue fabric + navy ridges
- blush fabric + burgundy ridges
This makes the diamond structure much more obvious.
For a more subtle result, use two shades from the same color family.
Yarn Tips
A smooth yarn is easiest to use because you need to identify:
- individual fan stitches
- the 4th dc of each shell
- sc anchor stitches
- surface-lattice locations
Very fuzzy yarn can hide these details.
For baby blankets, choose a soft yarn that can be washed easily.
For bags, cotton or a firm cotton blend gives better structure.
Hook Size
For medium #4 yarn, begin around:
5 mm
If the fans feel stiff or bunch together, try a slightly larger hook.
If the openings become too large and loose, move down one hook size.
Common Problems
Fans Lean Sideways
You are probably not working the single crochet into the exact center of the previous fan.
Always use:
the 4th dc of the 7-dc fan
Stitch Pattern Becomes Wider
Check that every fan is worked only into the designated single crochet anchor.
Do not accidentally add a second fan into the same section.
Fabric Narrows
A sc anchor has probably been skipped at one of the edges.
Check the beginning and end of each row carefully.
Fans Look Too Flat
Try a slightly larger hook or loosen the double crochet stitches.
The shell should spread naturally.
Fans Ruffle
Your hook may be too large or your double crochet tension may be too loose.
Move down slightly.
Surface Lattice Pulls the Fabric
The surface slip stitches are too tight.
Undo them and work again with deliberately loose loops.
The ridge should sit on top of the fabric without shortening it.
Raised Lines Look Uneven
Follow the same anchor sequence for every diagonal.
Use stitch markers to mark the zigzag path before beginning if necessary.
Blocking
Blocking helps the repeating fan sections open evenly.
After finishing:
- Weave in all yarn ends.
- Dampen the fabric according to the yarn care instructions.
- Lay it flat.
- Straighten the edges.
- Shape the fans gently.
- Make sure the raised lattice remains centered.
- Allow the project to dry completely.
Do not heavily press the surface texture.
The dimensional ridges should remain raised.
Raised Fan Lattice Crochet Stitch
This pattern gets its visual impact from combining two simple ideas.
First, large seven-stitch fans are alternated from row to row, creating a staggered shell pattern with small openings at the base.
Then surface crochet follows the natural valleys between those shells, creating raised zigzag lines that visually divide the fabric into repeating fan-shaped tiles.
The result is a textured crochet fabric that looks much more complicated than the underlying construction and can work equally well for a baby blanket, tote bag, cushion, scarf, or decorative home project.