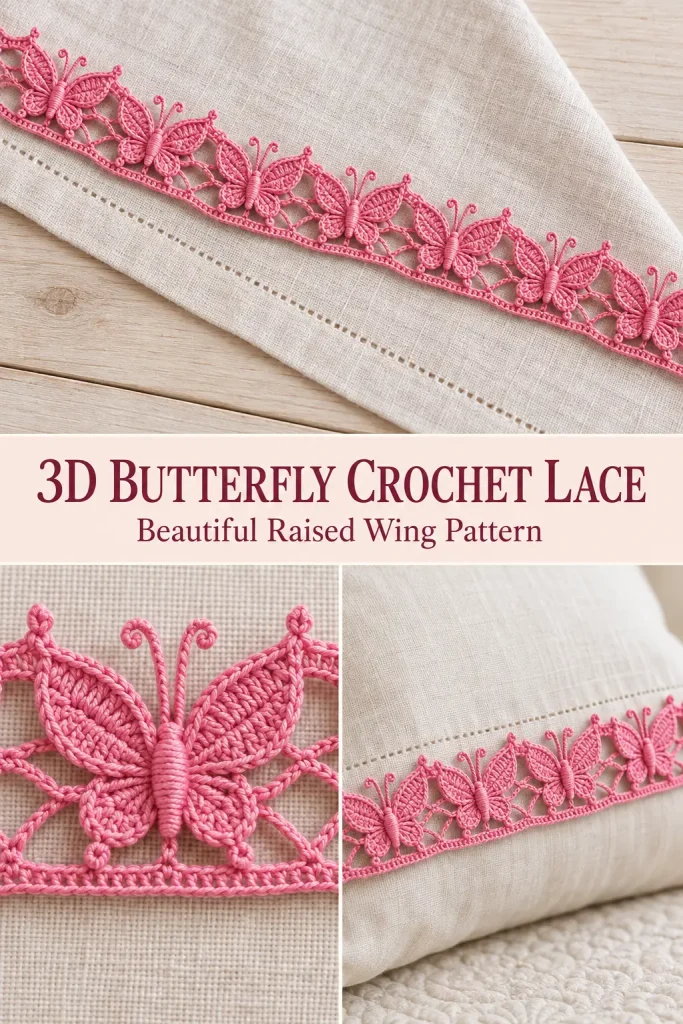
This decorative crochet lace creates a repeating row of three-dimensional butterflies with raised wings, a textured center body, tiny antennae, and open lace arches between each motif.
Unlike a flat butterfly appliqué, the wings are constructed directly into the lace and remain dimensional on the right side. The pattern can be repeated continuously, making it useful as meterage for decorative edging and trim.
The supplied tutorial gives enough construction detail to follow the original working sequence: it uses fine cotton approximately 220 m per 50 g, a 1 mm crochet hook, begins with a 23-chain foundation, and builds one butterfly repeat over a four-row lace structure.
This article reorganizes those spoken instructions into a cleaner row-by-row written pattern using US crochet terminology.
Skill Level
Intermediate to Advanced
The basic lace framework is straightforward, but the butterfly itself involves several techniques:
- treble crochet
- treble clusters
- working around posts and chain arches
- turning the work several times inside one motif
- surface slip stitches
- picots
- raised dimensional wings
- a wrapped/puff-style butterfly body
- crocheted antennae
This is best attempted after you are comfortable identifying stitches and chain spaces without relying entirely on row counts.
Materials
- Fine cotton crochet thread, approximately 220 m / 50 g
- 1 mm crochet hook
- Yarn needle
- Scissors
- Stitch markers, optional
A smooth mercerized cotton works particularly well because it keeps the butterfly wings crisp and shows the detailed stitches clearly.
Abbreviations — US Terms
ch – chain
sl st – slip stitch
sc – single crochet
dc – double crochet
tr – treble crochet, yarn over twice
dtr – double treble crochet, yarn over three times
st(s) – stitch(es)
sp – space
ch-sp – chain space
Special Stitches
Treble Crochet — tr
Yarn over twice.
Insert hook into the indicated stitch or space.
Yarn over and pull up a loop.
Yarn over and pull through 2 loops three times.
2-Treble Cluster — tr2tog in Same Stitch
Yarn over twice.
Insert hook into the indicated stitch.
Work the treble until 2 loops remain on the hook.
Yarn over twice again.
Insert hook into the same stitch.
Work the second treble until 3 loops remain.
Yarn over and pull through all remaining loops.
This creates the central foundation for the butterfly.
Picot
Unless another size is stated:
ch 4, sl st into the base of those chains.
Wrapped Butterfly Body
A tall treble forms the core.
Loops are then drawn around that post several times and closed together to create a raised body.
Detailed instructions appear in the butterfly section.
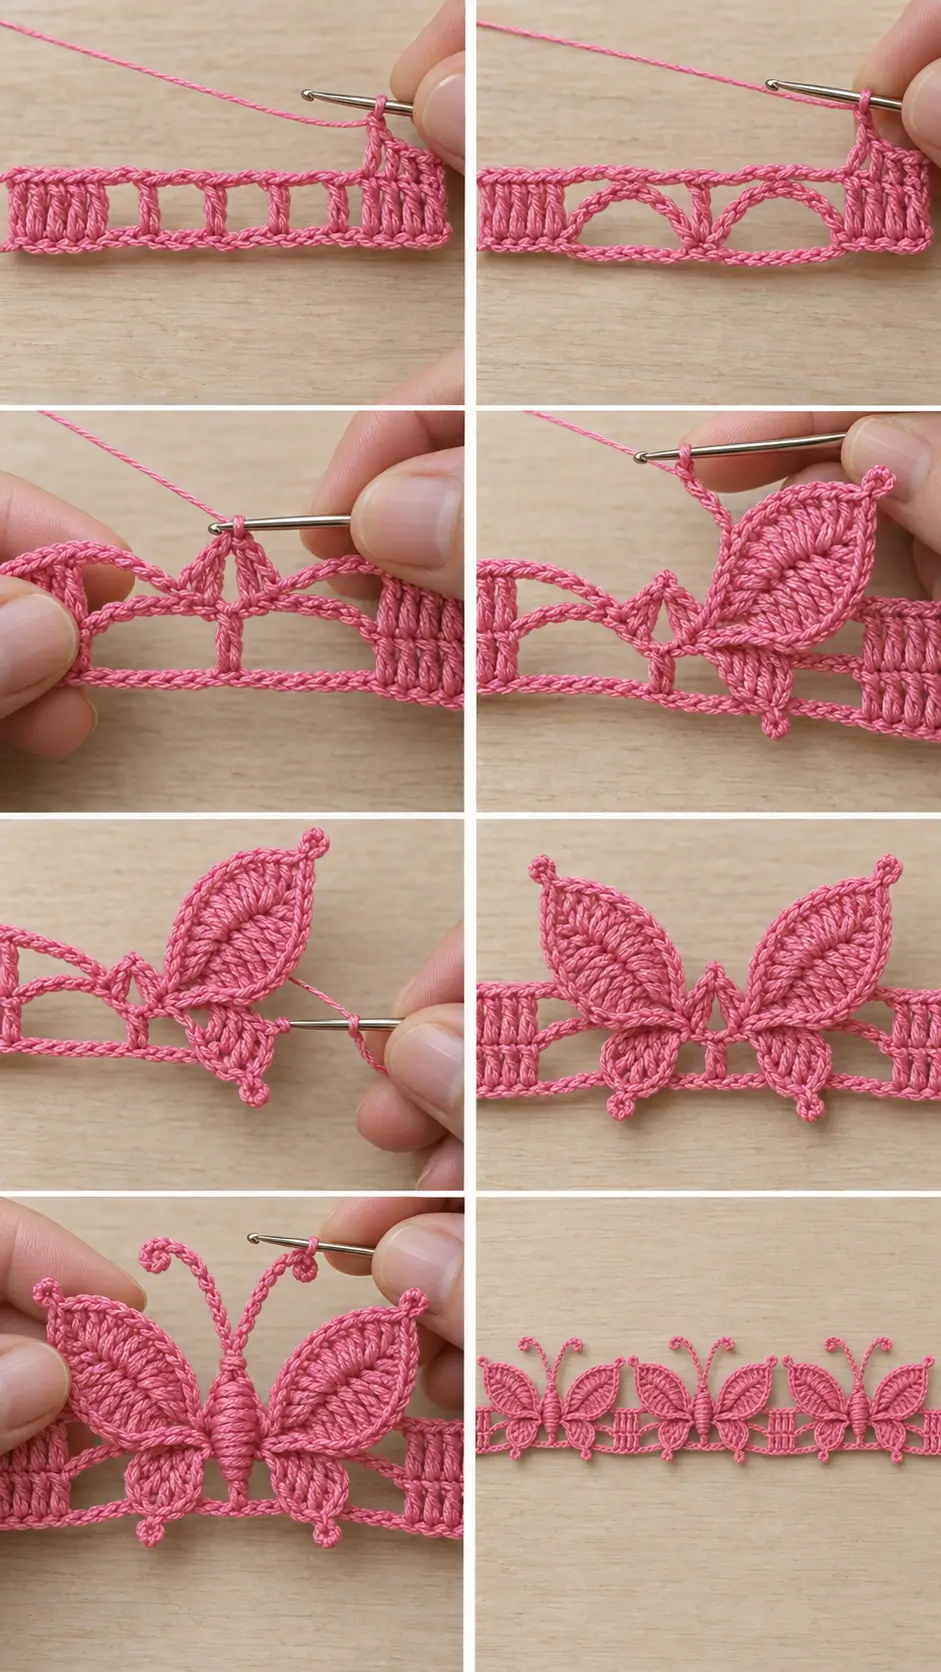
Pattern Structure
One complete repeating lace unit uses four main row types:
- Open lattice row
- Large-arch row
- Butterfly row
- Connecting row
After the connecting row, the pattern returns to the first lattice structure and the next butterfly repeat begins.
The butterfly motifs therefore repeat one above another along the lace strip.
Foundation
Ch 23.
Keep the chain relaxed.
The first five chains provide the height and edge positioning needed for the first row.
Row 1 — Open Lace Foundation
Yarn over twice.
Work 1 tr in the 6th ch from the hook.
Work 1 tr in each of the next 2 chains.
You now have three actual treble stitches beside the beginning chain section.
Next:
ch 2, skip 2 foundation chains, tr in next ch.
Repeat that sequence until you have created 3 individual tr posts separated by ch-2 spaces.
Then:
ch 2, skip 2 chains.
Work 1 tr in each of the final 4 foundation chains.
Turn.
Row 1 Structure
Visually, the row contains:
- one solid edge group
- ch-2 opening
- isolated tr
- ch-2 opening
- isolated tr
- ch-2 opening
- isolated tr
- ch-2 opening
- second solid edge group
These center posts establish the lace framework for the butterfly.
Row 2 — Two Large Arches
Ch 4 and turn.
The turning chain provides the height of a tr.
Work 1 tr over each of the next 3 edge posts as required to complete the solid edge section.
Now:
ch 6.
Across the center posts from Row 1, skip the first available central post and work:
1 tr in the middle central post.
Then:
ch 6.
Work tr across the final edge group, giving a matching solid section at the opposite side.
Turn.
What You Should See
The center now contains:
- one tall center post
- one ch-6 arch on each side
These two large arches create the space needed for the dimensional butterfly in the next row.
Row 3 — Butterfly Row
This is the most detailed row.
Ch 4 and turn.
Work 2 additional tr across the edge section so that the outer edge remains solid.
Now:
ch 7.
The next step forms the butterfly foundation.
Butterfly Foundation
Locate the central tr from Row 2.
Into that same stitch work a:
2-tr cluster
as follows:
- Begin first tr but leave the last 2 loops unworked.
- Begin a second tr in the same stitch.
- Leave the final loops on the hook.
- Yarn over and pull through the remaining loops together.
This joined pair forms the central upright base of the butterfly.
Insert the hook into the small opening between the two cluster posts.
Work:
1 sl st
to secure the working loop close to the foundation.
You will now build the first dimensional side of the butterfly.
First Wing Section
Foundation Arch
Ch 4.
Work around the butterfly foundation post:
2 tr
Then:
ch 2
Work around the same foundation again:
2 tr
This creates the framework for the first raised wing.
Fill the First Wing
Turn the motif so you can work back across the ch-4 arch.
Work into/around the arch:
- 2 dc
- 4 tr
- 2 dc
This gradual increase and decrease in stitch height produces a rounded leaf-shaped wing.
At the far corner, work a:
sl st
into the corner where the starting chain was anchored.
You now have one thick curved arch.
Define the Wing Edge
Turn the work again.
Slip stitch across the first half of the raised wing:
5 sl sts
or enough to reach the top center of the wing.
At the top work:
ch 4
Sl st into the base of the ch-4 to form a picot.
Continue down the opposite side of the wing with approximately:
5 sl sts
Return to the lower corner.
The first raised upper wing should now have a pointed picot at its outer tip.
Add the Lower Lobe of the First Wing
Ch 3.
Sl st back into the butterfly foundation.
Ch 3 again.
Into the same lower foundation area work:
3 tr
Then make:
ch 4, sl st into the base of the ch-4
to create another picot.
Ch 3.
Work 1 sc into the butterfly foundation to close this lower section.
You now have the first side of the butterfly, made from an upper raised wing and a smaller lower lobe.
Second Wing Section — Mirror Image
The second half is worked as a mirror of the first.
Turn the work so the opposite side of the butterfly foundation is accessible.
Work:
1 sc around the foundation
to secure the beginning of the second side.
Lower Portion of Second Wing
Ch 7.
Form a small picot near the end of this chain by slip stitching back into the appropriate chain so that a 4-chain tip loop remains.
Now work into the same butterfly foundation:
3 tr
Ch 3.
Sl st into the foundation.
This forms the small lower lobe on the second side.
Second Large Wing Framework
Ch 3.
Around the same foundation work:
2 tr
Ch 2.
Work:
2 more tr
around the same foundation.
The second large wing framework should mirror the first side.
Fill the Second Large Wing
Turn.
Work into/around its arch:
- 2 dc
- 4 tr
- 2 dc
Sl st into the corner.
Turn again.
Edge the Second Large Wing
Slip stitch across approximately half the wing:
5 sl sts
At the top work:
ch 4, sl st into base
for the pointed picot.
Continue with approximately:
5 sl sts
down the opposite side.
Ch 3.
Work 1 sc into the center butterfly foundation.
Both sides of the butterfly are now complete.
Check the Wings
Before continuing, the butterfly should have:
- two large upper dimensional wings
- two smaller lower lobes
- one pointed picot at the tip of each large wing
- decorative picot detail on the smaller lower sections
- a clear gap through the center where the butterfly body will be added
The wings should project toward the right side of the lace.
Butterfly Body
Bring the working loop to the upper center between the two wings.
If necessary, fold the wings slightly apart so you can reach the center.
Yarn over twice.
Insert the hook between the two wings.
Work:
1 tr
This tall stitch becomes the central spine of the butterfly.
Raised Wrapped Body
Now work around that treble post.
Repeat approximately 6 times:
- Yarn over.
- Insert hook around the treble post.
- Pull up a long loop to the height of the body.
After six wraps/loops have been created, yarn over and pull through the gathered loops together.
Tighten gently.
Ch 1 to secure.
The result should be a raised padded body running through the middle of the butterfly.
Do not pull the loops excessively tight or the wings will bunch together.
Return to Butterfly Base
Insert the hook back into the lower butterfly foundation.
Work:
1 sl st
Pull the stitch firmly enough to secure the body without flattening the wings.
First Antenna
Ch 10.
Working back along the chain, form the curled tip with a small chain loop/picot.
Then work several slip stitches down the antenna chain toward the butterfly body.
The tutorial uses approximately 4 slip stitches to define this section while leaving the remaining chain length as the flexible antenna stem.
Secure near the top of the butterfly body with a sl st.
Second Antenna
Ch 10 again.
Repeat the same construction:
- create the small curled/picot tip
- work slip stitches back down part of the chain
- secure beside the first antenna
The two antennae should extend upward from opposite sides of the butterfly body.
Finish the Butterfly Row
After completing both antennae, return the working loop to the main lace.
Ch 7.
Fold the wing slightly out of the way so the underlying stitches are visible.
Across the far edge work:
3 tr
in the available edge posts, maintaining the solid outside border.
Turn.
Row 3 Check
The right side should now display one complete dimensional butterfly suspended between the two lace edges.
Row 4 — Connecting Row Above the Butterfly
Ch 4 and turn.
Work tr across the first solid edge group.
Then:
ch 6.
Work 1 tr into the center of the butterfly, inserting the hook beneath the base of the antennae / central body attachment point.
This stitch anchors the next lace row to the butterfly without flattening it.
Ch 6.
Work across the opposite edge group with tr stitches.
Turn.
What You Should See
The butterfly is now enclosed between:
- a ch-6 arch on the left
- a ch-6 arch on the right
with the next row anchored through its center.
Row 5 — Restart the Lace Framework
This row begins the next butterfly repeat.
Ch 4 and turn.
Work tr across the first edge group.
Then:
ch 2
Work 1 tr into the center of the first ch-6 arch.
Ch 2.
Work 1 tr over the central tr from Row 4.
Ch 2.
Work 1 tr into the center of the second ch-6 arch.
Ch 2.
Work tr across the final edge group.
Turn.
This recreates the same structural layout used in Row 1.
Row 6 — Large Arches
Ch 4 and turn.
Work the edge tr group.
Ch 6.
Skip the first of the three central posts and work:
1 tr in the center post.
Ch 6.
Work the final edge tr group.
Turn.
This matches Row 2.
Row 7 — Next Butterfly
Ch 4 and turn.
Work the edge stitches.
Ch 7.
In the central tr, make another:
2-tr cluster in the same stitch
Then work the complete butterfly exactly as described in Row 3:
- first raised wing
- first lower lobe
- mirrored second wing
- second lower lobe
- wrapped center body
- first antenna
- second antenna
Ch 7 and finish the far edge.
Row 8 — Connect Above Butterfly
Repeat Row 4:
- solid edge group
- ch 6
- tr through the center of the butterfly beneath the antennae
- ch 6
- opposite edge group
Pattern Repeat
After the first butterfly unit is complete, repeat:
Rows 5–8
for the desired length.
In simplified form:
Repeat Row A
Open lattice with ch-2 spaces and 3 center tr posts.
Repeat Row B
Two ch-6 arches with one center tr.
Repeat Row C
Dimensional butterfly row.
Repeat Row D
Two ch-6 arches anchored into the butterfly center.
Then begin again.
Finished Lace Appearance
On the right side, you should see:
- repeating dimensional butterflies
- four raised wing sections per butterfly
- padded central bodies
- two antennae
- picot tips
- open lace arches
- firm straight outer edges
On the wrong side, the lace framework remains visible, but the butterfly volume is less pronounced because the wings project toward the right side.
How to Make a Longer Trim
This design is intended to be repeated continuously.
Simply keep repeating the four-row sequence until the strip reaches the length required for your project.
Because the butterfly itself is part of the repeat, every additional repeat adds:
1 complete 3D butterfly
to the lace.
Measuring Before Cutting Yarn
If the lace will be sewn to fabric, work several complete repeats first.
Block them lightly.
Measure the length of one blocked butterfly repeat.
Then calculate:
required trim length ÷ repeat length = approximate number of butterflies
Always make one extra repeat if possible before cutting the yarn.
Using the Lace as a Fabric Edge
This trim can decorate:
- pillowcases
- tablecloths
- curtains
- towels
- bed linens
- clothing hems
- sleeves
- bags
- scarves
Pin the straight outer edge of the crochet lace against the fabric.
Hand sew through the firm treble-crochet edge rather than through the butterfly wings.
This keeps the three-dimensional motifs free.
Crochet Bag Decoration
The butterfly lace can also be used as a decorative strip across a bag.
Crochet a firm bag body separately.
Then sew one or more butterfly lace strips horizontally across the front.
Attach only through the structural edge stitches.
Do not sew through the wing tips.
Pillow or Cushion Border
For a decorative cushion:
- Measure each side of the cushion.
- Crochet enough butterfly repeats for that length.
- Lightly block the trim.
- Sew along the cushion seam.
- Position the butterflies facing outward.
For corners, leave a small amount of ease rather than pulling the lace tightly.
Joining Two Lace Strips
If you need a wider decorative panel, make two identical strips.
Place them parallel.
Join the straight edge sections with:
- whip stitch
- slip stitch
- small chain bridges
Avoid connecting through the dimensional butterfly wings.
Yarn Choice
This design works best in smooth crochet cotton.
Fine cotton gives:
- sharper picots
- better wing definition
- cleaner antennae
- more elegant lace openings
The original tutorial uses approximately:
220 m per 50 g
with a:
1 mm hook.
For a larger, more dramatic decorative trim, you can use thicker yarn and a larger hook while keeping the same construction.
Tips for Symmetrical Wings
Count Every Tall Stitch
The two large wings must use matching stitch groups.
If one wing contains an extra tr, it will become noticeably larger.
Keep Picots the Same Size
Use the same number of chains at every major wing tip.
Do Not Tighten the Surface Slip Stitches
The slip stitches defining the wing should follow the curve naturally.
Compare Both Halves Before Making the Body
Once both sides are finished, place them side by side.
Correct uneven tension before adding the center body.
Tips for a Strong Butterfly Body
The body needs enough tension to hold the two wing halves together, but it should not collapse them.
When drawing up the six body loops:
- pull every loop to approximately the same height
- keep them centered around the treble post
- close them together gently
- secure with one chain
Tips for the Antennae
If the antennae look too stiff:
- loosen your chains slightly
- use softer tension on the slip stitches
If they flop downward:
- use slightly tighter chains
- lightly block them upward
Both antennae should be approximately the same length.
Common Problems
Butterfly Has Only Two Visible Wings
The smaller lower lobes are probably being worked too tightly.
Loosen the ch-3 sections and shape them outward before completing the body.
Wings Curl Too Much
The tall stitches are too tight.
Use looser tr stitches or a slightly larger hook.
Wings Lie Completely Flat
The surface slip-stitch edging may be too loose.
Lightly tighten the outline and shape the petals upward with your fingers.
Butterfly Pulls the Lace Inward
The central wrapped body or the wing anchors are too tight.
The lace strip should remain straight after each butterfly is completed.
Ch-6 Arches Are Uneven
Count every chain.
Both sides of the butterfly should use exactly the same arch length.
Center Post Is Off-Center
On the open lattice row, make sure you work the tr into the correct middle post.
Otherwise the following butterfly will lean to one side.
Picot Tips Disappear
Keep the ch-4 picot slightly loose and shape it outward before moving to the next section.
Blocking the Lace
Blocking is important, but do not flatten the butterflies.
Lightly dampen the finished strip according to your yarn care instructions.
Pin:
- the straight outer edges
- the ch-6 arches
- the butterfly spacing
Then gently lift and shape:
- upper wings
- lower lobes
- picots
- antennae
Allow the lace to dry completely.
Do not place heavy objects over the motifs.
Color Ideas
The dimensional details are easiest to see in a single solid color.
Romantic
Rose pink
Bridal
White or ivory
Botanical
Sage or emerald green
Vintage
Dusty rose or antique cream
Dramatic
Black
Soft Nursery
Powder blue or lavender
Bright
Coral, turquoise, or yellow
A very lightly variegated thread can also work, but highly contrasting variegated yarn may hide the butterfly structure.
3D Butterfly Crochet Lace
This lace is much more than a flat stitch repeat.
Each motif is constructed directly into the strip with its own raised upper wings, smaller lower lobes, pointed picots, padded body, and two curled antennae. The open ch-6 framework then connects one butterfly repeat to the next without crushing the dimensional elements.
Once the butterfly construction becomes familiar, the same four-row structure can be repeated continuously to create decorative trim by the yard for clothing, linens, bags, cushions, curtains, and other crochet or sewing projects.