
This relaxed crochet sweater combines a rich chocolate-brown color with alternating solid ridges and airy horizontal texture for an everyday pullover that looks polished without requiring complicated shaping.
The sweater is made from four straightforward pieces:
- front
- back
- two sleeves
The body uses an original 6-row Open Ridge stitch repeat, the shoulders are dropped for comfortable shaping, and the sleeves gradually widen from the cuff before being seamed into the body.
The rich brown boxy silhouette was inspired by the visual mood of Linda Skuja’s Čiekurs, published in Nordic Textures in Crochet Garments. The sweater below uses a different stitch repeat, grading, neckline, sleeve shaping, panel construction, and finishing. (Ravelry)
Pattern at a Glance
Skill level: Intermediate
Terminology: US crochet terms
Construction: Bottom-up, separate panels, seamed
Fit: Relaxed with approximately 6–8 inches positive ease
Sizes: S (M, L, XL, 2X, 3X, 4X)
Yarn weight: Sport / Category 2
Main hook: 5 mm
Neck finishing hook: 4 mm
Main texture: Open Ridge Stitch
Sleeves: Drop shoulder with gradual increases
Neck: Rounded crew neck
Color: Deep chestnut / chocolate brown
Finished Sizes
| Size | To Fit Bust | Finished Bust | Length |
|---|---|---|---|
| S | 32–34″ | 40″ | 24″ |
| M | 36–38″ | 44″ | 24½” |
| L | 40–42″ | 48″ | 25″ |
| XL | 44–46″ | 52″ | 25½” |
| 2X | 48–50″ | 56″ | 26″ |
| 3X | 52–54″ | 60″ | 26½” |
| 4X | 56–58″ | 64″ | 27″ |
Choose a size approximately 6–8 inches larger than your actual bust for the relaxed fit shown here.
For a closer fit, choose approximately 3–5 inches of positive ease.
Materials
You will need approximately:
S
1,400 yards
M
1,550 yards
L
1,750 yards
XL
1,950 yards
2X
2,200 yards
3X
2,450 yards
4X
2,700 yards
of sport-weight yarn.
Also:
- 5 mm crochet hook
- 4 mm crochet hook
- yarn needle
- scissors
- stitch markers
- measuring tape
- blocking mats, optional
Suggested Yarn
Choose a smooth sport-weight yarn with enough drape for a garment.
Good fibers include:
- cotton/acrylic
- cotton/bamboo
- wool/cotton
- soft wool blend
- acrylic with good drape
Avoid extremely stiff cotton if you want the sweater to move softly.
Suggested Color
For the photographed look:
Dark Chestnut / Cocoa Brown
Other colors that would show the texture beautifully:
- rust
- deep olive
- oatmeal
- charcoal
- mustard
- burgundy
- dusty blue
- forest green
- warm cream
A solid color works especially well because the shadows make the stitch pattern visible.
Gauge
In the Open Ridge Stitch pattern:
16 stitches × 13 rows = 4 inches
after light blocking.
Make your gauge swatch at least:
6 × 6 inches
for a more reliable measurement.
Garment gauge matters.
If you have too many stitches per 4 inches, use a larger hook.
If you have too few, use a smaller hook.
Abbreviations
- ch = chain
- sc = single crochet
- hdc = half double crochet
- dc = double crochet
- sl st = slip stitch
- BLO = back loop only
- st = stitch
- sts = stitches
- RS = right side
- WS = wrong side
- rep = repeat
Turning Chains
The beginning chains in this pattern:
Do not count as stitches.
Work the first real stitch into the first stitch of every row.
This helps keep the edges straight.
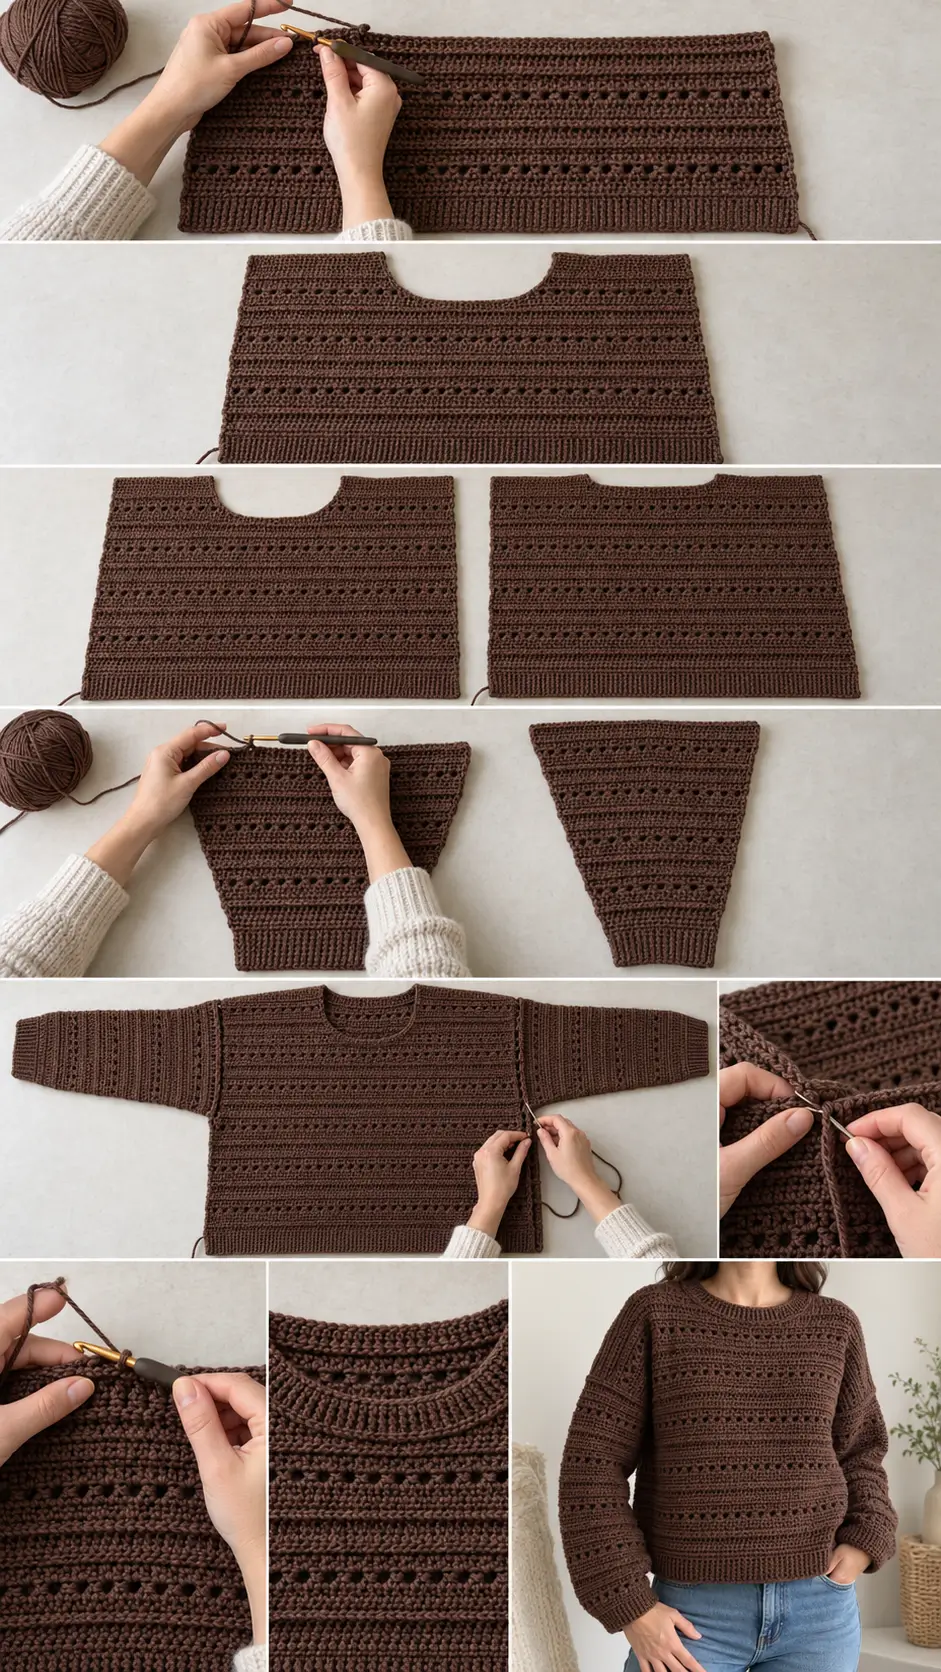
Open Ridge Stitch
The main sweater texture uses a:
6-row repeat.
The combination of solid hdc rows, BLO ridges, and a controlled eyelet row creates the horizontal texture.
Pattern Row 1 — RS
Ch 1.
Hdc in every stitch across.
Turn.
Pattern Row 2 — WS
Ch 1.
Working in the BLO:
Hdc in every stitch across.
Turn.
This creates the first raised horizontal ridge.
Pattern Row 3 — RS — Open Bar Row
Ch 2.
Dc in first 2 sts.
Repeat across as many full repeats as possible:
Ch 1, skip next st, dc in next 3 sts.
Work dc in any remaining 0–3 stitches at the end.
Turn.
Pattern Row 4 — WS
Ch 1.
Hdc in every dc and:
1 hdc in every ch-1 space.
You must finish with the same stitch count you started with.
Turn.
Pattern Row 5 — RS
Ch 1.
Working in BLO:
Hdc across.
Turn.
Pattern Row 6 — WS
Ch 1.
Hdc across.
Turn.
Main Repeat
Repeat:
Rows 1–6.
The fabric should develop:
- one subtle raised ridge
- one controlled openwork stripe
- another raised ridge
- several solid structural rows
Important Stitch Count Rule
The eyelet row does not change the stitch count.
Every ch-1 space replaces one skipped stitch.
On the next row:
Work one hdc into the chain space.
Your stitch count should therefore remain unchanged throughout each panel.
FRONT PANEL
Use the 5 mm hook.
Foundation stitch counts:
S
80 sts
M
88 sts
L
96 sts
XL
104 sts
2X
112 sts
3X
120 sts
4X
128 sts
Foundation
Ch:
S
81
M
89
L
97
XL
105
2X
113
3X
121
4X
129
Hem Row 1
Sc in second ch from hook and every chain across.
You should have:
80 (88, 96, 104, 112, 120, 128) sc.
Turn.
Hem Rows 2–6
Ch 1.
Hdc in BLO of every stitch across.
Turn.
These rows create a subtle firm lower band.
Do not work them tightly.
Begin Main Body Pattern
Begin with:
Open Ridge Pattern Row 1.
Continue repeating Rows 1–6 until the front measures approximately:
S
21″
M
21½”
L
22″
XL
22½”
2X
23″
3X
23½”
4X
24″
from the foundation edge.
You are now approximately:
3 inches below the finished shoulder.
FRONT NECKLINE
The center stitches will remain unworked.
Use this table:
| Size | Left Shoulder | Neck | Right Shoulder |
|---|---|---|---|
| S | 26 sts | 28 sts | 26 sts |
| M | 30 sts | 28 sts | 30 sts |
| L | 32 sts | 32 sts | 32 sts |
| XL | 36 sts | 32 sts | 36 sts |
| 2X | 38 sts | 36 sts | 38 sts |
| 3X | 42 sts | 36 sts | 42 sts |
| 4X | 44 sts | 40 sts | 44 sts |
Place markers around the center neckline stitches before continuing.
First Front Shoulder
Continue the established stitch pattern across only the first:
26 (30, 32, 36, 38, 42, 44) sts.
Turn.
Leave the remaining stitches unworked.
Continue back and forth over the shoulder stitches until the entire front measures:
24 (24½, 25, 25½, 26, 26½, 27) inches
from the lower edge.
Fasten off.
Second Front Shoulder
With RS facing, skip the center:
28 (28, 32, 32, 36, 36, 40) neckline sts.
Rejoin yarn in the next stitch.
Work the remaining:
26 (30, 32, 36, 38, 42, 44) shoulder sts
in the established pattern.
Continue until the second shoulder matches the first.
Fasten off.
FRONT NECK SHAPE
You now have a wide rectangular neckline approximately:
3 inches deep.
The final crochet neckband will soften the upper corners and create a rounded crew-neck appearance.
BACK PANEL
Make the back exactly as the front through:
- foundation
- hem
- Open Ridge body
but work longer before dividing for the neckline.
Continue until the back measures approximately:
S
23″
M
23½”
L
24″
XL
24½”
2X
25″
3X
25½”
4X
26″
This leaves approximately:
1 inch
for the shallow back neckline.
Divide Back Neck
Use the same shoulder and neck counts as the front.
Work across the first shoulder.
Leave the center neckline stitches unworked.
Finish the first shoulder to the full finished length.
Fasten off.
Rejoin for the second shoulder.
Work until both shoulders match.
The back neckline is therefore much shallower than the front neckline.
Check the Body Panels
Before assembly, front and back should have exactly the same:
- width
- shoulder width
- total length
The front neck should be deeper than the back.
Lightly block both panels before seaming if the edges curl or the eyelet bands look uneven.
SLEEVES
Make 2 identical sleeves.
The sleeves begin at the cuff and gradually widen toward the upper arm.
Sleeve Stitch Counts
| Size | Cuff | Upper Sleeve |
|---|---|---|
| S | 36 sts | 56 sts |
| M | 36 sts | 60 sts |
| L | 40 sts | 64 sts |
| XL | 40 sts | 68 sts |
| 2X | 44 sts | 72 sts |
| 3X | 44 sts | 76 sts |
| 4X | 48 sts | 80 sts |
Approximate finished upper sleeve widths:
- S: 14″
- M: 15″
- L: 16″
- XL: 17″
- 2X: 18″
- 3X: 19″
- 4X: 20″
Sleeve Foundation
Ch:
37 (37, 41, 41, 45, 45, 49).
Sleeve Row 1
Sc in second chain from hook and across.
You should have:
36 (36, 40, 40, 44, 44, 48) sts.
Cuff Rows 2–6
Ch 1.
Hdc in BLO across.
Turn.
The cuff should measure approximately:
1½–1¾ inches deep.
Sleeve Main Pattern
Begin the Open Ridge Stitch pattern.
Work a total of approximately:
8 full 6-row repeats
or until sleeve measures approximately:
16–17 inches
from cuff edge.
Because this is a drop-shoulder sweater, the sleeve is intentionally shorter than a traditional set-in sleeve.
Sleeve Increase Row
Sleeve increases are worked on:
Pattern Row 1.
Instead of normal hdc across:
Ch 1.
Work:
2 hdc in each of first 2 sts.
Hdc across until 2 sts remain.
Work:
2 hdc in each of final 2 sts.
Turn.
This adds:
4 stitches.
Your stitch count remains divisible by 4.
Number of Increase Rows
Work an increase Row 1 during the first:
S
5 pattern repeats
M
6 pattern repeats
L
6 pattern repeats
XL
7 pattern repeats
2X
7 pattern repeats
3X
8 pattern repeats
4X
8 pattern repeats
After reaching the upper-sleeve stitch count, continue remaining repeats without increases.
Example — Size S
Begin:
36 sts
After Increase 1:
40
Increase 2:
44
Increase 3:
48
Increase 4:
52
Increase 5:
56
Then continue straight.
Example — Size XL
Begin:
40 sts
Increase sequence:
44
48
52
56
60
64
68
Then work remaining rows straight.
Sleeve Length Adjustment
Before fastening off, measure from the expected dropped shoulder point to your wrist.
For longer arms:
Add one full:
6-row repeat.
For shorter arms:
Remove one full repeat.
If removing a repeat containing an increase, make sure you still reach the required upper-sleeve width before finishing.
Fasten Off
When the sleeve reaches the required:
- upper-arm stitch count
- desired length
fasten off.
Make the second sleeve exactly the same.
BLOCK BEFORE ASSEMBLY
Lightly block:
- front
- back
- both sleeves
to schematic measurements.
Do not stretch the eyelet rows aggressively.
Allow the pieces to dry completely before seaming.
ASSEMBLY
Use yarn and a yarn needle.
A mattress stitch creates a neat seam.
STEP 1 — JOIN SHOULDERS
Place front and back with:
right sides together.
Align the shoulder stitches.
Sew:
- left shoulder
- right shoulder
Do not sew across the neckline.
Turn the sweater right side out.
STEP 2 — MARK THE ARMHOLES
Lay the joined body flat.
Measure downward from each shoulder seam:
S
7″
M
7½”
L
8″
XL
8½”
2X
9″
3X
9½”
4X
10″
Place a marker on both the front and back at this measurement.
These marks indicate the lower edges of the sleeve opening.
STEP 3 — ATTACH THE SLEEVES
Find the center of the upper edge of one sleeve.
Mark it.
Align that marker with the shoulder seam.
Pin the sleeve edge down toward the armhole marker on:
- front
- back
The sleeve should fit evenly between the two armhole markers.
Sew the upper sleeve edge to the body.
Repeat with second sleeve.
STEP 4 — SIDE + SLEEVE SEAMS
Fold the sweater with right sides together.
Beginning at the cuff:
Sew along the sleeve seam.
Continue through the underarm.
Then continue straight down the side of the sweater to the hem.
Repeat on the opposite side.
Turn the sweater right side out.
Check the Fit
Try the sweater on before adding the neckline.
Check:
- body width
- sleeve length
- shoulder drop
- neckline opening
- sweater length
Minor neckline adjustments can still be made during the edging.
NECKLINE
Switch to the:
4 mm hook.
Join yarn at the back neckline near one shoulder seam.
Neck Round 1
Ch 1.
Sc evenly around the entire neck opening.
Work approximately:
- 1 sc per stitch across horizontal edges
- 2 sc for every 3 row ends along vertical neckline edges
At the two front neckline corners:
Work:
sc2tog
to soften the square corners.
Join with sl st.
Neck Round 2
Ch 1.
Working in BLO:
Sc in every stitch around.
At each front corner:
Work another sc2tog only if the neckline still looks angular.
Join.
Neck Round 3
Ch 1.
BLO sc loosely around.
Join.
Fasten off.
The finished neckband should measure approximately:
¾–1 inch deep.
If the Neckline Feels Too Wide
Work one additional round.
Decrease approximately:
4–6 stitches evenly
around.
Do not place all decreases at the front.
If the Neckline Feels Too Tight
Undo the final round and:
- use the 5 mm hook
- or add a few evenly spaced stitches
The opening should comfortably pass over the head without stretching aggressively.
OPTIONAL STRONGER HEM
If you want the bottom hem to feel more structured, join yarn after assembly and work one round of:
reverse single crochet
around the lower edge.
This creates a subtle corded finish.
OPTIONAL SIDE SLITS
For a more relaxed sweater:
Leave the lower:
2½–3 inches
of each side seam open.
Finish each slit edge with one row of sc.
This works especially well if you make the back panel approximately:
1 inch longer
than the front.
Finishing the Ends
Thread every yarn tail onto a yarn needle.
Weave:
- through several stitches
- reverse direction
- weave through several more stitches
Pay special attention to:
- shoulder seams
- underarms
- neckline
- cuffs
Trim only after the ends are secure.
Final Blocking
Lightly wet-block or steam-block according to the yarn manufacturer’s instructions.
Shape the sweater to the finished dimensions.
Straighten:
- hem
- neckline
- sleeve cuffs
- side seams
Gently open the eyelet rows with your fingers.
Do not stretch them dramatically.
How the Finished Sweater Should Fit
The sweater should have:
- relaxed boxy body
- dropped shoulders
- straight side seams
- moderately loose sleeves
- crew neckline
- full-length sleeves
- subtle horizontal texture
- airy bands between solid ridges
- firm lower hem
The hem should fall around the upper hip.
Making the Sweater Longer
Simply continue the body pattern before beginning neckline shaping.
For approximately:
1 extra inch
add about:
3 rows
2 extra inches
add approximately:
6 rows
For the neatest result, adding a complete 6-row stitch repeat is ideal.
Remember to add the same amount to both:
front and back.
Making a Cropped Version
Remove one or two complete 6-row pattern repeats before the neckline section.
For a cropped sweater finishing around the waist:
Remove approximately:
4–6 inches
from the body.
Do not change the neckline or sleeve instructions.
Making a More Oversized Sweater
Choose a finished bust measurement:
10–12 inches larger
than your actual bust.
The shoulders will drop farther down the arms and the overall silhouette will become more dramatic.
Consider shortening the sleeves by approximately:
1 inch
because the increased shoulder drop effectively adds sleeve length.
Making a Closer-Fitting Sweater
Choose approximately:
3–4 inches positive ease.
Because the sweater has straight sides, measure your hip circumference as well.
Choose a size that comfortably accommodates whichever measurement is larger:
- bust
- upper hip
Adjusting Sleeve Width
If you need more upper-arm room, continue working additional increase repeats.
Each increase row adds:
4 stitches
or approximately:
1 inch
of sleeve circumference at gauge.
For example:
72 sts = approximately 18″
76 sts = approximately 19″
80 sts = approximately 20″
Adjusting the Cuff
For a narrower cuff:
Begin with:
4 fewer stitches.
Increase back to the written sleeve count during the first pattern repeat.
For a looser cuff:
Add:
4 stitches
to the starting count.
Why Is My Sweater Growing Wider?
Count the body stitches after every openwork section.
On Pattern Row 3:
Every:
ch 1 + skipped stitch
replaces one stitch.
On Row 4:
Work exactly:
1 hdc into that ch-1 space.
Do not work an additional hdc into the skipped stitch beneath it.
Why Is My Eyelet Row Puckering?
Your chain stitches or double crochets may be too tight.
Try:
- slightly looser ch-1 stitches
- pulling the dc loops a little taller
- using a 5.5 mm hook only for Pattern Row 3
Return to the 5 mm hook afterward.
Why Are My Side Edges Uneven?
The turning chains do not count as stitches.
Always place:
- first stitch into first real stitch
- last stitch into final real stitch
Using stitch markers in the first and last stitches can help.
Why Is One Panel Longer?
Count complete pattern repeats rather than relying only on visual comparison.
Front and back must measure the same from:
hem to shoulder.
The front neckline begins earlier, but the finished shoulder height remains identical.
Why Does the Sleeve Look Too Wide at the Top?
Remember that this is a:
drop-shoulder sweater.
The upper sleeve needs enough width to fill the relatively deep rectangular armhole.
A narrower sleeve would restrict movement around the upper arm.
Why Does the Underarm Feel Bulky?
When joining the sleeve:
Do not place several stitches into the exact shoulder seam.
Distribute the sleeve edge evenly.
At the underarm intersection, securely join the four seam directions without repeatedly wrapping yarn around the same spot.
Can I Work the Body in the Round?
The sweater is intentionally written as seamed panels.
The seams help stabilize the open textured fabric and make the drop-shoulder shape easier to control.
Working in the round would require changing the neckline and shoulder construction.
Can I Use DK Yarn?
Yes, but you must make a gauge swatch.
If your DK yarn achieves:
16 sts × 13 rows = 4 inches
you can follow the pattern unchanged.
If not, choose a hook size that produces the correct gauge.
Can I Use Worsted Yarn?
You can, but the fabric will be considerably heavier.
A smaller finished size may still produce a physically larger sweater if you ignore gauge.
Always match the written gauge rather than relying only on the yarn label.
Can I Make It in Cotton?
Yes.
Cotton creates beautiful stitch definition.
For a full sweater, choose a cotton blend rather than very heavy kitchen-style cotton.
Look for a yarn with:
- drape
- softness
- some recovery
to prevent the sweater from stretching excessively under its own weight.
Can I Make Short Sleeves?
Yes.
Work only:
2–3 Open Ridge repeats
after the cuff.
Continue increasing until the sleeve comfortably fits your upper arm.
Finish with the same seaming instructions.
Sleeveless Version
Skip the sleeves entirely.
Sew the side seams while leaving approximately:
7–9 inches
open for the armholes.
Finish each armhole with:
- one round sc
- one round BLO sc
This creates a textured sweater vest using the same body panels.
Color-Block Version
The horizontal repeat is ideal for color blocking.
Try:
Rows 1–6
Chestnut
Rows 7–12
Caramel
Rows 13–18
Cream
Then repeat.
Or keep the body one color and make the:
- cuffs
- neckline
- hem
in a contrasting shade.
Stripe Version
For subtler stripes, change color only on Pattern Row 3.
The openwork band will become the accent while most of the sweater remains one color.
For example:
Chocolate body + rust openwork stripes
creates a strong autumn look.
Matching Projects
The Open Ridge stitch can also be used for:
- scarves
- wraps
- cardigans
- sweater vests
- cushion covers
- lightweight blankets
- tote panels
For a scarf, simply begin with a multiple of 4 stitches and repeat the same six rows to your preferred length.
Final Thoughts
This sweater gets its visual impact from a very manageable combination:
solid hdc
→ BLO ridge
→ open dc-and-chain stripe
→ solid hdc
→ another ridge
The dropped shoulders remove the need for complicated armhole shaping, while gradual sleeve increases create enough room for comfortable movement.
Once the front, back, and two sleeves are finished, the sweater comes together with simple seams and a clean crocheted crew neck.
The result is a relaxed, textured pullover with the rich dimensional appearance of a much more complicated garment while still being built from straightforward pieces and a repeating six-row stitch pattern.

