
This richly textured crochet blanket uses a simple half double crochet worked into the third loop to create deep horizontal ridges that look almost braided across the fabric.
The stitch is especially striking with self-striping or variegated yarn because every ridge picks up different flashes of color. The finished fabric is dense, warm, reversible, and beautifully textured without requiring complicated stitch counting.
The entire blanket is built from one repeating row, making it a good project for relaxing crochet once you understand where to insert the hook.
Skill Level
Confident Beginner
You should know how to:
- chain
- half double crochet
- turn rows
- identify the front loop, back loop, and third loop
- weave in yarn ends
- work a simple border
Finished Size
Baby blanket:
Approximately 35 × 41 inches
The pattern is easy to resize for:
- stroller blankets
- lap blankets
- throws
- scarves
- cushion covers
Materials
- Medium weight #4 self-striping or variegated yarn
- Approximately 1,100–1,300 yards for the baby blanket
- 5 mm crochet hook
- Yarn needle
- Scissors
- Stitch markers
- Measuring tape
For the colorful look, choose yarn containing several contrasting shades such as:
- coral
- turquoise
- lavender
- mustard
- pink
- gray
- cream
- orange
A long-color-repeat yarn creates softer bands, while a highly variegated yarn creates the speckled woven appearance.
Abbreviations — US Terms
ch – chain
hdc – half double crochet
sl st – slip stitch
st(s) – stitch(es)
3rd loop – horizontal loop directly below the top two loops of a half double crochet
Special Stitch — Half Double Crochet
Yarn over.
Insert the hook into the indicated stitch.
Yarn over and pull up a loop.
You now have 3 loops on the hook.
Yarn over.
Pull through all 3 loops.
Finding the Third Loop
A normal half double crochet has the familiar two top loops:
- front loop
- back loop
But it also has another horizontal strand just below those top loops.
That strand is the:
third loop
When you work into the third loop instead of through the normal top loops, the unused top V is pushed outward and becomes the raised horizontal ridge. (Kirsten Holloway Designs)
That raised V-shaped line is what creates the strong ribbed appearance of this blanket.
Important: Third Loop in Rows
Because the work is turned after every row, the third loop can appear in a slightly different position depending on which side is facing you.
After turning, look directly below the normal top V of the next hdc.
You are looking for the horizontal strand that belongs to that stitch.
Do not confuse it with:
- the back loop
- the horizontal bar from the row below
- the space between stitches
Insert the hook under only that third loop.
Practice Before Starting the Blanket
Before beginning a large project, make a small swatch.
Ch 18.
Work Row 1 normally.
Then work several rows entirely in the third loop.
After 4–5 rows, you should clearly see raised horizontal ridges running across the fabric.
If the fabric looks like ordinary half double crochet, you are probably working through the normal top loops instead.
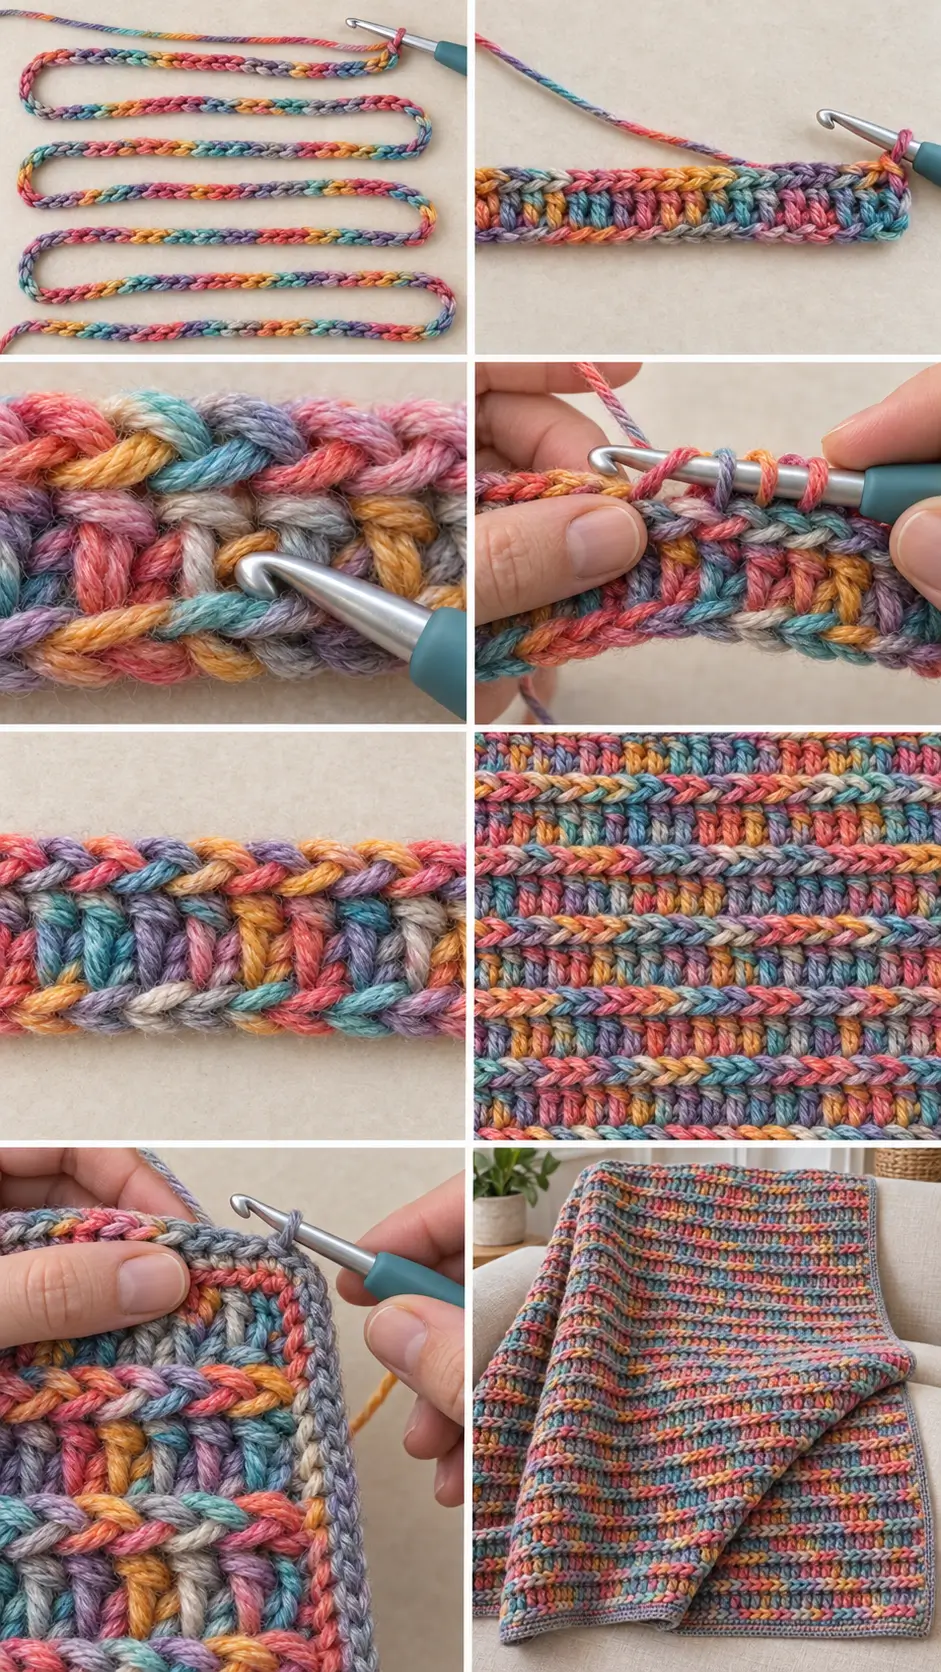
PART 1 — Foundation Chain
For the baby blanket:
Ch 119 loosely.
The starting chain should not be tight.
If necessary, make the foundation chain with a 5.5 mm hook, then switch back to the 5 mm hook for the blanket.
Row 1 — Foundation Half Double Crochet Row
Hdc in the 2nd chain from the hook.
Hdc in every remaining chain across.
You should have:
118 hdc
Ch 1.
Turn.
The ch-1 does not count as a stitch.
Row 2 — First Raised Ridge Row
Locate the third loop of the first hdc.
Work:
1 hdc in the third loop only
of that stitch.
Continue across:
hdc in the third loop of every stitch
You should still have:
118 hdc
Ch 1.
Turn.
What You Should See
The normal top loops of Row 1 have been pushed toward the surface.
They form a clearly visible horizontal chain-like ridge running across the blanket.
Row 3
Hdc in the third loop of every stitch across.
118 hdc
Ch 1.
Turn.
Row 4 and Every Following Body Row
Repeat Row 3:
hdc in third loop of every stitch across
Ch 1 and turn.
Continue until the blanket measures approximately:
39–40 inches long
before the border.
The Complete Stitch Repeat
After the normal foundation row, the entire blanket body is simply:
Hdc in the third loop of every stitch across.
That is the full repeat.
There are:
- no increases
- no decreases
- no stitch multiples
- no complicated row sequence
The texture comes entirely from hook placement.
Why the Fabric Looks So Different
Every hdc creates a top V.
Ordinary crochet uses that V for the next row.
In this pattern, you leave the V unused and insert the hook into the hidden third loop below it.
Because the top V is no longer trapped inside the next row, it folds outward.
Repeating the process row after row creates the pronounced braided ridges.
The vertical bodies of the hdc stitches remain visible between the ridges, giving the blanket the alternating appearance of:
raised braid → vertical stitches → raised braid → vertical stitches
Keeping the Stitch Count Correct
Every row must contain:
118 stitches
Count periodically.
The most common place to lose stitches is at the edges.
At the beginning of each row:
- do not work into the ch-1
- work into the third loop of the first actual hdc
At the end:
- make sure you work into the final hdc
- do not mistake the turning chain for another stitch
Using a stitch marker in the first and last stitch of each row can help.
How to Recognize the Correct Loop
Turn the fabric toward you slightly.
At the top of each hdc you will see:
V
Directly below that V is another horizontal strand.
That is the loop you want.
Slide the hook underneath that strand only.
After working the stitch, look at the front of the fabric.
The original V should remain untouched and visible as part of the horizontal ridge.
If the V disappears inside your new row, you probably inserted the hook through the wrong loops.
Edge Stitch Tip
The first and last third loops can be harder to see than the middle stitches.
Do not guess.
Gently pull the fabric sideways with your fingers.
This opens the stitch anatomy and makes the third loop easier to identify.
Keeping the edge stitches accurate is important because a blanket worked in this stitch can gradually become narrower if one edge stitch is repeatedly missed.
Using Variegated Yarn
This texture is particularly effective with multicolored yarn.
Because each ridge exposes a different section of yarn, the color changes appear in small vertical and horizontal flashes.
You may see:
- turquoise stitches beside coral
- lavender ridges over mustard
- gray mixing with pink
- short bursts of cream between brighter shades
There is no need to control where each color lands.
Allow the yarn to change naturally.
That randomness is part of the visual effect.
Joining a New Ball of Yarn
Whenever possible, join the next skein at the side edge.
On the final yarn-over of the last hdc:
Stop with 3 loops on the hook.
Drop the old yarn.
Yarn over with the new strand.
Pull the new yarn through all 3 loops.
Ch 1.
Turn.
Continue normally.
Leave approximately:
6-inch tails
for weaving in.
If You Want to Control the Color Sequence
Some self-striping yarns have obvious repeating color sections.
If two skeins begin in very different places, you can:
- Find the color where the previous skein ended.
- Pull yarn from the new skein until you reach approximately the same section.
- Join from there.
- Save the removed yarn for another project.
For a more random blanket, simply join the next skein wherever its color sequence begins.
PART 2 — Continue to Full Length
Continue the third-loop hdc rows until the blanket body measures approximately:
39–40 inches
The border will add roughly another inch to the overall length and width.
Finish after completing a full row.
Do not fasten off if you are adding the border in the same color.
PART 3 — Simple Single Crochet Border
The blanket already contains a lot of texture, so a simple border works best.
If your variegated yarn is very busy, you can use:
- the same yarn
- gray
- cream
- one solid color pulled from the blanket
Border Round 1
After finishing the final blanket row:
Ch 1.
Work sc evenly across the top edge.
At the first corner work:
3 sc
Continue evenly down the first long side.
At the bottom corner:
3 sc
Sc across the foundation edge.
At the next corner:
3 sc
Work evenly up the second long side.
At the final corner:
3 sc
Join with a sl st to the first sc.
How Many Stitches Along the Sides?
Do not force one stitch into every tiny opening.
The side edge is formed from hdc row ends.
A useful starting ratio is approximately:
2 sc for every 3 row ends
but the correct number depends on your tension.
The border should lie flat.
If it:
ruffles: remove some side stitches.
If it:
pulls inward: add several more.
Border Round 2
Ch 1.
Sc in every stitch around.
At each corner, work:
3 sc in the center corner stitch
Join with a sl st.
Fasten off.
Optional Third-Look Border
If you want the border to echo the blanket texture, replace Border Round 2 with half double crochet.
Work one hdc around.
Then add another round worked in the third loop of those border hdc stitches.
This creates a raised ridge around the outside.
For the cleanest beginner version, however, the two single crochet rounds are easier.
Finished Baby Blanket
The finished blanket should measure approximately:
35 × 41 inches
after light blocking.
It should have:
- dense raised horizontal ridges
- short vertical stitch columns between ridges
- straight sides
- firm but flexible fabric
- rich multicolored texture
- no holes
- reversible appearance
How to Make a Smaller Stroller Blanket
Begin with approximately:
Ch 95
Work:
94 stitches
Continue until the blanket measures approximately:
30–34 inches long
Add the same border.
How to Make a Larger Baby Blanket
Begin with approximately:
Ch 127
Work:
126 hdc
Continue until approximately:
42–44 inches long
Then add the border.
How to Make a Lap Blanket
Begin with approximately:
Ch 151
Work:
150 hdc
Continue until approximately:
48–52 inches long
How to Make a Throw Blanket
For a sofa throw, try:
Ch 171
giving:
170 working stitches
Continue until approximately:
58–62 inches long
The stitch is relatively dense, so a full throw will use a substantial amount of yarn.
The Easiest Way to Resize
This stitch has no required stitch multiple.
You can begin with any number of chains.
The easiest sizing method is:
- Make a loose chain.
- Lay it flat without stretching.
- Continue until it is approximately the desired blanket width.
- Add one additional chain for turning.
- Work the first hdc row.
- Measure again after 4–5 textured rows.
The measurement after several rows is more reliable than measuring only the foundation chain.
Make a Matching Scarf
This stitch is excellent for scarves because it is warm and double-sided.
Try:
Ch 31
Work:
30 hdc
Repeat third-loop rows until approximately:
65–70 inches long
Leave the ends plain or add fringe.
Make a Cushion Cover
Crochet two rectangles the same size as your pillow insert.
For a 16-inch cushion:
Work each panel approximately:
15½–16 inches square
Place panels together.
Sc around three sides.
Insert pillow form.
Sc the final side closed.
The heavy ridge texture works especially well for decorative cushions.
One-Color Version
The stitch does not require variegated yarn.
In a solid shade, the ridges become the main feature.
Good colors include:
- cream
- oatmeal
- camel
- sage
- dusty blue
- terracotta
- charcoal
- blush
A light solid color makes the individual stitch anatomy easiest to see.
Two-Color Version
You can also alternate colors every 2 or 4 rows.
For example:
4 rows cream
4 rows sage
or:
2 rows gray
2 rows mustard
Because the stitch already contains horizontal ridges, changing colors at the edge creates very strong stripe definition.
Best Yarn for the Texture
Smooth yarn works best.
Look for yarn that:
- is not extremely fuzzy
- has visible strand definition
- can tolerate repeated handling
- drapes without becoming floppy
Good options include:
- acrylic
- acrylic-wool blends
- cotton-acrylic blends
- smooth washable wool
- soft baby yarn
Very fuzzy yarn can hide the third loop and make the stitch more frustrating.
Choosing the Hook Size
For medium #4 yarn, approximately:
5 mm
is a good starting point.
If the blanket feels stiff:
move to 5.5 mm.
If the ridges are too loose:
try 4.5 mm.
The best hook is the one that produces:
- clearly defined ridges
- flexible fabric
- no large gaps
- comfortable drape
Common Problems
I Cannot Find the Third Loop
Make several ordinary hdc stitches and inspect them closely.
Look behind or below the top V.
Gently pull the stitch apart.
You should see a separate horizontal strand.
Use light-colored practice yarn if necessary.
My Blanket Looks Like Ordinary HDC
You are probably working through the normal top loops.
The hook must go under the third loop only.
The normal V must remain unused.
My Ridges Are Not Consistent
You may be alternating between:
- third loop
- back loop
- normal top loops
Pause before every stitch until you can recognize the correct strand consistently.
My Blanket Gets Narrower
You are probably losing the final stitch.
Use markers in:
- first stitch
- last stitch
Count every few rows.
My Blanket Gets Wider
You may be accidentally working into the turning chain.
The ch-1 does not count as a stitch.
The Starting Edge Pulls Tight
Redo the foundation chain with:
- looser tension
- or a hook 0.5–1 mm larger
Fabric Is Too Stiff
The stitch is naturally dense.
Increase the hook size slightly.
Fabric Has Large Gaps
Reduce the hook size.
Variegated Colors Pool Strangely
This is normal with multicolored yarn.
Changing tension slightly can alter pooling, but for this design the irregular color placement usually enhances the textured effect.
Tips for Perfect Ridges
Keep the HDC Height Consistent
Do not pull some loops much taller than others.
Uniform hdc height creates straighter ridges.
Do Not Split the Yarn
Insert the hook cleanly beneath the whole third loop.
Splitting only part of the strand can distort the ridge.
Flatten the Work Occasionally
Every few rows, lay the blanket flat.
Check:
- width
- side edges
- ridge alignment
- stitch count
Do Not Over-Block
The raised ridges are the main feature.
Heavy stretching can flatten them.
Blocking
When the blanket is finished:
- Weave in all yarn ends.
- Wash or lightly dampen according to the yarn instructions.
- Lay the blanket flat.
- Straighten the four sides.
- Smooth the ridges gently with your fingers.
- Allow it to dry completely.
Do not press the ridges flat with an iron.
Color Burst Raised-Ridge Blanket
The dramatic texture comes from changing only one small detail in an ordinary half double crochet: instead of working under the usual top loops, every new stitch is placed in the hidden third loop.
That simple change pushes the unused V-shaped loops forward and creates one raised braided ridge after another.
With solid yarn, the result is a clean architectural ribbed blanket. With highly variegated yarn, every stitch catches a different section of color, creating a dense woven-looking surface full of coral, turquoise, yellow, lavender, gray, and pink.
Because there is no complicated stitch multiple or multi-row sequence to memorize, the design can be adapted easily to blankets, scarves, cushions, throws, and other rectangular crochet projects.


