
This soft cream crochet scarf combines a simple textured stitch pattern with a generous length and long tassels for a classic cold-weather accessory that works with almost anything.
The scarf is worked lengthwise, so the foundation chain determines the finished length and the number of rows determines the width. That makes it especially easy to customize.
This version uses an original 4-row ridge repeat combining herringbone half double crochet with back-loop single crochet. The result is a dense, flexible fabric with subtle raised lines running the full length of the scarf.
Pattern at a Glance
Skill level: Advanced beginner
Terminology: US crochet terms
Construction: Worked lengthwise in rows
Finished scarf size: Approximately 68 × 8 inches, excluding tassels
Finished length with tassels: Approximately 78–80 inches
Yarn weight: Aran / worsted, Category 4
Hook: 5 mm
Main texture: Herringbone half double crochet + BLO single crochet
Foundation: 199 chains
Stitch count: 198 stitches
Pattern repeat: 4 rows
Tassels: Optional, added to both short ends
Materials
You will need:
- approximately 650–750 yards aran or worsted-weight yarn
- 5 mm crochet hook
- yarn needle
- scissors
- measuring tape
- stitch markers, optional
- a piece of cardboard approximately 6 inches tall for making tassels
A smooth yarn with a little softness works especially well because it allows the raised rows to remain visible without making the scarf stiff.
Suggested Color
For the classic version, use:
Champagne Cream / Warm Ivory
Other colors that would show the texture beautifully include:
- oatmeal
- camel
- dusty rose
- sage
- rust
- charcoal
- deep wine
- pale gray
- soft blue
A solid color makes the stitch texture easiest to see.
Finished Measurements
Without tassels:
Approximately 68 inches long × 8 inches wide
With tassels:
Approximately 78–80 inches total length
Each tassel is approximately:
5–6 inches long
after trimming.
Exact measurements will vary with yarn, tension, and blocking.
Gauge
Approximately:
12 stitches × 13 rows = 4 inches
in the established texture pattern after light blocking.
Gauge is not critical for a scarf, but it affects:
- total length
- finished width
- yarn usage
The easiest way to customize the scarf is to measure as you work rather than forcing an exact gauge.
Abbreviations
- ch = chain
- sc = single crochet
- hdc = half double crochet
- HBhdc = herringbone half double crochet
- BLO = back loop only
- sl st = slip stitch
- st = stitch
- sts = stitches
Important Pattern Notes
The scarf is worked along its long edge, not from one short end to the other.
That means:
- foundation chain = scarf length
- number of rows = scarf width
The beginning ch-1 does not count as a stitch.
The beginning ch-2 does not count as a stitch.
Always work the first actual stitch into the first stitch of the previous row.
The stitch count remains:
198 stitches
throughout.
Use stitch markers in the first and last stitch if you tend to lose edge stitches.
Herringbone Half Double Crochet
Yarn over.
Insert the hook into the next stitch.
Yarn over and pull up a loop.
You now have 3 loops on the hook.
Pull the first loop directly through the second loop.
You now have 2 loops remaining.
Yarn over and pull through both remaining loops.
That completes one:
HBhdc
The slight sideways movement of the stitch creates a smoother, flatter texture than an ordinary half double crochet.
Back Loop Only Single Crochet
Look at the top of the next stitch.
You will see two loops:
- front loop
- back loop
Insert the hook through only the:
back loop
Yarn over and pull up a loop.
Yarn over and pull through both loops.
Working only into the back loop leaves the unused front loop visible as a subtle raised line.
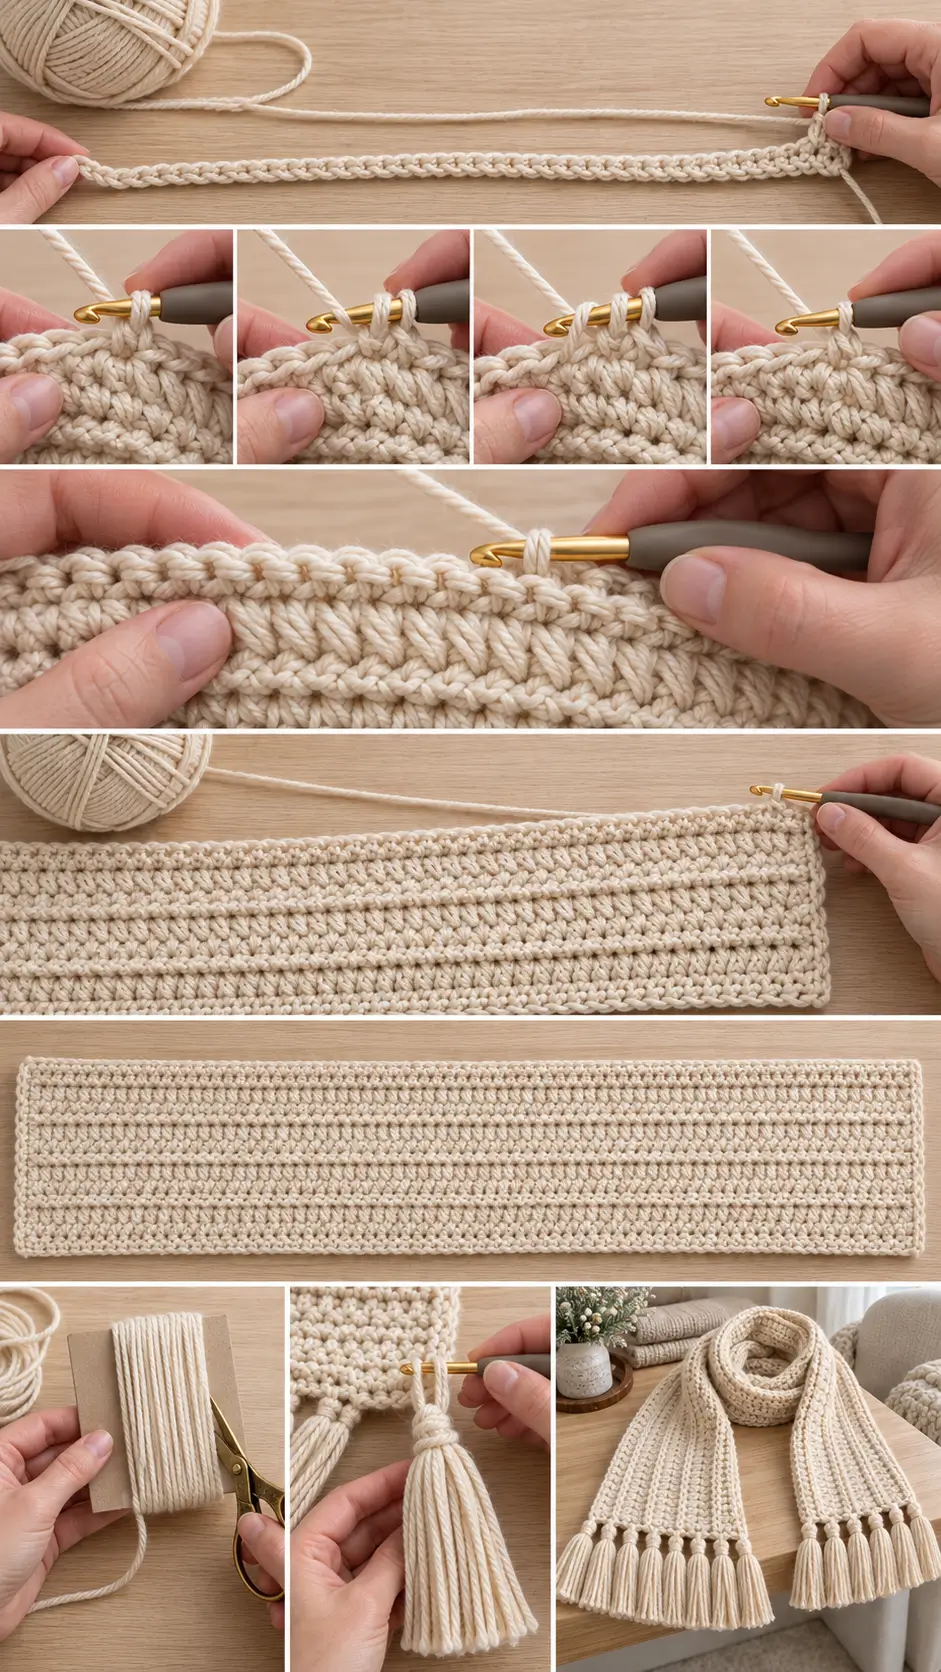
Foundation
Using the 5 mm hook:
Ch 199.
Keep the foundation chain relaxed.
If your chains are naturally tight, make the foundation using a:
5.5 mm hook
then switch back to the 5 mm hook for Row 1.
Row 1
Sc in the second chain from the hook.
Sc in every remaining chain across.
You should have:
198 sc
Ch 2.
Turn.
Row 2
HBhdc in the first stitch.
HBhdc in every stitch across.
198 HBhdc
Ch 1.
Turn.
Row 3
Working in the BLO:
Sc in every stitch across.
198 sc
Ch 2.
Turn.
Row 4
HBhdc in every stitch across.
198 HBhdc
Ch 1.
Turn.
Row 5
Working in the BLO:
Sc in every stitch across.
198 sc
Ch 2.
Turn.
You have now established the main texture.
Rows 6–28
Continue repeating:
Row 4
then:
Row 5
until you have completed approximately:
28 total rows
or until the scarf measures about:
8 inches wide
Finish after a BLO sc row for a slightly firmer outer edge.
Fasten off.
What the Texture Should Look Like
The finished fabric should show:
- long horizontal ridges running from end to end
- compact stitches
- subtle herringbone movement between ridges
- no large holes
- flexible drape
- straight long edges
The texture should look understated rather than heavily ribbed.
Check the Length Before Continuing
Lay the scarf flat without stretching it.
It should measure approximately:
68 inches long
before tassels.
If it is a little shorter or longer, that is completely fine for this project.
The most important measurement is whether the length feels comfortable when wrapped around the neck.
Optional Simple Edge
The scarf can be left exactly as written, but if you want a slightly more defined finish, work one simple round of single crochet around the entire scarf.
Join yarn at one corner.
Ch 1.
Across the long edges:
Work 1 sc in each stitch.
Across each short edge:
Work sc evenly into the row ends.
At each corner:
Work:
sc, ch 1, sc
Do not add too many stitches along the short edges or they will flare.
Join and fasten off.
If you are adding tassels, leaving the scarf without this extra edging also works beautifully.
Adding the Tassels
Tassels give the simple cream scarf a more finished, substantial appearance.
For this version, make:
8 tassel bundles for each short end
for:
16 bundles total
Prepare the Tassel Strands
Cut a piece of sturdy cardboard approximately:
6 inches tall
Wrap the yarn around the cardboard:
6 times
for each tassel bundle.
Cut across the yarn at one end of the cardboard.
You should now have:
6 strands approximately 12 inches long
When folded in half, the tassel will be approximately:
6 inches long
before trimming.
Attach the First Tassel
Hold all 6 strands together.
Fold them in half.
Insert the crochet hook through the edge of the scarf.
Catch the folded center of the strands with the hook.
Pull the folded section partway through the scarf edge to create a loop.
Pass all loose strand ends through that loop.
Pull gently until the knot sits firmly against the scarf edge.
Continue Across
Add tassel bundles evenly along the entire short end.
For the written scarf, approximately:
8 tassel bundles per end
creates a full finish without overcrowding the edge.
Repeat on the opposite end.
Trim the Tassels
Lay the scarf flat.
Comb the tassel strands gently with your fingers.
Use sharp scissors to trim them to approximately:
5–6 inches long
Make both ends as even as possible.
Optional Fuller Tassels
For a fuller fringe, use:
8 strands per bundle
instead of 6.
Keep in mind that fuller tassels require additional yarn.
Optional Lighter Fringe
For a lighter, more delicate finish:
Use:
4 strands per bundle
and place them slightly closer together.
Finishing
Thread the remaining yarn tails onto a yarn needle.
Weave each end through several stitches.
Change direction.
Weave through another section.
Trim only after the tail is secure.
Do not simply cut yarn close to the fabric because scarves receive frequent pulling and movement.
Blocking
Blocking helps the long edges settle and makes the ridge pattern more even.
Follow the care instructions for your yarn.
For a washable yarn:
- Lightly dampen the scarf.
- Lay it flat on a towel or blocking mats.
- Straighten the long edges.
- Shape to approximately 68 × 8 inches.
- Arrange the tassels neatly.
- Allow everything to dry completely.
Do not overstretch the scarf.
How to Make the Scarf Longer
Because the scarf is worked lengthwise, change the foundation chain.
At the written gauge:
approximately 3 stitches = 1 inch
For about a:
60-inch scarf
Try approximately:
181 chains
68-inch scarf
Use:
199 chains
72-inch scarf
Try approximately:
217 chains
These are starting estimates.
Chain until the foundation measures approximately the length you want, remembering that the finished fabric may relax slightly after blocking.
How to Make the Scarf Shorter
Simply reduce the foundation chain.
There is no complicated stitch multiple for this design.
The only requirement is that after skipping the first chain, you have the number of stitches you want across the scarf.
How to Make the Scarf Wider
Continue repeating the established rows.
For approximately:
6-inch width
Stop around 21–22 rows
8-inch width
Work approximately 28 rows
10-inch width
Work approximately 34–36 rows
Measure instead of relying only on row counts because row gauge varies considerably.
Narrow Everyday Scarf
For a lighter scarf:
- keep the same length
- work only 5–6 inches wide
- use smaller tassels
This version uses less yarn and sits easily under a coat.
Extra-Wide Wrap Scarf
Continue until the fabric measures approximately:
11–12 inches wide
This makes the scarf feel closer to a narrow wrap.
You may need approximately:
900–1,000 yards
depending on yarn and gauge.
One-Color Version
The cream version highlights texture rather than color.
Other elegant solid options include:
- camel
- chocolate
- charcoal
- forest green
- burgundy
- navy
The simple stitch repeat works especially well in classic neutrals.
Two-Color Version
Use one color for the HBhdc rows and another for the BLO sc rows.
For example:
Cream + Camel
or:
Oatmeal + Rust
This creates narrow alternating stripes while preserving the texture.
Tonal Stripe Version
Try three shades from the same color family.
For example:
- ivory
- oatmeal
- taupe
Change color every:
4–6 rows
for subtle wide bands.
Scrap-Yarn Version
Because the scarf is worked in very long rows, scrap yarn works best when you have reasonably large leftover amounts.
Use:
- one neutral main color
- occasional accent rows
instead of changing colors every row.
This keeps the number of ends manageable.
Why Are My Long Edges Getting Uneven?
You are probably losing or adding stitches at the ends.
Every row should contain:
198 stitches
for the written size.
Place a marker in:
- first stitch
- last stitch
and count periodically.
Why Is My Scarf Getting Narrower?
The most common cause is missing the final stitch.
Long rows make that very easy to do.
Remember that the turning chain does not count.
Work:
one stitch in the first stitch
and:
one stitch in the final stitch
of every row.
Why Is My Foundation Edge Tight?
A tight starting chain can cause the scarf to curve.
Make the foundation chain with a hook:
0.5–1 mm larger
than the main hook.
Then switch back for Row 1.
Why Does My Scarf Curve?
Possible causes include:
- tight foundation chain
- tighter tension on one stitch type
- accidentally losing stitches
- working BLO sc too tightly
Blocking can correct mild curvature.
For strong curvature, check your stitch count before continuing.
Why Does the BLO Row Feel Tight?
Single crochet is naturally shorter and denser than HBhdc.
Relax your tension slightly when working the BLO row.
If necessary, use a:
5.5 mm hook
for only the BLO sc rows.
Why Doesn’t My Herringbone Texture Show?
A very fuzzy yarn can hide the stitch definition.
Choose a smoother yarn.
Also check that you’re completing the stitch correctly:
pull the first loop through the second loop before the final yarn-over.
Why Are My Tassels Uneven?
The easiest solution is to intentionally cut them slightly longer than needed.
Attach all the tassels first.
Then lay the scarf flat and trim the entire fringe afterward.
Why Are My Tassels Falling Loose?
Make sure the folded strands are pulled completely through their own loop.
Tighten each bundle individually.
Cotton and very smooth yarns may need a firmer knot than wool or acrylic.
Can I Use DK Yarn?
Yes.
Try a:
4–4.5 mm hook
and make a longer foundation chain because the stitches will be smaller.
Use physical measurement rather than the written stitch count.
Can I Use Bulky Yarn?
Yes.
Try approximately:
6–6.5 mm hook
and make fewer foundation stitches.
The finished scarf will be much thicker, so consider reducing the width to:
6–7 inches.
Can I Use Cotton?
Yes.
Cotton gives excellent stitch definition but can create a heavier scarf.
A cotton/acrylic or cotton/wool blend usually provides more drape.
Can I Leave Off the Tassels?
Absolutely.
Without tassels, the scarf has a cleaner minimalist finish.
If omitting them, consider adding the optional sc edging around the scarf.
Is This Pattern Beginner Friendly?
If you already know:
- chain
- single crochet
- half double crochet
the only new technique is the herringbone half double crochet.
Practice several stitches on a small swatch first.
Once that movement becomes comfortable, the scarf itself is highly repetitive.
Is the Scarf Reversible?
Both sides look attractive.
The raised lines appear slightly different on each side because of the BLO rows, but there is no obvious unusable wrong side.
How Much Yarn Should I Buy?
For the written scarf, including tassels, allow approximately:
650–750 yards of worsted/aran yarn
For an extra-wide version, buy additional yarn.
Tassels can use more yarn than expected, especially if you make them long and full.
Can I Make This Without Tassels for a Man’s Scarf?
Yes.
Use a neutral color such as:
- charcoal
- navy
- camel
- forest green
- chocolate
and leave the short edges plain.
You can also reduce the width to approximately:
6½–7 inches.
Matching Cowl
The same stitch combination can be used for a cowl.
Instead of making a very long foundation:
Create a rectangle approximately:
28–30 inches long × 8–10 inches wide
then seam the short ends together.
Matching Headband
For a quick companion project:
Chain enough for approximately:
19–20 inches
and work the same ridge repeat until the fabric measures:
3–4 inches wide.
Seam the short edges.
Final Thoughts
The construction is intentionally simple:
long foundation chain
→ herringbone half double crochet
→ back-loop single crochet ridge
→ repeat until the scarf reaches the desired width
Then finish the short ends with long cream tassels.
The subtle texture keeps a one-color scarf interesting without requiring complicated stitches, and the lengthwise construction makes it easy to change both the length and width for exactly the scarf you want.


