
This soft winter scarf combines smooth herringbone half double crochet with small raised cluster sections, creating a fabric that looks textured without becoming bulky or stiff.
The scarf is worked from one short end to the other, so the starting chain determines the width and you simply keep repeating the textured rows until the scarf reaches your preferred length. A generous fringe finishes both ends.
The soft, reversible look was inspired by the broad stitch combination used in Daisy Farm Crafts’ Crochet Dreamy Scarf, which pairs herringbone half double crochet with clustered texture. This version uses an original stitch placement, alternating cluster direction, different repeat, dimensions, edging, and fringe arrangement.
Pattern at a Glance
Skill level: Advanced beginner
Terminology: US crochet terms
Construction: Worked flat from short end to short end
Finished size: Approximately 10 × 72 inches, excluding fringe
Finished length with fringe: Approximately 80–82 inches
Yarn weight: Aran / light bulky
Hook: 6 mm
Main stitches: Herringbone half double crochet + half double crochet clusters
Starting chain: 34
Stitch count: 32 stitches
Main repeat: 7 rows
Fringe: Optional, approximately 4–5 inches finished
Materials
You will need:
- approximately 700–850 yards aran or light bulky yarn
- 6 mm crochet hook
- yarn needle
- scissors
- measuring tape
- 2 stitch markers, optional
- piece of cardboard approximately 5½–6 inches tall for fringe
Choose a yarn that feels soft against the neck and has enough stitch definition to show the raised cluster rows.
Yarn Suggestions
The texture works particularly well in yarn that is:
- smooth or lightly brushed
- soft enough for scarves
- not excessively fuzzy
- able to drape rather than stand stiffly
Acrylic, wool/acrylic blends, brushed acrylic, soft wool blends, and some alpaca blends can all work.
Extremely fuzzy yarn can hide the cluster texture.
Suggested Color
For the photographed look, use:
Soft Blush / Champagne Pink
Other beautiful options include:
- warm cream
- oatmeal
- dusty rose
- camel
- sage
- light gray
- burgundy
- charcoal
- soft blue
A solid color makes the alternating smooth and raised sections especially easy to see.
Finished Measurements
Before fringe:
Approximately 10 inches wide × 72 inches long
After adding fringe:
Approximately 80–82 inches total length
The scarf is designed to be long enough to:
- wrap once around the neck
- cross loosely in front
- wear under a coat
- drape over both shoulders
Because scarves do not require exact sizing, feel free to stop sooner or continue longer.
Gauge
In the established pattern:
13 stitches × approximately 11 rows = 4 inches
after light blocking.
Gauge is not critical, but it affects:
- width
- total length
- yarn usage
- drape
The written 32-stitch width should measure close to 10 inches.
Abbreviations
- ch = chain
- sc = single crochet
- hdc = half double crochet
- HBhdc = herringbone half double crochet
- CL = half double crochet cluster
- BLO = back loop only
- sl st = slip stitch
- st = stitch
- sts = stitches
Important Pattern Notes
The beginning chains do not count as stitches.
Always work the first actual stitch into the first stitch of the previous row.
Your stitch count should remain:
32 stitches
throughout.
The cluster rows are alternated so the raised bumps do not stack directly on top of one another throughout the scarf.
This creates a softer broken texture rather than rigid vertical columns.
Place a stitch marker in the first and last stitch if you tend to lose edge stitches.
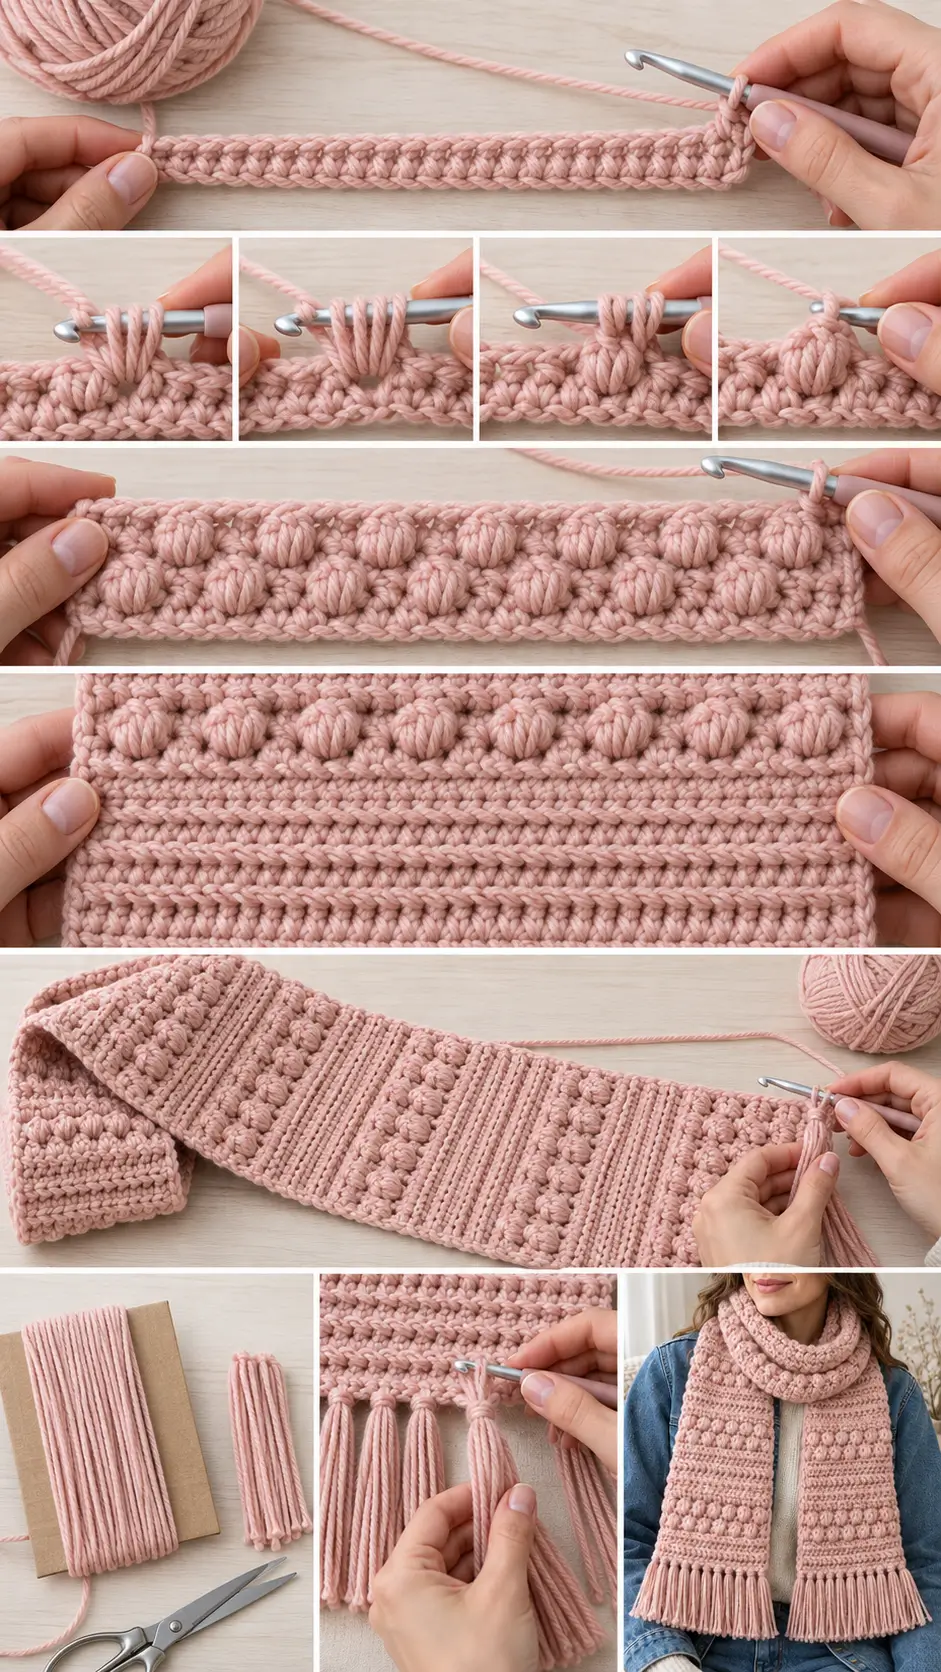
Herringbone Half Double Crochet
Yarn over.
Insert hook into the indicated stitch.
Yarn over and pull up a loop.
You now have 3 loops on the hook.
Pull the first loop directly through the second loop.
You now have 2 loops remaining.
Yarn over and pull through both loops.
One HBhdc is complete.
The stitch creates a subtle sideways slant and a smoother fabric than ordinary half double crochet.
Half Double Crochet Cluster
The cluster is worked entirely into one stitch.
Yarn over.
Insert hook into the next stitch.
Yarn over and pull up a loop.
Do not complete the stitch.
Yarn over again.
Insert hook into the same stitch.
Yarn over and pull up another loop.
Yarn over and pull through all loops on the hook.
One CL is complete.
The doubled insertion creates a small rounded bump without the height of a traditional bobble.
Why Alternate the Cluster Placement?
On the first cluster row, the repeat begins with:
CL, sc
On the next cluster row, it begins with:
sc, CL
That moves each raised cluster sideways by one stitch.
Instead of forming straight vertical columns, the bumps alternate position and create a more scattered, fabric-like texture.
Foundation
Using the 6 mm hook:
Ch 34.
Keep the chains relaxed.
If your chains tend to be tight, make the foundation chain using a 6.5 mm hook, then return to the 6 mm hook for Row 1.
Row 1 — Smooth Foundation Row
Beginning in the third chain from the hook:
HBhdc in each chain across.
You should have:
32 HBhdc
Ch 1.
Turn.
Checkpoint
The row should measure approximately 9½–10 inches wide without being stretched.
If it is considerably wider, use a smaller hook.
If it is much narrower, use a larger hook.
Row 2 — First Cluster Row
Sc in the first stitch.
Repeat across:
CL in next st, sc in next st
until 1 stitch remains.
Work:
CL in final stitch.
You should still have:
32 stitch positions
Ch 1.
Turn.
Row 3 — Second Cluster Row
Work the cluster placement in the opposite position.
CL in first stitch.
Repeat:
sc in next st, CL in next st
across.
End with:
sc in final stitch.
32 sts
Ch 2.
Turn.
Checkpoint
The raised clusters from Row 3 should sit between the clusters from Row 2 rather than directly above them.
Row 4 — Smooth Herringbone Row
HBhdc in every stitch across.
32 HBhdc
Ch 2.
Turn.
Row 5 — Smooth Herringbone Row
HBhdc in every stitch across.
32 HBhdc
Ch 1.
Turn.
The two smooth rows create visual space between the textured sections.
Row 6 — Subtle Ridge Row
Working in the back loop only:
Hdc in every stitch across.
32 hdc
Ch 2.
Turn.
This leaves the front loops visible and creates a narrow raised ridge across the scarf.
Row 7 — Smooth Row
HBhdc in every stitch across.
32 HBhdc
Ch 2.
Turn.
Row 8 — Smooth Row
HBhdc in every stitch across.
32 HBhdc
Ch 1.
Turn.
You have now completed one full textured section.
Main Repeat
Repeat:
Rows 2–8
until the scarf measures approximately:
70–71 inches
from the foundation edge.
Then finish with:
- one Row 2
- one Row 3
- one Row 4
This places a final textured band near the second end of the scarf.
Continue with the finishing row below.
Final Row
Ch 1.
Sc loosely in every stitch across.
32 sc
Fasten off.
The finished scarf body should measure approximately:
72 inches long
before fringe.
What the Finished Texture Should Look Like
The scarf should show repeating sections of:
- small rounded clusters
- offset cluster bumps
- smooth herringbone rows
- one subtle ridge
- more smooth fabric
The cluster sections should be visible but not extremely bulky.
Both sides should look attractive enough for the scarf to be worn without constantly checking which side is facing outward.
Check the Long Edges
Lay the scarf flat.
The long sides should look reasonably straight.
Minor waviness usually disappears after blocking.
If one edge is noticeably shorter than the other, check whether stitches were accidentally skipped at the end of some rows.
Optional Edge Finish
If your side edges are neat, you can leave them exactly as they are.
For a more defined finish, add one simple round of single crochet before adding fringe.
Join yarn at one corner.
Ch 1.
Work sc evenly along the first long side.
At the corner:
sc, ch 1, sc
Work sc across the short end.
Repeat around the remaining sides.
At each corner work:
sc, ch 1, sc
Join with sl st.
Fasten off.
Do not work too many stitches into the row ends or the edge will ripple.
Adding Fringe
Fringe gives this scarf a softer, fuller winter look.
For the written version, attach approximately:
16 fringe bundles to each short end
for:
32 bundles total
Cut the Fringe
Wrap your yarn around a piece of cardboard approximately:
5½–6 inches tall
about:
4 times
for each bundle.
Cut across one end.
You now have approximately:
4 strands about 11–12 inches long
for each bundle.
When folded, each finished fringe section will be approximately:
5–6 inches long before final trimming.
Attach the First Bundle
Hold the 4 strands together.
Fold them in half.
Insert the crochet hook through the edge stitch from front to back.
Catch the folded center of the strands.
Pull the fold partly through the scarf edge.
You now have a loop.
Pass all 8 loose ends through that loop.
Pull gently until the knot sits firmly against the scarf edge.
Continue Across
Attach bundles evenly across the entire short edge.
You do not need fringe in every individual stitch.
Approximately every second stitch creates a full finish without making the scarf excessively heavy.
Repeat across the second short end.
Trim the Fringe
Lay the scarf flat.
Straighten the fringe with your fingers.
Use sharp scissors to trim the ends evenly.
Aim for a finished fringe length around:
4–5 inches.
It is easier to trim after every bundle has been attached.
Fuller Fringe
For more dramatic fringe:
Use:
6 strands per bundle
instead of 4.
This requires additional yarn.
Lighter Fringe
For a more understated scarf:
Use:
3 strands per bundle
or place bundles every third stitch.
Finishing
Thread all remaining yarn tails onto a yarn needle.
Weave the tails through several stitches.
Change direction.
Weave back through another section.
Trim only after the ends are secure.
Pay particular attention to:
- foundation tail
- final-row tail
- any yarn joins
Blocking
Light blocking helps even the herringbone stitches and relax the cluster sections.
Follow your yarn’s care instructions.
For washable yarn:
- Lightly dampen the scarf.
- Lay it flat.
- Straighten both long edges.
- Shape to approximately 10 × 72 inches.
- Arrange the fringe.
- Allow it to dry completely.
Do not aggressively stretch the clusters flat.
How to Make the Scarf Narrower
The written scarf uses:
32 stitches
and the cluster pattern requires an even stitch count.
For a narrower scarf, choose any even stitch count.
For example:
Approximately 8 inches wide
Try:
26 stitches
Foundation:
Ch 28
Approximately 9 inches wide
Try:
30 stitches
Foundation:
Ch 32
Written width
32 stitches
Foundation:
Ch 34
Always check your own gauge.
How to Make the Scarf Wider
Again, use any even stitch count.
For approximately:
11 inches
Try:
36 stitches
Foundation:
Ch 38
12 inches
Try:
40 stitches
Foundation:
Ch 42
A wider scarf will require noticeably more yarn.
How to Make the Scarf Shorter
Simply stop repeating the 7-row section earlier.
Useful finished body lengths include:
Short scarf
58–60 inches
Everyday scarf
64–68 inches
Long scarf
72 inches
Extra-long scarf
78–82 inches
Add fringe after reaching your desired body length.
Child-Size Scarf
For an older child, consider approximately:
6–7 inches wide × 48–54 inches long
Use an even number of stitches and follow the same pattern repeat.
For younger children, omit very long fringe and keep any decorative ends short and securely attached.
One-Color Version
A single soft neutral works especially well because the stitch changes provide enough visual interest.
Try:
- cream
- blush
- camel
- oatmeal
- gray
- forest green
- burgundy
Two-Color Version
Use:
Color A
Smooth HBhdc sections
Color B
Cluster sections
For example:
Cream + dusty rose
or:
Oatmeal + camel
Change colors only at the beginning of complete sections to keep the edges tidy.
Tonal Version
Choose three shades from the same color family.
Example:
- pale blush
- dusty rose
- mauve
Rotate them every complete 7-row repeat.
This gives the scarf soft stripes without hiding the stitch pattern.
No-Fringe Version
The scarf works perfectly without fringe.
If omitting fringe, I recommend adding the optional single crochet edging around the entire scarf.
This gives the short ends a more deliberate finish.
Why Is My Scarf Getting Wider?
The written pattern should always contain:
32 stitches
If your count is growing, the most common cause is accidentally working into:
- the turning chain
- and the first real stitch
The turning chains do not count as stitches.
Why Is My Scarf Getting Narrower?
You are probably missing the final stitch.
This happens easily in textured rows.
Mark:
- first stitch
- last stitch
with stitch markers.
Count occasionally to confirm:
32 stitches
Why Do My Cluster Rows Look Too Bulky?
Possible causes include:
- yarn that is too thick
- very tight stitches
- hook that is too small
Try a slightly larger hook.
The clusters should create small bumps, not large bobbles.
Why Are My Clusters Flat?
Make sure both partial half double crochets are worked into the same stitch before pulling through all loops.
A smooth, tightly spun yarn will also show the cluster more clearly than very fuzzy yarn.
Why Are the Cluster Rows Leaning?
Some sideways movement is normal because the clusters alternate with single crochet.
The next cluster row deliberately reverses the placement.
After several repeats, the texture should look balanced.
Why Is the Foundation Edge Tight?
Use a larger hook for the foundation chain.
A tight chain can make the first end of the scarf pull inward.
Try:
6.5 mm for the chain
then:
6 mm for the scarf
Why Are the Long Sides Wavy?
A little movement is normal.
Strong waviness usually means:
- inconsistent tension
- missed edge stitches
- extra edge stitches
- too many stitches in optional edging
Block the scarf after confirming your stitch count.
Can I Use Worsted-Weight Yarn?
Yes.
Try approximately a:
5–5.5 mm hook
and adjust the starting chain to reach your preferred width.
Keep an even number of stitches.
Can I Use Bulky Yarn?
Yes.
A:
6.5–7 mm hook
may work better depending on the yarn.
Make fewer stitches across to keep the scarf from becoming excessively wide.
Can I Use DK Yarn?
Yes.
Try:
4–4.5 mm hook
and increase the number of starting stitches.
Keep the final stitch count even.
Can I Use Cotton?
You can, but pure cotton produces a heavier scarf with less spring.
A cotton/acrylic or cotton/wool blend usually gives better cold-weather drape.
Is This Scarf Reversible?
The two sides are not absolutely identical because of the BLO ridge, but both sides are attractive and wearable.
If you want a more completely reversible version, work ordinary hdc instead of BLO hdc on Row 6.
Is This Beginner Friendly?
It is best for an advanced beginner.
You should already be comfortable with:
- chain
- single crochet
- half double crochet
- turning rows
The only techniques to learn are:
- herringbone half double crochet
- the simple hdc cluster
Make a small practice swatch before beginning if either stitch is new to you.
How Much Yarn Do I Need?
For approximately 10 × 72 inches plus fringe, allow:
700–850 yards
The exact amount depends heavily on:
- yarn thickness
- scarf length
- cluster tension
- fringe fullness
Buy extra if you want very long or dense fringe.
Can I Make a Matching Cowl?
Yes.
Use the same even-number stitch rule.
Crochet a rectangle approximately:
28–30 inches long × 9 inches wide
then seam the short ends together.
Matching Headband
Use the same stitch pattern with approximately:
18–20 inches of length
and a width around:
3½–4 inches.
Seam the short edges.
The cluster section makes a nice winter gift set when paired with the scarf.
Final Thoughts
The scarf is built from a simple repeating rhythm:
offset cluster rows
→ smooth herringbone rows
→ one subtle ridge
→ more smooth herringbone
Then the same sequence begins again.
The combination keeps the fabric interesting without relying on complicated cables or large bobbles, while the long fringe adds movement and a soft winter finish.
Once the first repeat is established, the rest of the scarf becomes easy to recognize by sight, making this a relaxing project for building a long, textured cold-weather accessory.


