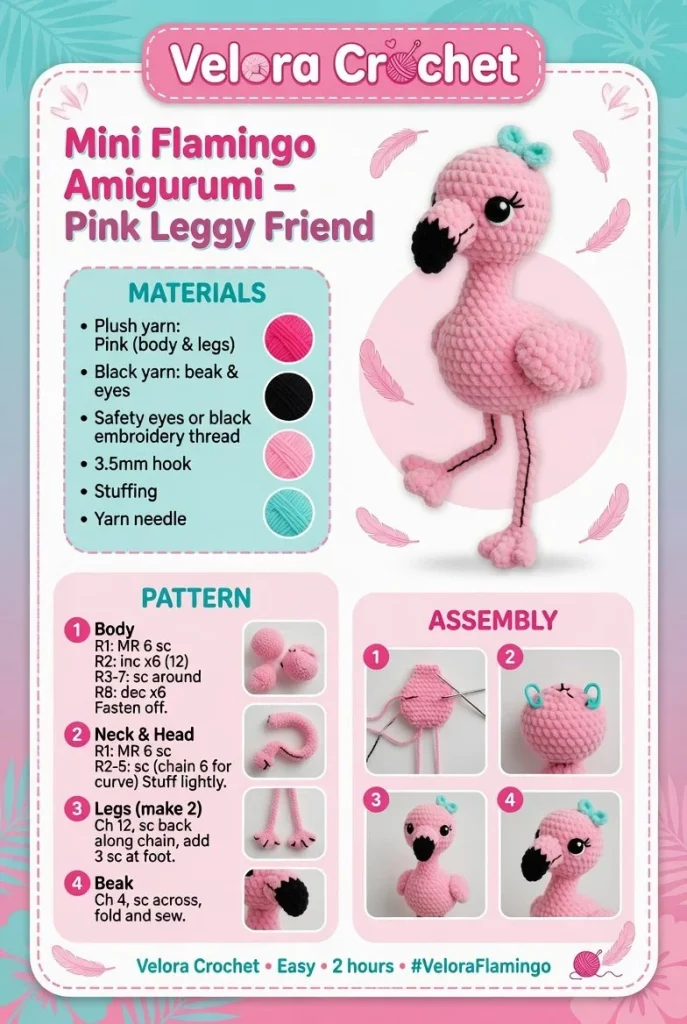
Create your very own charming mini flamingo amigurumi with this fun and straightforward crochet pattern! Perfect for beginners, this delightful pink buddy will add a pop of personality to your home décor or can be a sweet gift for a loved one. Follow the instructions carefully, and you will have a lovely mini crochet flamingo in no time.
Materials
- Worsted weight yarn in pink, black, and white
- G (4.0 mm) crochet hook
- Fiberfill stuffing
- Yarn needle
- Scissors
- Stitch markers
Abbreviations
- CH = chain
- SC = single crochet
- INC = increase
- DEC = decrease
- RND = round
- SL ST = slip stitch
Pattern Instructions
Head
- With pink yarn, make a magic ring.
- Round 1: 6 SC in magic ring (6 stitches).
- Round 2: INC in each stitch around (12 stitches).
- Round 3: (1 SC, INC) around (18 stitches).
- Round 4-6: SC in each stitch around (18 stitches).
- Round 7: (1 SC, DEC) around (12 stitches).
- Stuff the head and complete the round, ending with a SL ST to finish off.
Body
- Using pink yarn, make a magic ring.
- Round 1: 6 SC in magic ring (6 stitches).
- Round 2: INC in each stitch around (12 stitches).
- Round 3: (1 SC, INC) around (18 stitches).
- Round 4-7: SC in each stitch around (18 stitches).
- Round 8: (1 SC, DEC) around (12 stitches).
- Add stuffing and finish with a SL ST.
Arms
- With pink yarn, CH 6 and SL ST to form a ring.
- RND 1: 6 SC in ring (6 stitches).
- RND 2-3: SC in each stitch around (6 stitches).
- Fasten off, leaving a long tail for attaching.
Legs
- With pink yarn, CH 8 and SL ST to form a ring.
- RND 1: 8 SC in ring (8 stitches).
- RND 2: (1 SC, INC) around (12 stitches).
- RND 3-4: SC in each stitch around (12 stitches).
- Fasten off, leaving a long tail for attaching.
Ears / Details
- With black yarn, CH 3.
- RND 1: 2 SC in the second CH from the hook, SC in the last CH (3 stitches).
- Fasten off and leave a long tail for sewing.
Accessories
- Optional: Create a small flower using white yarn. CH 4 and form a ring with a slip stitch. Work 5 SC into the ring, then SL ST to finish.
Assembly & Finishing
- Attach the head to the body using the yarn needle.
- Sew the arms to the sides of the body.
- Attach the legs to the bottom of the body.
- Position the ears on top of the head and sew into place.
- Stitch the accessories onto the flamingo as desired.
- Weave in any loose ends.
Tips for Best Results
- Keep your tension consistent for a smoother finish.
- Use a stitch marker to help keep track of your rounds.
- Make sure to add enough stuffing to give your flamingo its shape without stretching the stitches.
- Don’t hesitate to customize the flamingo’s accessories and colors to make it your own!
- Practice makes perfect; take your time and enjoy the process.
Conclusion
Now that you have your mini flamingo amigurumi pattern, you can get started on this delightful project! With clear instructions and a bit of imagination, you’ll create a cute amigurumi that will surely bring a smile to anyone’s face. Happy crocheting!



