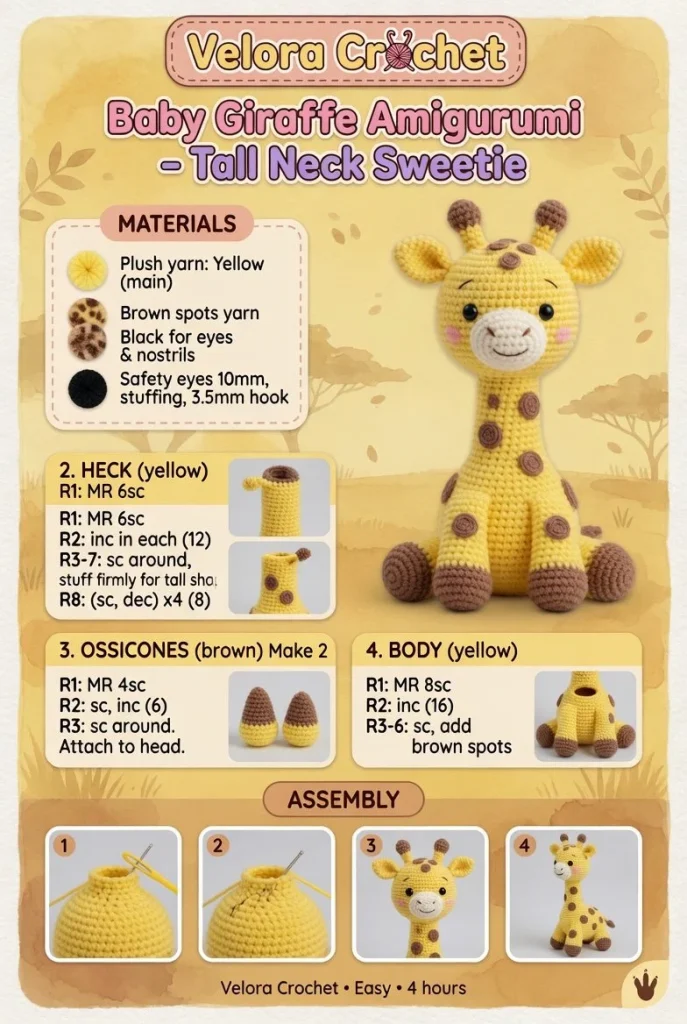
Create your own adorable Baby Giraffe Amigurumi with this easy-to-follow crochet pattern, perfect for beginner crochet enthusiasts. This tall neck sweetie will be a delightful addition to any nursery or playroom. Let’s gather the materials and get started!
Materials
- Worsted weight yarn in yellow, brown, and black
- Crochet hook size G (4.0 mm)
- Safety eyes (10 mm)
- Fiberfill stuffing
- Yarn needle
- Scissors
- Stitch marker (optional)
Abbreviations
- ch = chain
- sc = single crochet
- inc = increase (2 sc in the same stitch)
- dec = decrease (single crochet two together)
- sl st = slip stitch
- st(s) = stitch(es)
Pattern Instructions
Head
- Start with yellow yarn.
- Make a magic ring.
- Round 1: 6 sc in the ring (6).
- Round 2: inc around (12).
- Round 3: (sc in next st, inc) repeat around (18).
- Round 4: (sc in next 2 sts, inc) repeat around (24).
- Rounds 5-8: sc in each st around (24).
- Round 9: (sc in next 2 sts, dec) repeat around (18).
- Insert safety eyes between rounds 7 and 8, about 5 stitches apart.
- Round 10: (sc in next st, dec) repeat around (12).
- Round 11: dec around (6).
- Fasten off, leaving a long tail for sewing.
Body
- With yellow yarn, make a magic ring.
- Round 1: 6 sc in the ring (6).
- Round 2: inc around (12).
- Round 3: (sc in next st, inc) repeat around (18).
- Round 4: (sc in next 2 sts, inc) repeat around (24).
- Rounds 5-10: sc in each st around (24).
- Round 11: (sc in next 2 sts, dec) repeat around (18).
- Round 12: (sc in next st, dec) repeat around (12).
- Round 13: dec around (6).
- Fasten off, leaving a long tail for sewing.
Arms
- With yellow yarn, make a magic ring.
- Round 1: 6 sc in the ring (6).
- Round 2: inc around (12).
- Rounds 3-5: sc in each st around (12).
- Fasten off, leaving a long tail for sewing. Make 2.
Legs
- With yellow yarn, make a magic ring.
- Round 1: 6 sc in the ring (6).
- Round 2: inc around (12).
- Rounds 3-6: sc in each st around (12).
- Change to brown yarn and continue with sc for another 3 rounds.
- Fasten off, leaving a long tail for sewing. Make 4.
Ears / Details
- With yellow yarn, make a magic ring.
- Round 1: 6 sc in the ring (6).
- Round 2: inc around (12).
- Round 3: (sc in next st, inc) repeat around (18).
- Rounds 4-5: sc in each st around (18).
- Change to brown for the last round: sc around (18).
- Fasten off, leaving a long tail. Make 2.
Accessories (if any)
- Optional: Create small horns using brown yarn; make a chain of 4, sc in each stitch back (12) and attach to the head.
Assembly & Finishing
- Stuff the head and body with fiberfill.
- Attach the head to the body using the long tail from the head.
- Sew the arms to the sides of the body.
- Sew the legs to the bottom of the body.
- Position the ears on the top of the head and sew securely.
- Add any other decorative features as desired.
Tips for Best Results
- Keep your tension consistent for even stitches.
- Use a stitch marker to keep track of your rounds.
- If you’re new to amigurumi, practice with a smaller crochet project first.
- Experiment with colors to give your giraffe a unique look.
- When sewing pieces together, take your time to position them accurately for a polished finish.
Conclusion
Congratulations on creating your own Baby Giraffe Amigurumi! With this beginner crochet pattern, you’ve crafted a sweet, cuddly friend that’s sure to delight. Don’t hesitate to share your creations and try new variations as you become more comfortable with crochet. Enjoy your crafting journey!



