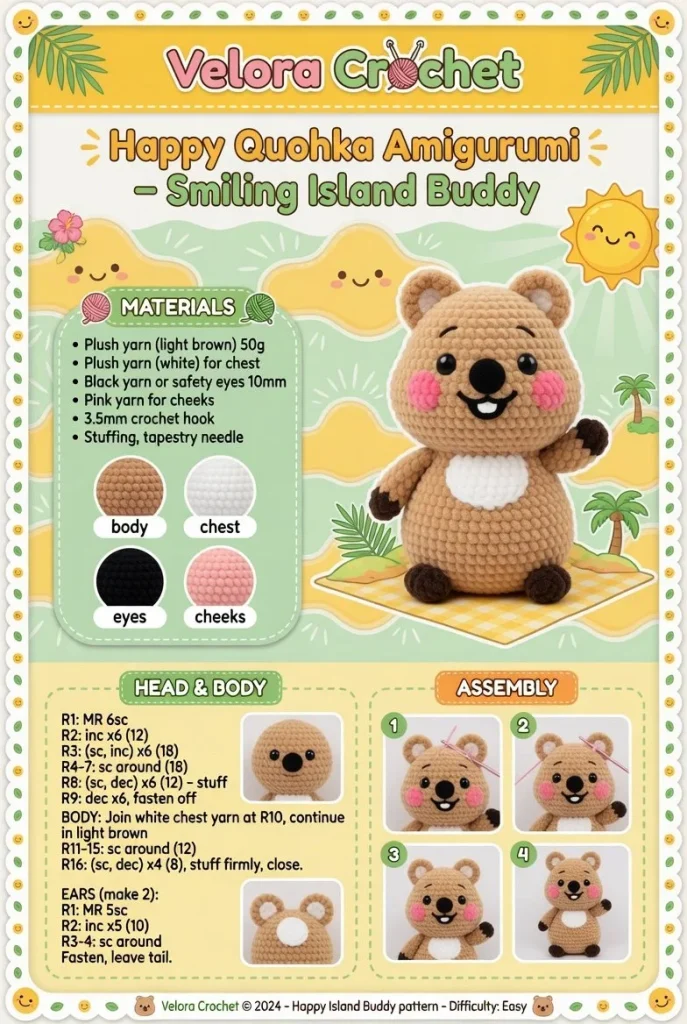
Create your very own adorable Amigurumi Quokka with this easy and enjoyable crochet pattern! This charming little creature is perfect for beginners and a delightful addition to your mini crochet collection. Follow the steps below to craft your very own smiling island buddy.
Materials
- Worsted weight yarn in brown, cream, and black
- Crochet hook (size G/4.0 mm)
- Polyester fiberfill stuffing
- Stitch marker
- Yarn needle for weaving in ends
- Scissors
Abbreviations
- ch = chain
- sc = single crochet
- inc = increase (2 sc in the same stitch)
- dec = decrease (sc 2 stitches together)
- sl st = slip stitch
- rnd = round
- st(s) = stitch(es)
Pattern Instructions
Head
- Begin with a magic ring.
- Rnd 1: 6 sc in the magic ring (6)
- Rnd 2: inc in each st around (12)
- Rnd 3: (sc in next st, inc) repeat around (18)
- Rnd 4-7: sc in each st around (18)
- Rnd 8: (sc in next st, dec) repeat around (12)
- Rnd 9: dec around (6)
- Fasten off, leaving a long tail for sewing. Stuff lightly.
Body
- Begin with a magic ring.
- Rnd 1: 6 sc in the magic ring (6)
- Rnd 2: inc in each st around (12)
- Rnd 3: (sc in next st, inc) repeat around (18)
- Rnd 4-8: sc in each st around (18)
- Rnd 9: (sc in next st, dec) repeat around (12)
- Rnd 10: dec around (6)
- Fasten off, leaving a long tail for sewing. Lightly stuff the body.
Arms
(Make 2)
- Begin with a magic ring.
- Rnd 1: 6 sc in the magic ring (6)
- Rnd 2: inc in each st around (12)
- Rnd 3-4: sc in each st around (12)
- Rnd 5: (sc in next st, dec) repeat around (8)
- Rnd 6: dec around (4)
- Fasten off, leaving a tail. Do not stuff.
Legs
(Make 2)
- Begin with a magic ring.
- Rnd 1: 6 sc in the magic ring (6)
- Rnd 2: inc in each st around (12)
- Rnd 3-4: sc in each st around (12)
- Rnd 5: (sc in next st, dec) repeat around (8)
- Rnd 6: dec around (4)
- Fasten off, leaving a tail. Do not stuff.
Ears / Details
(Make 2)
- Begin with a magic ring.
- Rnd 1: 6 sc in the magic ring (6)
- Rnd 2: inc in each st around (12)
- Rnd 3: (sc in next st, inc) repeat around (18)
- Rnd 4: (sc in next 4, inc) repeat around (24)
- Rnd 5: sc in each st around (24)
- Fasten off, leaving a tail. Do not stuff.
Assembly & Finishing
- Sew the head to the body securely.
- Attach the arms to either side of the body.
- Position and sew the legs at the bottom of the body.
- Attach the ears at the top of the head, ensuring they are balanced.
- Use black yarn to create the eyes and a smile on the face, or use safety eyes.
- Weave in all ends and trim any excess yarn.
Tips for Best Results
- Use a stitch marker to keep track of your rounds.
- If using a lighter yarn, consider a smaller hook to maintain tight stitches.
- Adjust the stuffing to achieve your desired firmness, ensuring all parts are proportionate.
- Experiment with textures by mixing yarn fibers for a unique look.
- Don’t worry about perfection; each Amigurumi is a unique piece of art!
Conclusion
Creating your very own Amigurumi Quokka can be a rewarding experience, perfect for those new to crochet. Follow this easy crochet pattern, and soon you’ll have a lovely friend who can brighten your day. Happy crocheting!



