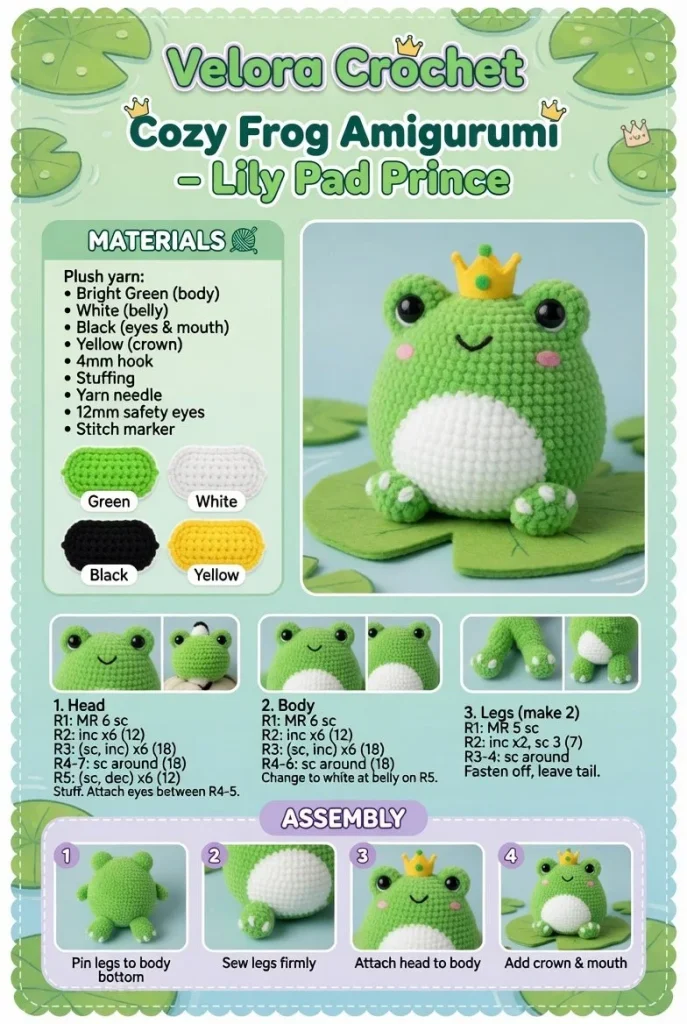
Create your very own cozy frog amigurumi with this delightful crochet pattern for a mini plush toy, perfect for beginners. This adorable Lily Pad Prince is not only fun to make but also adds a charming touch to any space. Follow along with these step-by-step instructions to craft your own little frog companion!
Materials
- Worsted weight yarn in green
- worsted weight yarn in white
- worsted weight yarn in yellow
- Crochet hook (size G/4.0 mm)
- Safety eyes (10 mm)
- Fiberfill stuffing
- Yarn needle
- Scissors
- Stitch marker (optional)
Abbreviations
- ch: chain
- sc: single crochet
- inc: increase
- dec: decrease
- sl st: slip stitch
- st: stitch
- rnd: round
Pattern Instructions
Head
- Start with a magic ring.
- Rnd 1: 6 sc in magic ring (6)
- Rnd 2: inc in each st around (12)
- Rnd 3: *sc in next st, inc in next st; repeat from * around (18)
- Rnd 4: *sc in next 2 st, inc in next st; repeat from * around (24)
- Rnd 5-8: sc in each st around (24)
- Add safety eyes between Rnds 6 and 7, approximately 6 stitches apart.
- Rnd 9: *sc in next 2 st, dec; repeat from * around (18)
- Rnd 10: *sc in next st, dec; repeat from * around (12)
- Insert fiberfill stuffing and finish off with a dec in each stitch until closed.
Body
- Start with a magic ring.
- Rnd 1: 6 sc in magic ring (6)
- Rnd 2: inc in each st around (12)
- Rnd 3: *sc in next st, inc in next st; repeat from * around (18)
- Rnd 4-7: sc in each st around (18)
- Rnd 8: *sc in next st, dec; repeat from * around (12)
- Rnd 9: dec in each st around (6)
- Finish off leaving a long tail for sewing.
Arms
(Make 2)
- Start with a magic ring.
- Rnd 1: 6 sc in magic ring (6)
- Rnd 2: inc in each st around (12)
- Rnd 3-5: sc in each st around (12)
- Finish off, leaving a long tail for sewing.
Legs
(Make 2)
- Start with a magic ring.
- Rnd 1: 6 sc in magic ring (6)
- Rnd 2: inc in each st around (12)
- Rnd 3: *sc in next st, inc in next st; repeat from * around (18)
- Rnd 4-6: sc in each st around (18)
- Rnd 7: *sc in next st, dec; repeat from * around (12)
- Rnd 8: dec in each st around (6)
- Finish off, leaving a long tail for sewing.
Ears / Details
(Make 2)
- Start with a magic ring.
- Rnd 1: 6 sc in magic ring (6)
- Rnd 2: inc in each st around (12)
- Rnd 3: *sc in next st, inc; repeat from * around (18)
- Rnd 4: dec in each st around (9)
- Finish off, leaving a long tail for sewing.
Accessories
Optionally, create a small crown for your frog.
- Ch 10.
- Rnd 1: sc in each chain (10).
- Rnd 2: inc in every st (20).
- Finish off and attach to head using the long tail.
Assembly & Finishing
- Sew the body to the head securely.
- Attach the arms on either side of the body.
- Position and sew the legs to the base of the body.
- Secure the ears to the top of the head.
- If made, attach the crown to the head.
- Weave in all ends and ensure everything is snug.
Tips for Best Results
- Use a stitch marker to keep track of your rounds for accuracy.
- Choose contrasting colors for added visual pop.
- Experiment with the size of your crochet hook for a tighter or looser finish.
- Make sure to stuff each part adequately for a plush look.
- Take your time while sewing pieces together for a neat finish.
Conclusion
This cozy frog amigurumi, known as the Lily Pad Prince, is a delightful project for crochet enthusiasts of all skill levels, especially beginners. Enjoy the process of creating this charming character, and let your creativity flourish as you place your new mini crochet creation in your home or gift it to a friend! Happy crocheting!



