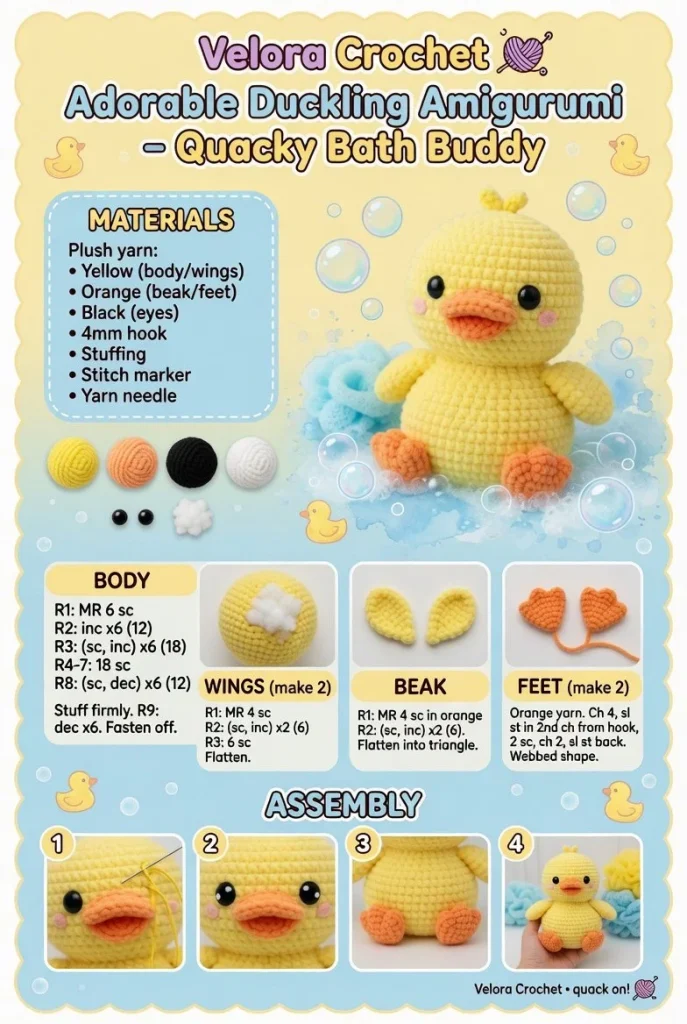
Create your very own charming duckling amigurumi with this delightful crochet pattern. This mini crochet project is great for beginners, providing a fun way to develop your skills while crafting an adorable bath buddy that you or your loved ones will cherish.
Materials
- Medium weight yarn (yellow, orange, and a touch of black)
- Crochet hook suitable for your yarn (usually size G/4.00mm)
- Safety eyes
- Fiberfill stuffing
- Yarn needle
- Stitch marker
- Scissors
Abbreviations
- ch: chain
- sc: single crochet
- inc: increase (2 sc in the same stitch)
- dec: decrease (sc 2 together)
- sl st: slip stitch
- st: stitch
- rnd: round
Pattern Instructions
Head
- With yellow yarn, begin with a magic ring.
- Round 1: 6 sc in the magic ring (6)
- Round 2: inc around (12)
- Round 3: (1 sc, inc) around (18)
- Round 4: (2 sc, inc) around (24)
- Rounds 5-7: sc in each st around (24)
- Round 8: (2 sc, dec) around (18)
- Round 9: (1 sc, dec) around (12)
- Stuff the head with fiberfill.
- Round 10: dec around (6)
- Fasten off, leaving a long tail for sewing.
Body
- Start with a magic ring using yellow yarn.
- Round 1: 6 sc in the magic ring (6)
- Round 2: inc around (12)
- Round 3: (1 sc, inc) around (18)
- Rounds 4-6: sc in each st around (18)
- Round 7: (1 sc, dec) around (12)
- Round 8: dec around (6)
- Fasten off and leave a long tail for sewing.
Arms (Make 2)
- With yellow yarn, create a magic ring.
- Round 1: 6 sc in the magic ring (6)
- Round 2: inc around (12)
- Rounds 3-4: sc in each st around (12)
- Fasten off, leaving a long tail for sewing.
Legs (Make 2)
- With orange yarn, start a magic ring.
- Round 1: 6 sc in the magic ring (6)
- Round 2: inc around (12)
- Rounds 3-4: sc in each st around (12)
- Switch to yellow yarn.
- Rounds 5-7: sc in each st around (12)
- Fasten off, leaving a long tail for sewing.
Ears / Details
- With yellow, ch 4.
- Row 1: sc in second ch from hook, sc in next 2 chs (3)
- Fasten off and leave a long tail for sewing. Make 2.
Accessories
Optional: Create a small bow using scrap yarn by chaining 10 and sewing it around the center.
Assembly & Finishing
- Attach the head to the body using the long tail from the head.
- Secure the arms to the sides of the body.
- Sew the legs to the base of the body.
- Position the ears at the top of the head and sew into place.
- Attach safety eyes to the head and embroider a small beak with orange yarn.
- Weave in all ends securely.
Tips for Best Results
- Use a stitch marker to keep track of your rounds, especially in the head and body sections.
- Ensure that your stitches are tight enough to avoid stuffing peeking through.
- Experiment with different colors to customize your duckling amigurumi.
- Take breaks to avoid fatigue, especially if you’re new to crocheting.
- If you find working in the round difficult, try using a heavier yarn for this project.
Conclusion
This delightful duckling amigurumi serves as a perfect project for beginner crochet enthusiasts. With its simple pattern and charming results, you’ll be encouraged to showcase your creativity and skill. Happy crocheting!



