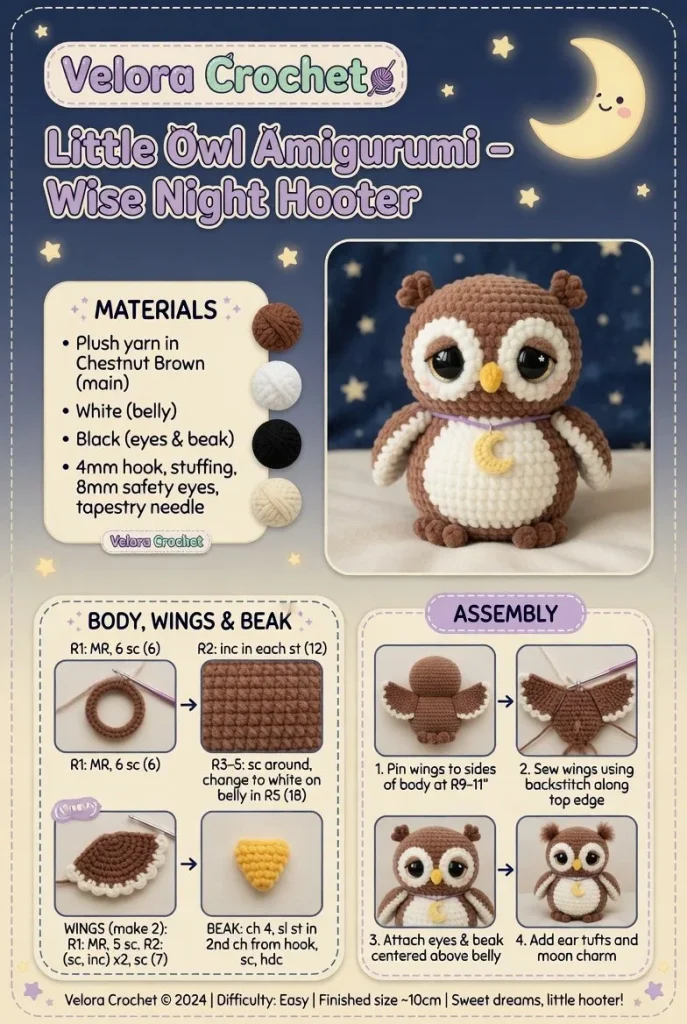
Create your very own charming Little Owl Amigurumi with this easy-to-follow crochet pattern. Perfect for beginner crochet enthusiasts, this mini crochet project will add a touch of whimsy to your collection. Let’s get started!
Materials
- Worsted weight yarn in owl colors (main color, belly color, and eye color)
- Crochet hook (size G/4.0mm)
- Fiberfill stuffing
- Safety eyes (9mm)
- Yarn needle
- Scissors
- Stitch marker (optional)
Abbreviations
- ch: chain
- sc: single crochet
- inc: increase (2 sc in one stitch)
- dec: decrease (sc2tog)
- sl st: slip stitch
- st: stitch
- R: round
Pattern Instructions
Head
- Start with a magic ring.
- R1: 6 sc in ring (6)
- R2: inc around (12)
- R3: sc in next, inc in next (18)
- R4: sc in next 2, inc in next (24)
- R5-R9: sc around (24)
- R10: sc in next 2, dec in next (18)
- R11: sc in next, dec in next (12)
- R12: dec around (6)
- Fasten off and leave a long tail for sewing.
Body
- Start with a magic ring.
- R1: 6 sc in ring (6)
- R2: inc around (12)
- R3: sc in next, inc in next (18)
- R4: sc in next 2, inc in next (24)
- R5-R10: sc around (24)
- R11: sc in next 2, dec in next (18)
- R12: sc in next, dec in next (12)
- R13: dec around (6)
- Fasten off and leave a long tail for sewing.
Arms
- Make 2.
- Start with a magic ring.
- R1: 6 sc in ring (6)
- R2: inc around (12)
- R3-R5: sc around (12)
- Fasten off, leaving a long tail for sewing.
Legs
- Make 2.
- Start with a magic ring.
- R1: 6 sc in ring (6)
- R2: inc around (12)
- R3-R7: sc around (12)
- Fasten off, leaving a long tail for sewing.
Ears / Details
- Make 2.
- Ch 4, then turn and sc in 2nd ch from hook and in next 2 ch (3).
- Ch 1 and turn, inc in first and last st (5).
- Ch 1 and turn, sc across (5).
- Fasten off and leave a long tail for sewing.
Accessories
- Optional: Add a small scarf or decorative element around its neck using the main yarn color or an accent color.
Assembly & Finishing
- Stuff the head and body firmly before closing.
- Attach the head to the body using the long tail.
- Sew on the arms and legs securely.
- Attach the ears on top of the head.
- Position the safety eyes and secure them in place.
- Weave in any loose ends for a tidy finish.
Tips for Best Results
- Use a stitch marker to help keep track of your rounds.
- Keep your tension consistent for a neat appearance.
- Experiment with different yarn colors to create fun variations of your owl.
- Be sure to stuff your pieces fully for a well-defined shape.
- Take your time with assembly to ensure all parts are attached securely.
Conclusion
This delightful Little Owl Amigurumi pattern is a wonderful way to explore your crochet skills. Ideal for those just starting their crochet journey, it serves as a perfect project for personal use or gifting. Enjoy crafting your own wise night hooter! Happy crocheting!



