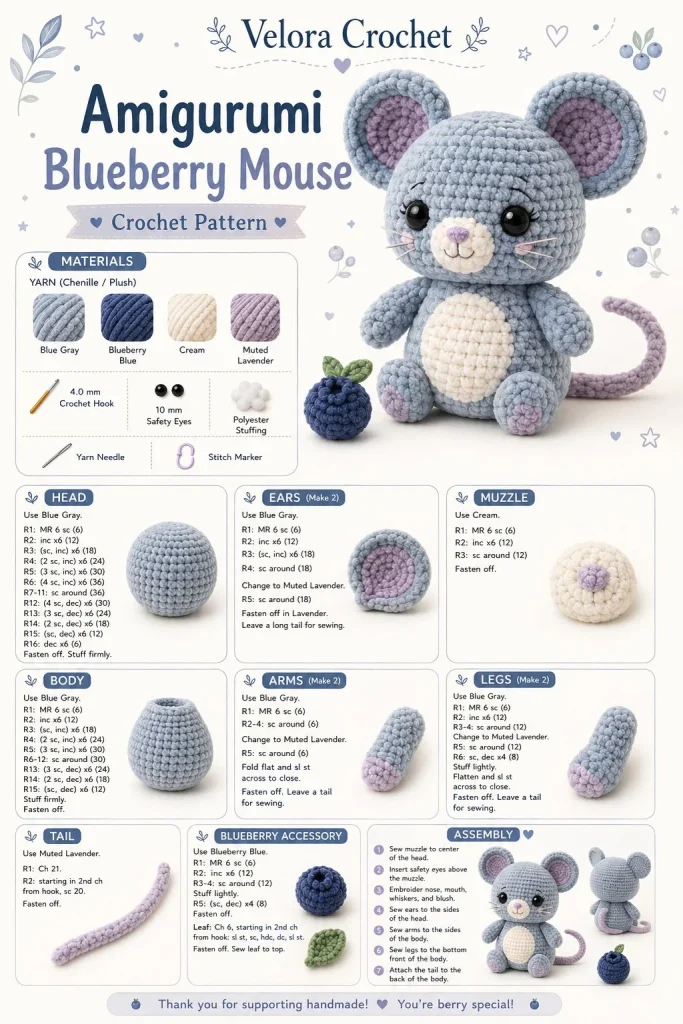
This adorable tiny blueberry mouse amigurumi is a delightful project that’s perfect for all levels of crocheters, especially beginners. Its soft blue-gray tones, rounded features, and charming details make it ideal for gifting or adding to your handmade toy collection. The simple yet sweet design captures the essence of whimsy, making it a wonderful choice for those who enjoy creating cuddly companions. Grab your yarn and hook, and let’s get started!
Materials
- Yarn:
- Soft blue-gray yarn (for body)
- Cream yarn (for muzzle)
- Green yarn (for blueberry leaves, if desired)
- Hook:
- 3.5mm (E) crochet hook recommended
- Stuffing:
- Fiberfill stuffing or cotton
- Scissors
- Yarn needle
- Stitch markers (helpful for marking rounds)
- Optional: Safety eyes or embroidery thread for face details
Abbreviations
- Ch: chain
- Sc: single crochet
- Inc: increase (2 sc in the same stitch)
- Dec: decrease (single crochet two together)
- Rnd: round
Pattern Instructions
Head
- Ch 2.
- Rnd 1: 6 sc in 1st ch (6).
- Rnd 2: Inc in each stitch around (12).
- Rnd 3: (Sc in next st, inc in next st) around (18).
- Rnd 4-6: Sc around (18).
- Rnd 7: (Sc in next st, dec) around (12).
- Stuff the head lightly and continue with the next rounds.
- Rnd 8: Dec around (6).
- Fasten off leaving a long tail for sewing later.
Body
- Ch 2.
- Rnd 1: 6 sc in 1st ch (6).
- Rnd 2: Inc in each stitch around (12).
- Rnd 3: (Sc in next st, inc) around (18).
- Rnd 4-7: Sc around (18).
- Rnd 8: (Sc in next st, dec) around (12).
- Rnd 9: Dec around (6).
- Lightly stuff the body and fasten off with a long tail.
Arms
- Ch 2.
- Rnd 1: 6 sc in 1st ch (6).
- Rnd 2: (Sc in next st, inc) around (9).
- Rnd 3-4: Sc around (9).
- Fasten off and leave a long tail for sewing. Make 2 arms.
Legs
- Ch 2.
- Rnd 1: 6 sc in 1st ch (6).
- Rnd 2: (Sc in next st, inc) around (9).
- Rnd 3: Sc around (9).
- Fasten off and leave a long tail for sewing. Make 2 legs.
Ears / Details
- For each ear, ch 2.
- Rnd 1: 6 sc in 1st ch (6).
- Rnd 2: Inc in each stitch around (12).
- Rnd 3: Sc around (12).
- Fasten off and leave a long tail for sewing. Make 2 ears.
Accessories (if any)
- To create a small blueberry, ch 2 and follow the method similar to the head.
- Alternatively, you can use a blue yarn bow to embellish the mouse.
Assembly & Finishing
- Sew the head onto the body.
- Position and attach the arms and legs, ensuring they are evenly spaced.
- Attach the ears at the top of the head; I suggest slightly overlapping them for a cuter look.
- For the muzzle, use the cream yarn and sew into place on the front of the face.
- Embroider or attach safety eyes, if using, then stitch or embroider the nose and mouth onto the muzzle.
- Lastly, add the blueberry accessory or bow to complete the look.
{image_template}
Tips for Best Results
- Maintain consistent tension throughout to ensure your stitches are even. I’ve found this makes a difference in appearance, especially in round shapes.
- When stuffing, do it gradually. This will give your mouse a nice firm shape without being overstuffed.
- Use stitch markers to keep track of your rounds, particularly in the head and body; it helps to prevent confusion down the road.
- For shaping the ears, you can lightly block them after finishing to help them hold their shape better.
- Take your time with the face embroidery. It might seem intimidating at first, but it truly brings your amigurumi to life!
Conclusion
With its charming design and sweet features, this tiny blueberry mouse amigurumi is sure to become a favorite among kids and adults alike. Whether you’re looking for a delightful gift or a new addition to your handmade toy collection, this project is perfect for any crochet enthusiast. So grab your yarn and get started on this adorable mini crochet adventure! Happy crocheting!



