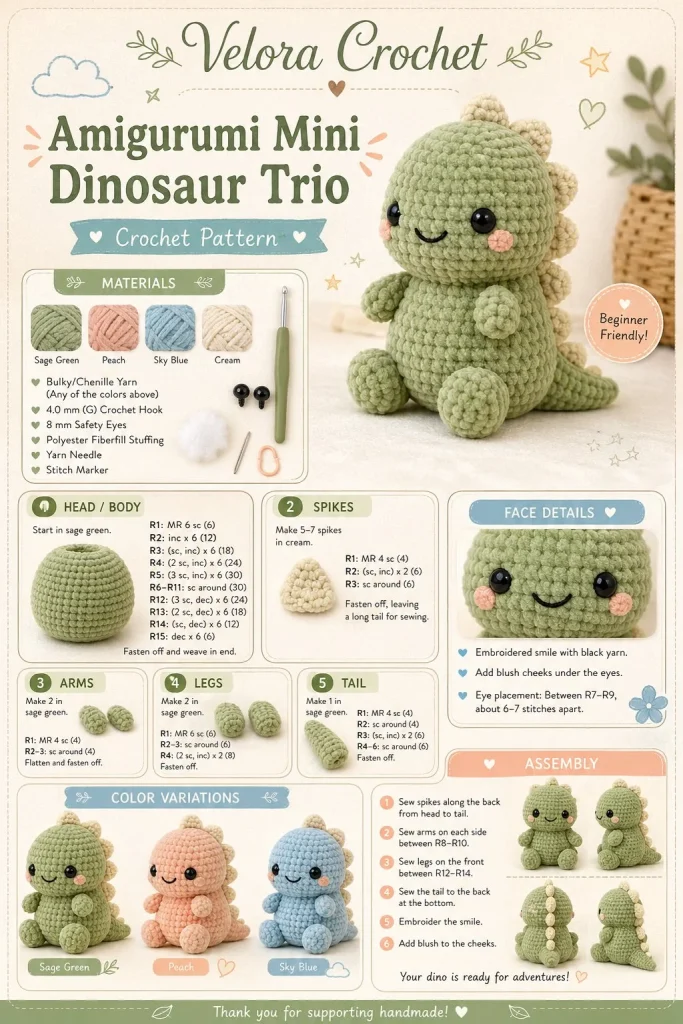
Creating a charming baby dinosaur amigurumi is an exciting project that brings joy to both the maker and the recipient. This cute, chunky design is perfect for beginners and offers the flexibility to create delightful variations in color. Whether you’re crafting for a baby shower or looking for a sweet handmade toy to brighten up your home, this crochet pattern will guide you through every simple step with ease.
Materials
- Worsted weight yarn in your choice of colors (suggestions: sage green, peach, sky blue)
- 3.5 mm (E) crochet hook
- Safety eyes (12 mm) or black embroidery thread
- Polyester fiberfill for stuffing
- Yarn needle for weaving in ends
- Stitch markers (optional)
Abbreviations
- ch = chain
- sc = single crochet
- inc = increase (2 sc in same stitch)
- dec = decrease (sc two stitches together)
- st = stitch
- rnd = round
Pattern Instructions
Head
- Start with a magic ring and make 6 sc into the ring. (6)
- Rnd 2: Inc in each st around. (12)
- Rnd 3: Sc in next st, inc in next st; repeat around. (18)
- Rnd 4-5: Sc in each st around. (18)
- Rnd 6: Sc in next st, dec; repeat around. (12)
- Stuff the head lightly. Rnd 7: Dec around to close. (6) Fasten off, leaving a long tail for sewing.
Body
- Start with a magic ring and make 6 sc into the ring. (6)
- Rnd 2: Inc in each st around. (12)
- Rnd 3: Sc in next st, inc in next st; repeat around. (18)
- Rnd 4-7: Sc in each st around. (18)
- Rnd 8: Sc in next st, dec; repeat around. (12)
- Stuff the body firmly. Rnd 9: Dec around to close. (6) Fasten off, leaving a long tail for sewing.
Arms
- Start with a magic ring and make 5 sc into the ring. (5)
- Rnd 2: Inc in each st around. (10)
- Rnd 3: Sc in each st around. (10)
- Rnd 4: Dec around. (5) Fasten off, leaving a long tail for sewing. Make two arms.
Legs
- Start with a magic ring and make 6 sc into the ring. (6)
- Rnd 2: Inc in each st around. (12)
- Rnd 3-4: Sc in each st around. (12)
- Rnd 5: Dec around. (6) Fasten off, leaving a long tail for sewing. Make two legs.
Ears / Details
- For each ear, ch 4, then sc in 2nd ch from hook, hdc in next ch, sl st in last ch. Fasten off, leaving a long tail for sewing. Make two ears.
Spikes
- Ch 4. Sc in 2nd ch from hook, hdc in next ch, dc in last ch. This spike will create a cute row down the back.
- Make 5 or 6 spikes, depending on your desired look.
Belly Patch
- With a contrasting color, ch 6. Sc in 2nd ch from hook and in each remaining ch. Fasten off, leaving a long tail for sewing.
Assembly & Finishing
- Sew the head onto the body, ensuring it’s centered.
- Attach the arms on either side of the body, about midway.
- Position the legs at the bottom, slightly apart.
- Sew on the ears atop the head, bending them slightly for a cute look.
- Add the belly patch to the front of the body with a secure stitch.
- Embroider the eyes or attach safety eyes, depending on your preference. For a cute face, add a smile with black embroidery thread.
- Sew the spikes along the back, securing them evenly spaced as you go.
{image_template}
Tips for Best Results
- Keep your tension consistent to ensure an even look; if your stitches feel tight, consider using a larger hook for comfort.
- Use small amounts of stuffing for the limbs and head, adding more as needed to achieve the desired shape without overstuffing.
- A stitch marker can help keep track of your rounds, especially when working in the round.
- When attaching individual parts, take your time; it makes a world of difference in the overall finish.
- Don’t be afraid to personalize your dinosaur with different colors or patterns—each one will have its own unique charm!
Conclusion
Creating your own mini crochet dinosaur is not only a fun project, but it’s also a perfect gift for little ones or a whimsical addition to your home. With just a few supplies and some simple stitches, you can bring a delightful creature to life! Think about making variations in color for gifts or market sales. Enjoy your crocheting journey, and happy hooking!



