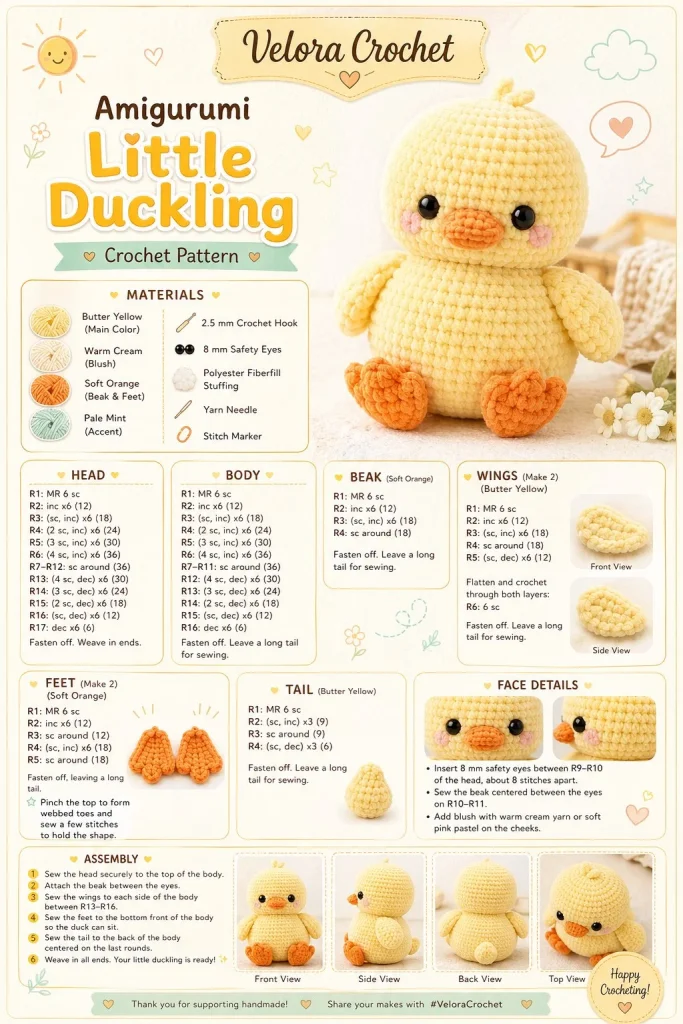
There’s something incredibly charming about crocheting a little yellow duckling amigurumi. This adorable handmade toy is perfect for beginners and seasoned crocheters alike. Whether you’re preparing for a delightful baby shower gift, brightening up your Easter celebrations, or just diving into a small yarn project, this mini crochet pattern will guide you through creating a soft and spring-ready duck that’s sure to warm hearts.
Materials
- Yarn: Yellow worsted weight yarn (approximately 50g)
- Yarn: Orange worsted weight yarn (for beak and feet)
- Yarn: Black yarn (for safety eyes or embroidery)
- Hook: 4.0 mm (G) crochet hook
- Stuffing: Polyester fiberfill
- Stitch markers (optional, but helpful)
- Tapestry needle (for weaving ends)
Abbreviations
- ch = chain
- sc = single crochet
- inc = increase (2 sc in the same stitch)
- dec = decrease (sc two together)
- sl st = slip stitch
- st = stitch
- rnd = round
Pattern Instructions
Head
- With yellow yarn, make a magic ring.
- Round 1: 6 sc in magic ring (6).
- Round 2: Inc in each st around (12).
- Round 3: sc in next st, inc around (18).
- Round 4-6: sc in each st around (18).
- Finish off, leaving a long tail for sewing.
Body
- Begin with a magic ring using yellow yarn.
- Round 1: 6 sc in magic ring (6).
- Round 2: Inc in each st around (12).
- Round 3: sc in next st, inc around (18).
- Round 4: sc in next 2 st, inc around (24).
- Round 5-7: sc in each st around (24).
- Round 8: sc in next 2 st, dec around (18).
- Round 9: sc in next st, dec around (12).
- Stuff the body well and continue.
- Round 10: Dec around (6).
- Finish off. Leave a long tail for assembly.
Arms
- Using yellow yarn, start with a magic ring.
- Round 1: 6 sc in magic ring (6).
- Round 2: sc in each st around (6).
- Finish off, leaving a long tail for sewing.
Legs
- Using orange yarn, work a magic ring.
- Round 1: 6 sc in magic ring (6).
- Round 2: sc in next st, inc around (9).
- Round 3: sc in each st around (9).
- Finish off and leave a long tail.
Tail
- Using yellow yarn, make a magic ring.
- Round 1: 6 sc in magic ring (6).
- Round 2: inc in each st around (12).
- Round 3: sc in next st, inc around (18).
- Finish off and leave a long tail for sewing.
Face Details
- Attach small black safety eyes about five stitches apart on the head, or embroider eyes if you prefer a softer look.
- For the beak, use a small amount of orange yarn, making a simple triangle and attaching it right below the eyes.
Assembly & Finishing
- Sew the head securely onto the body, aligning it with the center.
- Attach the arms on either side of the body. Position them low to create a cute look.
- Sew the legs to the bottom of the body, ensuring they are spaced evenly for stability.
- Attach the tail at the back of the body.
- Weave in any loose ends to keep your duckling looking tidy.
{image_template}
Tips for Best Results
- Take care with your tension! Keeping your stitches even will help your duckling’s shape stay consistent.
- Fill the body and head with stuffing until they feel firm, but not overly stuffed; this helps maintain a soft appearance.
- Use stitch markers to keep track of your rounds, especially when working on the body and head—trust me, it makes everything much easier.
- If your stitches feel tight, try going up a hook size just for that section to allow for better shaping.
- Don’t be shy about playing with colors! A little pink for the beak or feet can add a lovely touch.
Conclusion
I hope you enjoy making your little yellow duckling amigurumi as much as I did! It’s a wonderful project to hone your beginner crochet skills, and it makes for a delightful gift or decoration. Consider creating a few variations, whether with different colors or sizes. This duckling will surely become a delightful addition to your crochet collection or possibly a highlight in a handmade toy market. Happy crocheting!



