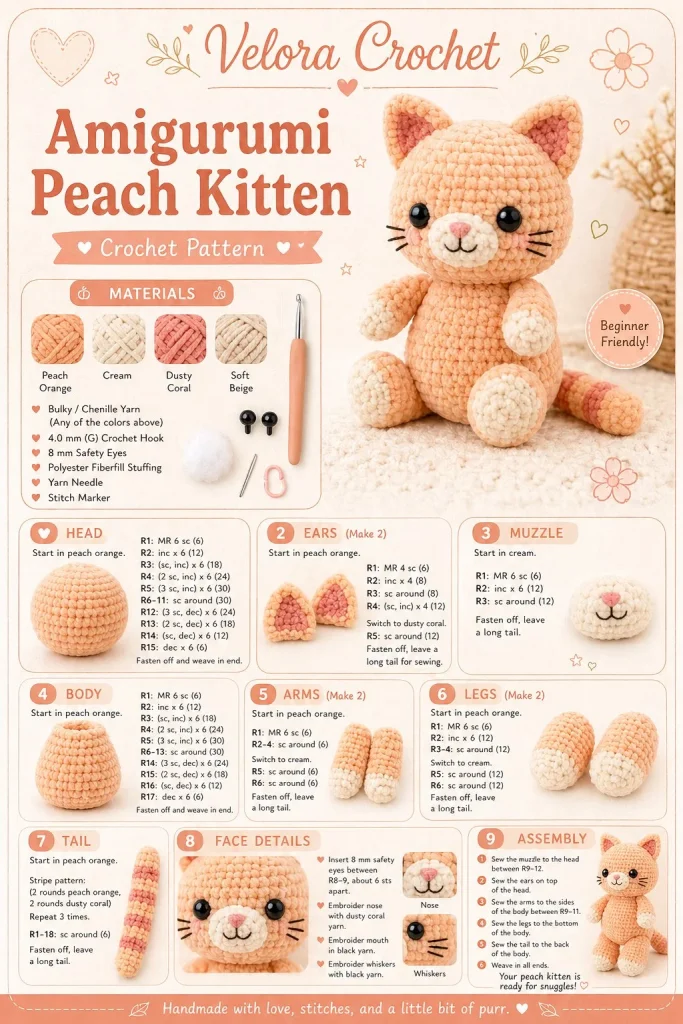
Creating a cute crochet kitten can be such a delightful project, especially this adorable peach-colored amigurumi version! Whether you’re a beginner just getting the hang of your stitches or an experienced crocheter looking for a quick handmade toy gift, this pattern strikes the perfect balance of simplicity and expressiveness. Plus, it makes for a wonderful keepsake or gift for any cat lover in your life.
Materials
- Yarn:
- Peach acrylic yarn (medium weight)
- Cream acrylic yarn (for the muzzle)
- Light brown acrylic yarn (for accents)
- Hook: 3.5 mm (US E/4) crochet hook
- Stuffing: Polyester fiberfill
- Tapestry needle: For sewing and embroidery
- Safety eyes: Optional, in dark color (or you can embroider eyes)
- Stitch markers: Helpful for tracking rounds
- Embroidery floss: For the whiskers and facial features
Abbreviations
- ch: chain
- sc: single crochet
- inc: increase
- dec: decrease
- st: stitch
- rnd: round
Pattern Instructions
Head
- With peach yarn, start magic ring to create a tight center.
- Rnd 1: 6 sc in magic ring (6 sts).
- Rnd 2: inc in each st around (12 sts).
- Rnd 3: (sc in next st, inc in next st) 6 times (18 sts).
- Rnd 4-8: sc in each st around (18 sts each round).
- Rnd 9: (sc in next st, dec) 6 times (12 sts).
- Stuff the head firmly before closing it off.
- Rnd 10: dec around (6 sts). Fasten off, leaving long tail for assembly.
Body
- With peach yarn, start magic ring.
- Rnd 1: 6 sc in magic ring (6 sts).
- Rnd 2: inc in each st around (12 sts).
- Rnd 3: (sc in next st, inc in next st) 6 times (18 sts).
- Rnd 4-10: sc in each st around (18 sts each round).
- Rnd 11: (sc in next st, dec) 6 times (12 sts).
- Fasten off and leave a long tail for assembly.
Arms
- Make 2:
- With peach yarn, ch 5.
- Row 1: sc in 2nd ch from hook and in next 3 ch (4 sts).
- Row 2: ch 1, turn, sc in each st (4 sts).
- Row 3: ch 1, turn, dec, sc in next 2 sts (3 sts).
- Row 4: ch 1, turn, dec twice (1 st).
- Fasten off, leaving a long tail for sewing.
Legs
- Make 2:
- With peach yarn, repeat the arm instructions but ch only 4 to start.
- They will be slightly shorter than the arms.
Ears / Details
- Make 2:
- With peach yarn, ch 4.
- Row 1: sc in 2nd ch from hook and in next 2 ch (3 sts).
- Row 2: ch 1, turn, inc twice (5 sts).
- Row 3: ch 1, turn, dec, sc in next 3 sts (4 sts).
- Row 4: ch 1, turn, dec (2 sts).
- Fasten off leaving a long tail for sewing.
Accessories (if any)
- Optional: Use light brown yarn for small stripes to add to the tail or on the legs for extra character.
Assembly & Finishing
- Sew the head onto the body securely.
- Position and attach the ears on top of the head.
- Attach the arms on either side of the body, and sew the legs at the bottom.
- Embroider a cream muzzle in the center of the face, then stitch on tiny whiskers with embroidery floss.
- For the eyes, you can use safety eyes or embroider them with black yarn.
- Optionally, add stripes along the tail for a fun touch.
{image_template}
Tips for Best Results
- Ensure your tension is consistent throughout the project to maintain an even look; loose stitches can lead to gaps.
- When stuffing your pieces, start lightly and add more gradually—this prevents overstuffing and allows for better shaping.
- Use stitch markers at the beginning of each round to help keep your place, especially as the pieces grow.
- If your stitches feel tightly pulled, consider using a larger hook as you progress.
- Don’t hesitate to adjust the size of the limbs for a more personalized look; these mini crochet components can be fun to experiment with!
Conclusion
With this crochet pattern for a peach-colored kitten amigurumi, you’ll have a charming little companion to enjoy or gift. It’s a fantastic project to sharpen your beginner crochet skills, and the small size means you can whip it up in an afternoon. Whether you’re making these for gifts or craft markets, the cute proportions and easy design elements ensure that this piece will delight anyone who receives it. Happy crocheting!



