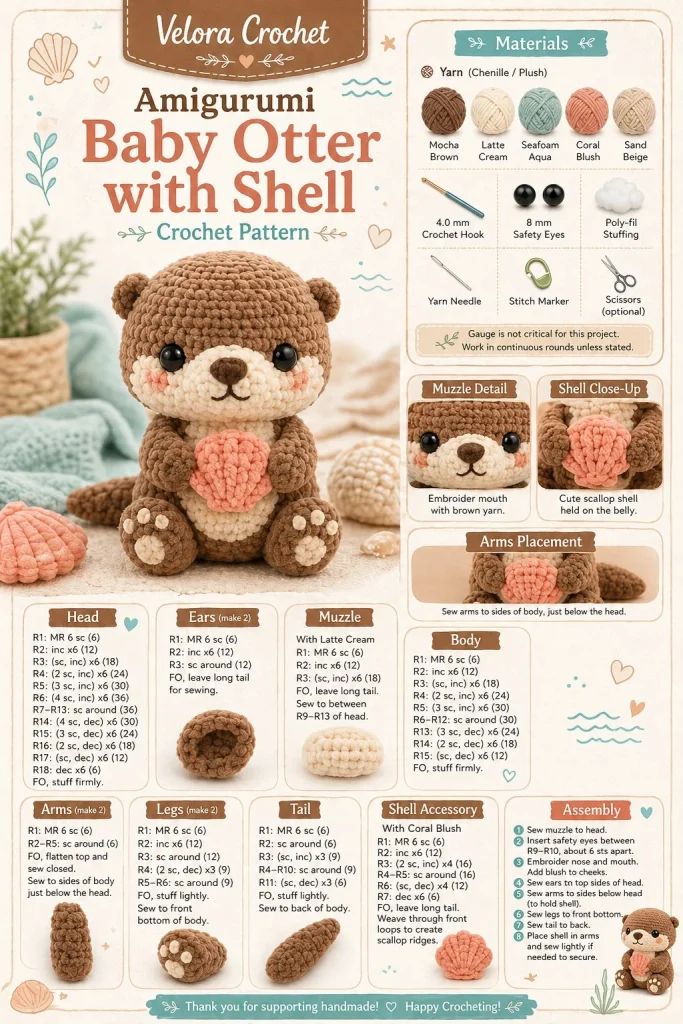
Starting your crochet journey with this adorable Velora Crochet pattern for a baby otter amigurumi is a delight, whether you’re a beginner crocheter or a seasoned pro looking for a charming project. This little otter, cradling a tiny crochet shell, makes the perfect handmade toy or gift for babies and kids alike—and it’s a wonderful opportunity to practice your amigurumi skills!
Materials
- Yarn:
- Medium-weight yarn (worsted) in warm brown for the body
- Lightweight yarn or cotton in cream for the face and belly
- Crochet Hook: Size G/4.0mm (adjust if preferred tension is needed)
- Stuffing: Polyester fiberfill or alternative stuffing of your choice
- Stitch Markers: Useful for tracking rounds
- Yarn Needle: For weaving in ends and attaching pieces
- Scissors: For trimming yarn
- Safety Eyes or Embroidery Thread: For eye details
Abbreviations
- ch: chain
- sc: single crochet
- inc: increase (2 sc in the same stitch)
- dec: decrease (sc two stitches together)
- st: stitch
- Rnd: round
Pattern Instructions
Head
- With warm brown yarn, ch 2.
- Rnd 1: 6 sc in the second ch from the hook (6).
- Rnd 2: inc in each st around (12).
- Rnd 3: *sc in next st, inc; repeat from * around (18).
- Rnd 4-7: sc in each st around (18).
- Rnd 8: *sc in next st, dec; repeat from * around (12).
- Rnd 9: dec around (6).
- Stuff lightly and fasten off, leaving a long tail for sewing.
Body
- With warm brown yarn, ch 2.
- Rnd 1: 6 sc in the second ch from the hook (6).
- Rnd 2: inc in each st around (12).
- Rnd 3: *sc in next st, inc; repeat from * around (18).
- Rnd 4-10: sc in each st around (18).
- Rnd 11: *sc in next st, dec; repeat from * around (12).
- Rnd 12: dec around (6).
- Stuff firmly and stitch to the head.
Arms
- With warm brown yarn, ch 2.
- Rnd 1: 6 sc in the second ch from the hook (6).
- Rnd 2: sc in each st around (6).
- Rnd 3: (Optional: for better shaping, work in hdc for a slightly larger arm)
- Rnd 4: Fasten off, leaving long tail for sewing.
- Make 2 arms and attach them near the body.
Legs
- With warm brown yarn, ch 2.
- Rnd 1: 6 sc in the second ch from the hook (6).
- Rnd 2: sc in each st around (6).
- Rnd 3: Fasten off, leaving long tail for sewing.
- Make 2 legs and attach to the bottom of the body.
Ears / Details
- With warm brown yarn, ch 2.
- Rnd 1: 4 sc in the second ch from the hook (4).
- Rnd 2: inc in each st around (8).
- Fasten off leaving a long tail for attaching.
- Make 2 ears and sew onto the head.
Accessories
- For the Shell:
- With cream yarn, ch 2.
- Rnd 1: 5 sc in the second ch from the hook (5).
- Rnd 2: *sc in next st, inc; repeat from * around (8).
- Fasten off, leaving a long tail for attachment.
- This shell is a simple and cute storytelling detail for our otter, rather than a complex design.
Assembly & Finishing
- Using the remaining yarn tails, sew on the head to the body securely.
- Position arms on the sides, near the belly, and sew into place.
- Attach the ears to the top of the head.
- For the face, embroider the muzzle, and add safety eyes or stitches for eyes.
- Sew the shell accessory into the left paw, so it looks like our otter is gently holding it.
{image_template}
Tips for Best Results
- Maintain consistent tension throughout to ensure even stitching; if your stitches feel tight, consider using a larger hook.
- When stuffing, use small amounts gradually to avoid lumps and ensure a soft, cuddly texture.
- Utilize stitch markers to keep track of your rounds, especially when working in continuous rounds.
- For shaping the arms and legs, gently bend them into place after securing them.
- Don’t hesitate to redesign the shell’s shape or color—this can be a fun twist to personalize your otter!
Conclusion
Making this baby otter amigurumi can be an enjoyable and relaxing experience, whether you’re gifting it or keeping it for yourself. Customize your otter in different colors or with varying sizes to create a few friends! This little project is perfect for markets or as unique baby gifts. Happy crocheting!



