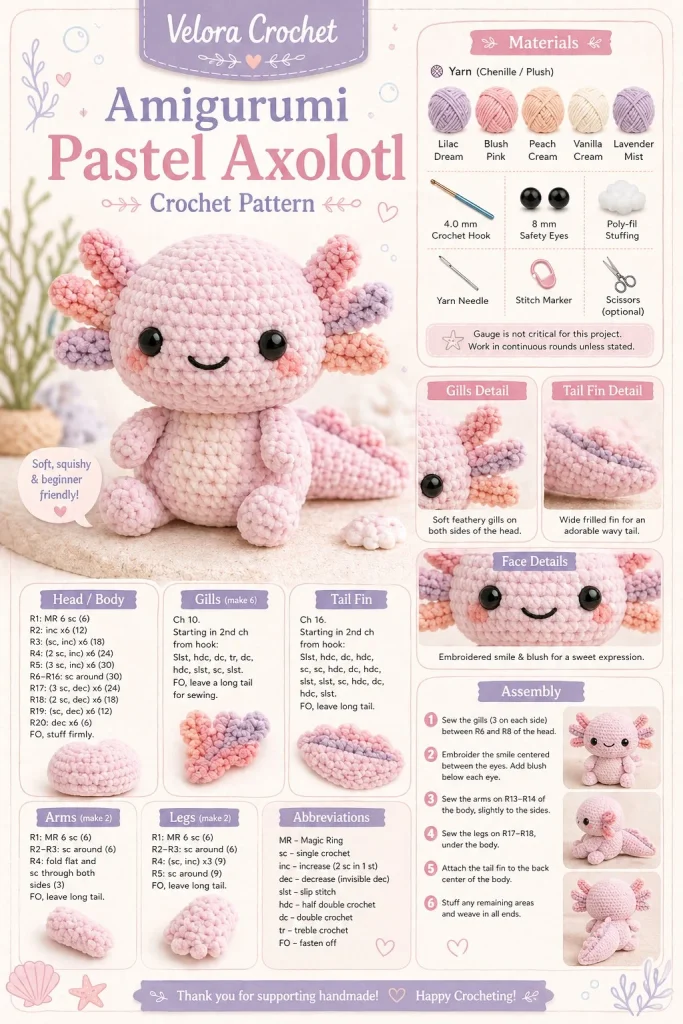
Crocheting a pastel axolotl amigurumi is such a delightful project, perfect for crafters of all skill levels. There’s something truly charming about creating this Kawaii-inspired creature with its rounded body and sweet expression. This pattern is a lovely way to dive into a DIY crochet project that can be gifted or simply enjoyed in your own space. Let’s get started on bringing this adorable axolotl to life!
Materials
- 3.5mm crochet hook (U.S. E/4)
- Worsted weight yarn in pink for the body
- Worsted weight yarn in a darker pink for the gills
- Black embroidery thread for the eyes
- Light pink or blush yarn for cheek blush
- Fiberfill stuffing (for ample plushiness)
- Yarn needle (for weaving in ends)
- Scissors
- Stitch markers (recommended for easier counting)
Abbreviations
- ch: chain
- sc: single crochet
- inc: increase (2 sc in the same stitch)
- dec: decrease (sc two stitches together)
- st: stitch
- sl st: slip stitch
- rnd: round
Pattern Instructions
Head
- Start with 6 sc in a magic ring. (6)
- Inc in each st around. (12)
- Sc in next st, inc in next st repeat around. (18)
- Sc in next 2 sts, inc in next st repeat around. (24)
- Work even in sc for 4 rounds.
- Sc in next 2 sts, dec over next 2 sts repeat around. (18)
- Sc in next st, dec repeat around. (12)
- Stuff the head firmly; continue decreasing.
- Dec around until closed (6). Finish off.
Body
- Attach yarn to the head.
- Ch 1, sc in each st around. (6)
- Sc in next st, inc around. (9)
- Sc in next 2 sts, inc around. (12)
- Sc in next 3 sts, inc around. (15)
- Work even for 5 rounds.
- Sc in next 3 sts, dec around. (12)
- Sc in next 2 sts, dec around. (9)
- Stuff the body, then dec until closed. Finish off.
Arms
- Make 2.
- Ch 5, sc in 2nd ch from hook, sc in next 3. (4)
- Work even in sc for 4 rounds.
- Leave a long tail for sewing.
Legs
- Make 2.
- Ch 5, sc in 2nd ch from hook, sc in next 3. (4)
- Work even in sc for 3 rounds.
- Leave a long tail for sewing.
Ears / Details
- Make 2 gills using darker pink yarn.
- Ch 4, sc in 2nd ch from hook and in next 2. (3)
- Working into the same chain, make 3 sc. This forms a fan shape.
- Repeat for the second gill.
Accessories (if any)
- Add a tiny bow or any additional embellishments, if desired.
Assembly & Finishing
- Sew the arms and legs to the body.
- Attach the gills on either side of the head.
- Embroider a small smile and eyes using black thread.
- Using the light pink yarn, add blush on either side of the face to give it that Kawaii touch.
- Weave in all ends, ensuring a tidy finish.
{image_template}
Tips for Best Results
- Aim for a consistent tension throughout the project; this will ensure your axolotl remains plush and rounded.
- When stuffing the arms and legs, go light to keep them soft and flexible but firm enough to hold their shape.
- I always use stitch markers to help keep track of my rounds — it can make counting a breeze!
- If your stitches feel tight, consider going up a hook size to keep your amigurumi nice and squishy.
- Try customizing the colors or added details for different personalities!
Conclusion
Congratulations on creating your very own axolotl amigurumi! This pattern is not only a fantastic beginner crochet project but also a charming handmade toy for any occasion. Imagine gifting it to a friend or displaying it in your home. Don’t hesitate to experiment with colors or sizes; the possibilities are endless. Happy crocheting!



