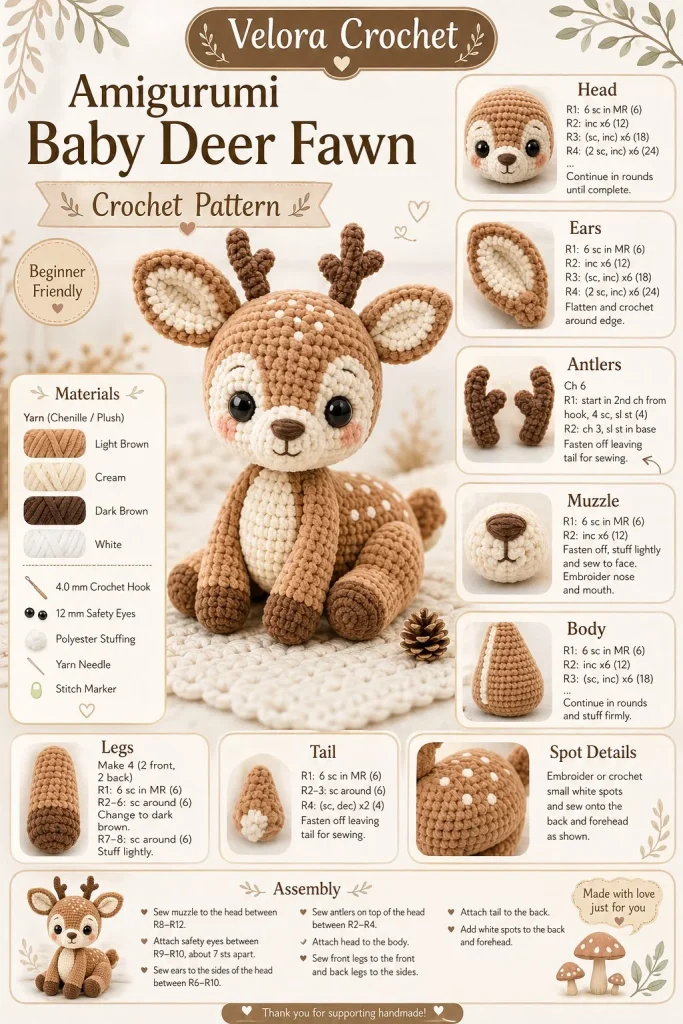
There’s something enchanting about creating a little fawn amigurumi, especially with its gentle features and woodland charm. Whether you’re a beginner crochet enthusiast or someone looking to craft a sweet gift for a loved one, this baby deer fawn project is a delightful choice. With its soft beige body, cream accents, and playful spots, it’s a fun little DIY crochet project that will surely brighten anyone’s day.
Materials
- Soft beige yarn (Body)
- Cream yarn (Belly, Muzzle)
- Dark brown yarn (Antlers, Ears)
- White yarn (Spots)
- Safety eyes (8mm)
- Polyester fiberfill stuffing
- Crochet hook (4.0mm / G)
- Tapestry needle
- Stitch marker (optional)
Abbreviations
- Chain (ch)
- Single crochet (sc)
- Slip stitch (sl st)
- Increase (inc)
- Decrease (dec)
Pattern Instructions
Head
- Begin with the soft beige yarn.
- Make a magic ring and crochet 6 sc into the ring. (6)
- Inc in each stitch around. (12)
- Sc in the next stitch, inc. Repeat around. (18)
- Sc in the next 2 stitches, inc. Repeat. (24)
- Work in sc for 6 rounds.
- Add safety eyes at this stage, ensuring they’re placed evenly.
- Sc in the next 2 stitches, dec. Repeat until 12 stitches remain.
- Dec around until closed.
Body
- Switch to soft beige.
- Make a magic ring and crochet 6 sc into the ring. (6)
- Inc in each stitch around. (12)
- Work in sc for 4 rounds.
- Sc in the next 3 stitches, inc. Repeat. (15)
- Sc in each stitch for 3 rounds, then start decreasing.
- Sc in next 3, dec. Repeat until you have 9 stitches.
- Stuff with fiberfill.
Arms
- Using beige yarn, make a magic ring; crochet 6 sc into the ring. (6)
- Inc in each stitch around. (12)
- Sc in each stitch for 4 rounds.
- Fasten off and leave a long tail for sewing.
Legs
- With beige yarn, create a ring of 6 sc. (6)
- Inc in each stitch for 12 stitches.
- Sc for 3 rounds.
- Dec around until 6 stitches remain, fasten off with a long tail.
Ears / Details
- For each ear, using dark brown yarn, ch 6.
- Sc in the 2nd ch from the hook, then sc across (5).
- Ch 1 and turn, and sc across once more. Fasten off.
- Position the ears on the head as desired, sewing securely.
Accessories (if any)
- Antlers: Using dark brown, ch 6 and sc back; repeat to form a forked shape.
- You can also add a small heart or a bow using leftover yarn.
Assembly & Finishing
- Attach the head to the body using the long tail from the head.
- Position and sew on the arms and legs securely.
- Place the ears and antlers carefully, securing firmly.
- Embroider the face with a soft brown or black to add character.
{image_template}
Tips for Best Results
- Maintain consistent tension throughout to ensure each piece fits well together; too tight can distort shapes, and too loose can create gaps.
- When stuffing your fawn, do so gradually; this helps achieve a nice rounded form without overstuffing.
- Use stitch markers to keep track of rounds, especially in the body. It’s a small step that can save time and confusion later on.
- If you ever feel your stitches look uneven, try working a row of sc to smooth it out before continuing.
- Remember to periodically step back and look at your fawn; you might spot areas that need adjusting before finishing.
Conclusion
Creating your own baby deer fawn amigurumi is an enjoyable and fulfilling project. Whether you’re crafting it as a cozy piece for a nursery, a cherished handmade toy for a child, or as a market item, each little stitch brings joy. I encourage you to personalize your fawn with different colors or accessories to make it truly your own. Happy crocheting!




Precioso