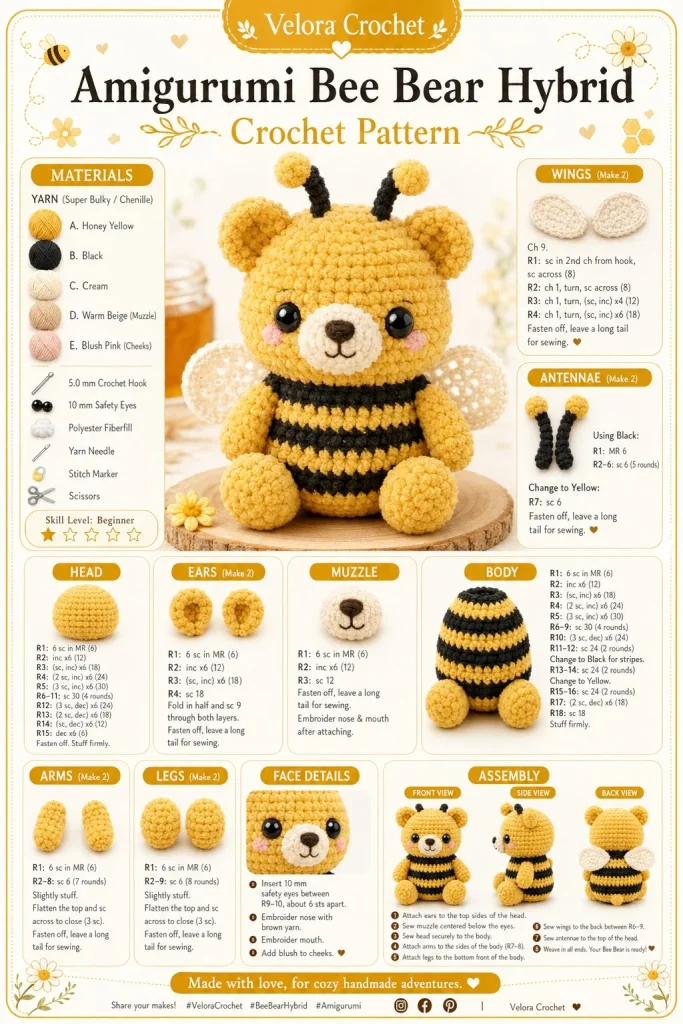
Crocheting a delightful teddy bear dressed as a buzzing bee is an absolute joy! This amigurumi pattern brings a unique Velora-style twist to the beloved crochet bee trend. Perfect for gifting, adding charm to your own collection, or even selling at craft markets, this cuddly character promises to warm hearts and make everyone smile. Whether you’re a seasoned crocheter or just dipping your toes into the world of beginner crochet, this project will surely enrich your skills and creativity.
Materials
- Worsted weight yarn in honey-yellow, black, cream, and white (choose good quality for a soft finish)
- 3.5 mm (E) crochet hook
- Safety eyes (10-12mm)
- Scissors
- Stitch marker (helps keep track of your rounds)
- Fiberfill stuffing (for that perfect bear hug)
- Yarn needle (for weaving in ends)
Abbreviations
- CH: chain
- SC: single crochet
- INC: increase (2 SC in the same stitch)
- DEC: decrease (single crochet two stitches together)
- RND: round
Pattern Instructions
Head
- Begin with honey-yellow yarn.
- Make a magic ring and work 6 SC into it (6).
- INC in each stitch around (12).
- SC in the next stitch, INC in the next; repeat around (18).
- SC in the next 2 stitches, INC in the next; repeat around (24).
- Continue working until the head measures about 4 inches from the base.
- Add safety eyes and a bit of stuffing before closing.
Body
- Change to honey-yellow yarn.
- Make a magic ring and work 6 SC into it (6).
- INC in each stitch around (12).
- SC in the next stitch, INC in the next; repeat around (18).
- Work even for 12 rounds or until it reaches the desired length.
- Leave a long tail for assembly.
Arms
- Start with honey-yellow yarn.
- Work 6 SC in a magic ring (6).
- INC in each stitch around (12).
- Work even for 5 rounds.
- Fasten off, leaving a long tail for sewing.
Legs
- Using honey-yellow yarn, work 6 SC in a magic ring (6).
- INC in each stitch around (12).
- SC in the next stitch, INC in the next; repeat around (18).
- Work even for 8 rounds before closing.
- Leave a long tail for sewing.
Ears / Details
- With honey-yellow yarn, make a magic ring and work 6 SC in it (6).
- INC in each stitch around (12).
- Work 1 round even.
- Fasten off, leaving a long tail for attaching to the head.
Accessories (Wings and Antennae)
Wings
- Using white yarn, chain 5.
- Work 2 SC in the 2nd chain from the hook, SC in next 2, 2 SC in the last chain, working on the opposite side, SC in the next 2, 1 SC in the last chain (total 10).
- Fasten off and leave a tail for attaching.
Antennae
- With black yarn, CH 4.
- Work 1 SC in the 2nd chain from the hook and 1 SC in the next two (3).
- Leave a long tail for sewing.
Assembly & Finishing
- Sew the head onto the body securely.
- Attach arms on either side of the body and legs at the bottom.
- Position the ears at the top of the head and the wings on the back.
- Position the antennae at the top of the head.
- Embroider the cream muzzle onto the face and add any additional details, like blushing cheeks, if desired.
{image_template}
Tips for Best Results
- Keeping your tension consistent throughout helps in achieving a uniform, soft look. If your stitches feel tight, consider using a larger hook for the body.
- For stuffing, try using small amounts at a time to shape your teddy bear properly. Don’t overstuff; you want it to be cuddly!
- Using stitch markers at the beginning of rounds can simplify your counting, especially in the body where rounds can get long.
- As you attach the limbs, don’t hesitate to use the yarn needle for securing connections well. This gives your bear a sturdier feel.
Conclusion
Creating this teddy bear dressed like a bee is not just a fun DIY crochet project; it’s a charming addition to your handmade toy collection that is sure to delight any recipient. Whether you’re thinking of gifting it to a friend, adding it to your market sales, or simply keeping it for yourself, this pattern provides endless opportunities for creativity. Embrace the fun and let your imagination buzz with variations in colors and accessories! Happy crocheting!



