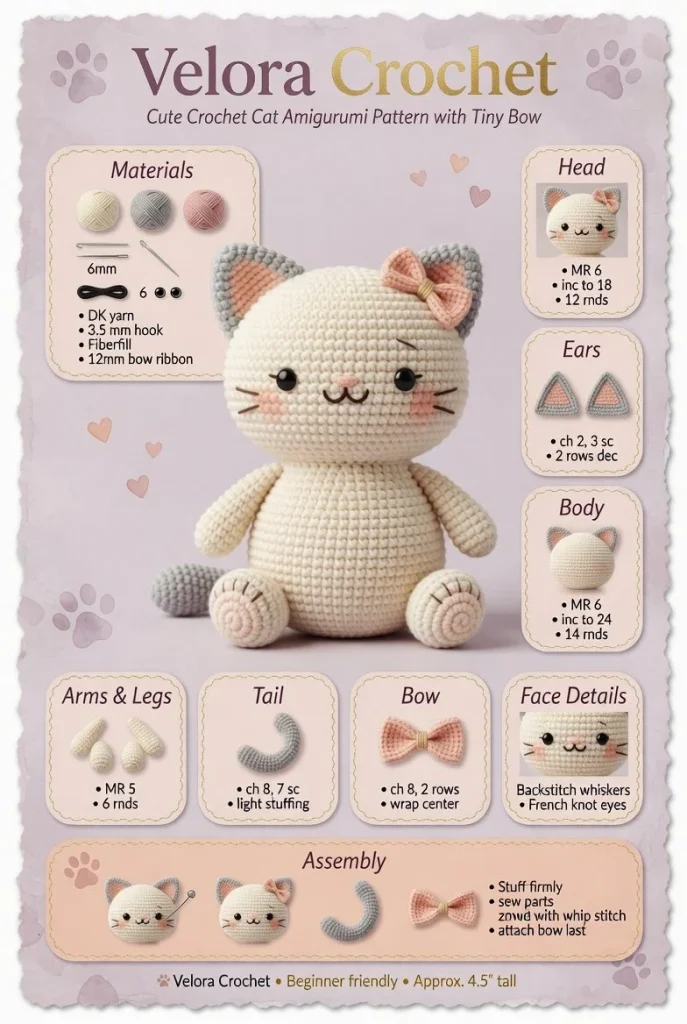
Creating your own cute crochet cat plush with a delightful tiny bow is a rewarding project that brings a touch of handmade charm to any room. Whether you’re looking to add a whimsical decoration to your home or make a heartfelt gift for a cat lover, this adorable design features a rounded head, triangle ears, and sweet sleepy eyes that make it irresistible. Let’s dive into the details of this handmade crochet project.
Materials
- Worsted weight yarn in desired cat colors (main color and contrast for the bow)
- Crochet hook (size G/4.0 mm)
- Fiberfill stuffing
- Yarn needle
- Safety eyes or embroidery thread for eyes
- Scissors
- Stitch marker
Abbreviations
- MR: magic ring
- ch: chain
- sc: single crochet
- inc: increase
- dec: decrease
- sl st: slip stitch
Instructions
Head
- Start with a magic ring, making 6 sc (6).
- Inc in each stitch around (12).
- Sc in next stitch, inc in next; repeat around (18).
- Sc in next 2 stitches, inc in next; repeat around (24).
- Work 6 rows of 24 sc.
- Sc in next 2 stitches, dec; repeat around (18).
- Sc in next stitch, dec; repeat around (12).
- Stuff the head with fiberfill, then dec around (6). Fasten off and sew closed.
Ears (make 2)
- Start with a magic ring, make 4 sc (4).
- Inc in each stitch around (8).
- Sc in next stitch, inc; repeat around (12).
- Working in rows, sc across for 3 rows. Fasten off, leaving a long tail for sewing.
Body
- Start with a magic ring, make 6 sc (6).
- Inc in each stitch around (12).
- Sc in next stitch, inc; repeat around (18).
- Work 6 rows of 18 sc.
- Sc in next stitch, dec; repeat around (12).
- Stuff the body firmly before closing (6). Fasten off.
Arms (make 2)
- Start with a magic ring, make 4 sc (4).
- Work 5 rows of 4 sc, then fasten off, leaving a long tail.
Legs (make 2)
- Start with a magic ring, make 6 sc (6).
- Work 6 rows of 6 sc, then fasten off, leaving a long tail.
Tail
- Start with a magic ring, make 6 sc (6).
- Work 10 rows of 6 sc. Fasten off, leaving a long tail.
Bow
- Using contrast yarn, chain 15.
- In the 2nd ch from the hook, work 1 sc; then 13 sc across (14).
- Fasten off and wrap the center with a small piece of yarn, sewing down to secure.
Face Details
- Stitch or glue safety eyes onto the head.
- Using black embroidery thread, stitch small whiskers on each side of the face.
- Embroider a small smile to complete the facial features.
Assembly and Finishing
- Attach the ears to the top of the head.
- Sew the head to the body, securing it well.
- Attach the arms on either side of the body, followed by the legs at the bottom.
- Sew the tail to the back of the body.
- Finally, secure the bow to the collar or head, wherever you prefer.
Tips for the Best Result
- When stuffing the plush, be cautious not to overstuff; this can cause the seams to stretch and distort the shape.
- Use stitch markers to keep track of your rounds, especially in the body sections.
- If you want to customize your cat, try different colors or patterns for the yarn.
Creating this cheerful crochet cat is not only a fun DIY crochet project but also a lovely way to express your creativity. Whether for yourself or as a gift, this whimsical plush will surely bring a smile to anyone’s face. Enjoy crafting your cute companion, and consider trying variations to create a whole family of adorable cats! If you’re interested in expanding your crochet collection, check out this crochet pattern for an equally charming fox.



