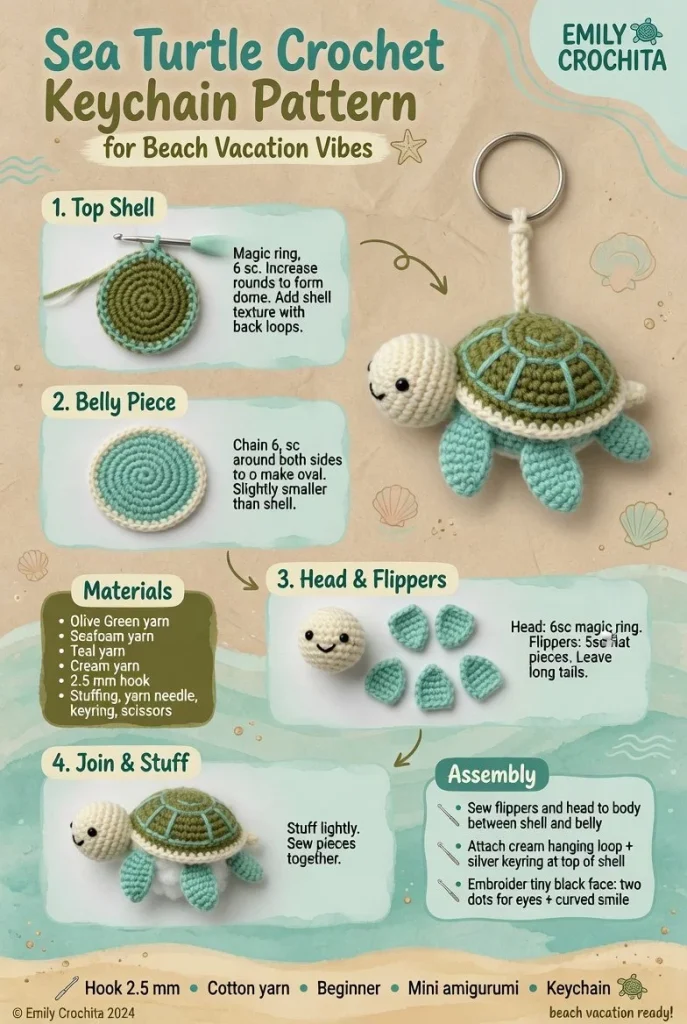
Creating a delightful small sea turtle keychain is a perfect summer project, combining the charm of ocean life with a handy accessory. This lovely little turtle features a rounded shell, four flippers, a tiny head, and embroidered eyes. With a beautiful palette of olive green for the shell, seafoam for the belly, teal for the edging, and cream highlights, this project not only brightens your keychain but also makes a thoughtful handmade gift. Let’s dive into the details of this easy crochet pattern!
Materials
- Olive green yarn for the shell
- Seafoam yarn for the belly
- Teal yarn for the edging
- Cream yarn for the highlights
- 2.5 mm (C) crochet hook
- Stitch marker
- Small amount of stuffing
- Tapestry needle
- Keyring loop
Abbreviations
- MR: magic ring
- ch: chain
- sc: single crochet
- inc: increase
- dec: decrease
- sl st: slip stitch
Shell
- Start with a magic ring.
- Round 1: 6 sc in MR (6).
- Round 2: Inc in each st around (12).
- Round 3: (1 sc, inc) around (18).
- Round 4: (2 sc, inc) around (24).
- Round 5: (3 sc, inc) around (30).
- Rounds 6-8: Sc in each st around (30).
- Round 9: (3 sc, dec) around (24).
- Round 10: (2 sc, dec) around (18).
- Round 11: (1 sc, dec) around (12).
- Fasten off, leaving a long tail for assembly.
This rounded shell is crucial to giving your sea turtle a charming, soft appearance, so take your time here!
Belly Panel
- With seafoam yarn, chain 10.
- Row 1: Sc in the 2nd ch from the hook and across (9).
- Row 2: Ch 1, turn, sc in each st across (9).
- Repeat Row 2 until you have 6 rows.
- Fasten off and leave a long tail for attachment.
The belly panel adds a nice contrast to your turtle’s shell. Make sure to keep your tension even for a neat finish!
Flippers (Make 4)
- With olive green yarn, chain 6.
- Row 1: Sc in the 2nd ch from the hook and across (5).
- Row 2: Ch 1, turn, sc in each st across (5).
- Repeat Row 2 until you have 3 rows.
- Fasten off, leaving a long tail for attachment.
The flippers are small enough to be quick and easy; however, they add a lovely detail to your turtle’s overall look.
Head
- With olive green yarn, create a magic ring.
- Round 1: 6 sc in MR (6).
- Round 2: Inc in each st around (12).
- Round 3: (1 sc, inc) around (18).
- Round 4: (2 sc, inc) around (24).
- Round 5: Sc in each st around (24).
- Round 6: (1 sc, dec) around (18).
- Fasten off, leaving a long tail for attachment.
When making the head, ensure it’s a bit more rounded than flat to help give it depth.
Assembly and Finishing
- Lightly stuff the shell and head.
- Attach the belly panel to the bottom of the shell using the long tail from the belly.
- Position and sew the flippers on either side of the shell.
- Attach the head to the front of the shell, ensuring it aligns with the flippers.
- Embroider tiny eyes on the head using cream yarn.
- Create a loop for the keyring using the long tail left on the shell, securing it well.
This little turtle will make an adorable keychain or bag charm!
Tips for the Best Result
- When stuffing the turtle, use light filling to keep it soft and rounded; overstuffing can distort the shape.
- Use stitch markers to keep track of your rounds, especially as the project begins to grow.
- Take care in sewing pieces together symmetrically for a polished final look.
Making this small sea turtle keychain is a fun and quick DIY crochet project that showcases your crochet skills. You can experiment with different colors or sizes, making them perfect gifts for friends or beach-themed party favors. If you’re interested in more ocean-inspired creations, check out this sea turtle crochet pattern set for additional designs! Whether you’re a beginner or more experienced in crochet, this pattern is sure to bring a smile and a touch of summer to your day. Happy crocheting!



