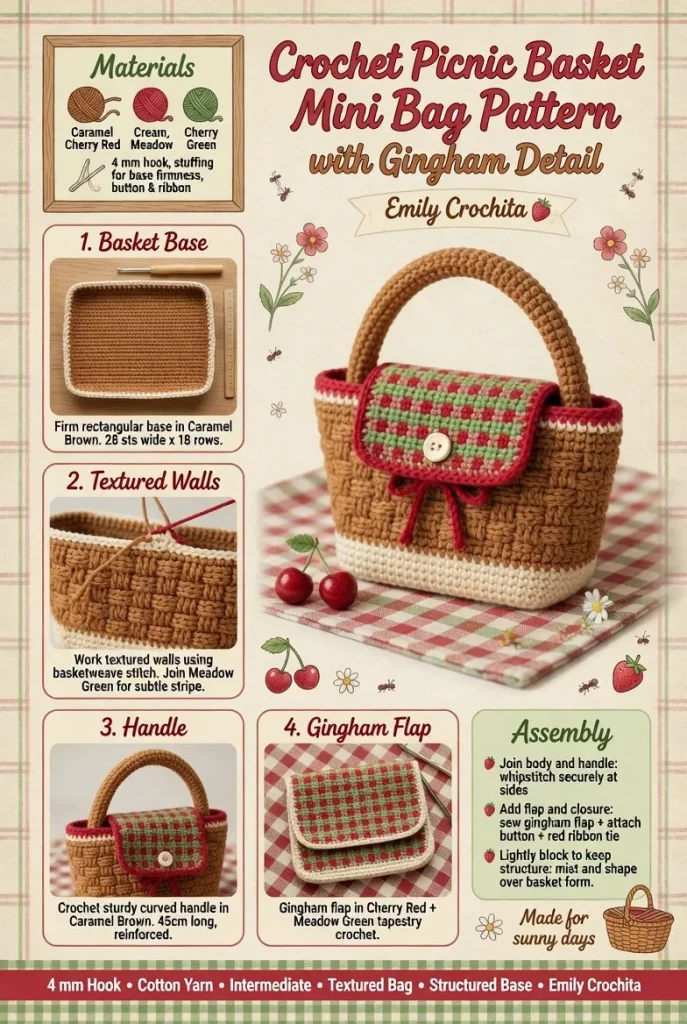
Creating a delightful mini crochet bag that resembles a picnic basket is a charming project that’s sure to elevate your summer outings. Not only is this handmade accessory practical, but it also offers a touch of cottagecore whimsy with its structured base, curved handle, and gingham-inspired details. Get ready to bring your crochet skills to life with the delightful colors of caramel brown, cream, and accents of red gingham, plus tiny green leaves that add the perfect finishing touch.
Materials
- Caramel brown yarn (for the basket texture)
- Cream yarn (for the trim)
- Red gingham yarn (for accents)
- Tiny green yarn (for leaf details)
- Crochet hook (size appropriate for your yarn weight)
- Yarn needle
- Scissors
Abbreviations
- MR: magic ring
- ch: chain
- sc: single crochet
- hdc: half double crochet
- dc: double crochet
- inc: increase
- dec: decrease
- sl st: slip stitch
Base
Start by creating the base, which is fundamental for the structure of your bag.
- Make a MR and ch 1.
- Round 1: 6 sc into the ring. (6)
- Round 2: Inc in each sc around. (12)
- Round 3: *1 sc, inc; repeat from * around. (18)
- Round 4: *2 sc, inc; repeat from * around. (24)
- Round 5: *3 sc, inc; repeat from * around. (30)
- Continue expanding until you achieve the desired size for the base of your bag while keeping the foundation flat.
Bag Body
Now, let’s create the body of the bag.
- From the last round of the base, work in hdc rows.
- Row 1: Ch 2, then hdc into each stitch around. Join with a sl st.
- Row 2: Ch 2, hdc in the first st, repeat around for desired height.
- Be sure to maintain firm tension so that the bag keeps its shape nicely.
Panels
Next, you’ll create the decorative panels which add charm to your bag.
- For each panel, ch according to your desired width.
- Work in rows using the red gingham yarn, alternating hdc and dc to create a textured effect resembling gingham.
- Repeat this process for both the front and back panels, ensuring they match up perfectly.
Handles
The curved handle is a vital component for function and style.
- With caramel brown yarn, ch enough to reach your desired handle length.
- Work in sc, increasing slightly in the middle for a rounded shape.
- Once the handle is the desired length and shape, firmly attach it to the top of the bag body and secure with stitches.
Border
A cream border will beautifully finish off your bag.
- Attach cream yarn to the top of your bag.
- Work a round of sc around the top edge of the bag, ensuring to catch the loose ends of your panels for a neat finish.
Lining
For a polished look and added durability, consider adding a soft lining.
- Cut fabric to fit the inside of your bag.
- Fold down the top edge and sew it to the inside of your bag, ensuring it is unattached from the crochet elements for flexibility.
Assembly and Finishing
Assemble the components of your bag for a clean finish.
- Secure the panels to the body with stitches, ensuring all edges are aligned perfectly.
- Add the tiny green leaves as embellishments around the opening for a sweet touch.
- Weave in all loose ends, and block the bag if necessary to enhance its overall shape.
Tips for the Best Result
- Maintain consistent tension throughout to ensure your bag holds its shape effectively.
- Take a moment to measure your handle’s length against the bag to confirm it’s comfortable to carry.
- Don’t hesitate to play with different colors or variations of gingham patterns to personalize your bag further.
This lovely crochet mini bag serves as the perfect accessory for summer picnics or outings. It’s a great way to showcase your crochet skills while providing a functional yet stylish option for your daily essentials. Consider gifting one to a friend or making a few for special occasions! If you’re eager for more bag inspiration, check out this cream mini crochet handbag pattern!



