Introduction
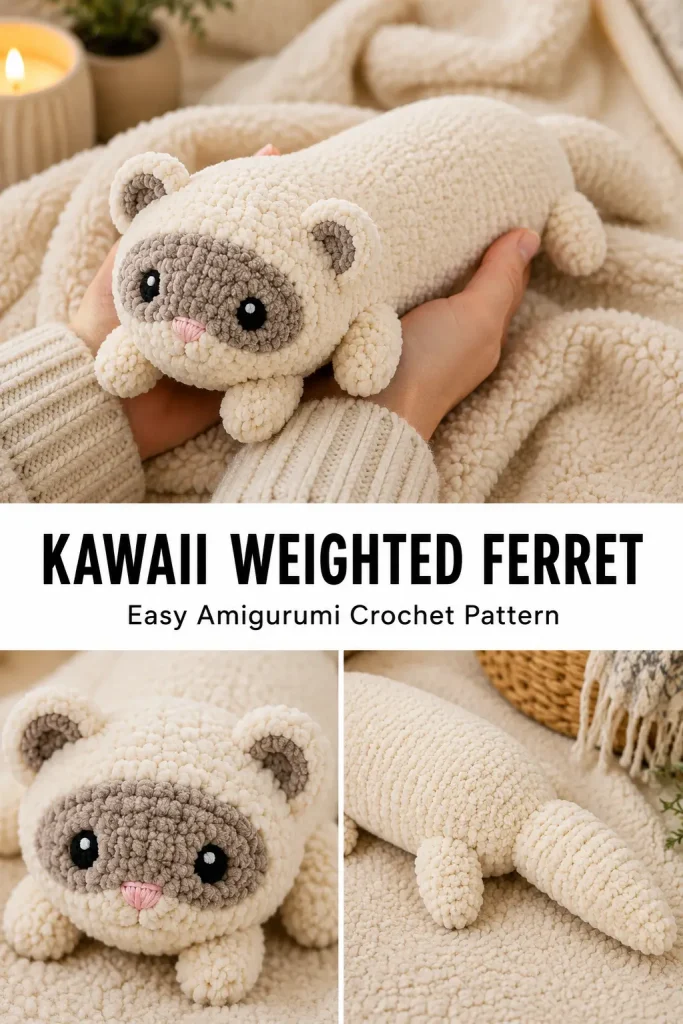
A soft weighted crochet plush can feel extra comforting because it has that gentle, huggable feel people love to hold. This Kawaii Weighted Ferret is designed as a long, floppy amigurumi plush with a sweet little face, rounded ears, tiny legs, and a soft tail that makes it feel cozy and handmade.
This pattern is inspired by the idea of a cuddly ferret plush, but the design here is written as an original, beginner-friendly amigurumi project. The body is simple, the shaping is soft, and the finished plush has a cute kawaii look that works beautifully for gifts, desk buddies, cozy collections, or handmade plush markets.
Because this plush includes optional weight, it should be made with care. Use a sealed fabric pouch for weighted filling, never loose pellets directly inside the crochet body. This keeps the project safer, cleaner, and easier to manage.
Description
The Kawaii Weighted Ferret is a long plush crochet toy with a cream body, soft taupe face markings, small rounded ears, black embroidered or safety eyes, a tiny pink nose, short little legs, and a tapered tail. The shape is slim and cuddly, with a slightly rounded head and a long body that sits nicely in the hands.
The texture is extra soft when made with blanket yarn or chenille yarn. The weighted insert gives the plush a gentle comforting feel, while regular stuffing keeps the head, legs, and tail soft and squishy.
This easy amigurumi pattern is perfect for plush crochet lovers, kawaii crochet collections, handmade gifts, and beginner crocheters who want a cute project that feels special without being too complicated.
Materials
- Super bulky chenille or blanket yarn in cream for the body
- Super bulky chenille or blanket yarn in soft taupe for face markings
- Small amount of cream or ivory yarn for ears
- Small amount of pink yarn for the nose
- Black embroidery yarn or 12 mm safety eyes
- 6 mm crochet hook
- Yarn needle
- Stitch marker
- Scissors
- Polyester fiberfill
- Poly pellets, glass beads, or weighted stuffing beads
- Small cotton fabric pouch or sewn muslin bag for weighted insert
Finished Size
Approximate finished size using super bulky plush yarn:
- Length from head to tail: 14–16 inches
- Body width: about 4 inches
- Head width: about 5 inches
Finished size may vary depending on yarn, hook size, and stuffing.
Gauge
Gauge is not critical for this plush, but stitches should be tight enough to hold stuffing securely.
If stuffing shows through, use a smaller hook.
Abbreviations
- MR: magic ring
- ch: chain
- sc: single crochet
- inc: increase, 2 sc in same stitch
- dec: invisible decrease
- sl st: slip stitch
- st: stitch
- sts: stitches
- FO: fasten off
Pattern Notes
This pattern is worked in continuous rounds.
Use a stitch marker to mark the first stitch of each round.
Stuff the plush gradually as you work.
The weighted insert is optional.
Do not place loose pellets directly inside the crochet body. Place pellets inside a securely sewn fabric pouch first.
For young children, avoid safety eyes and embroider the eyes instead.
Step-by-Step Instructions
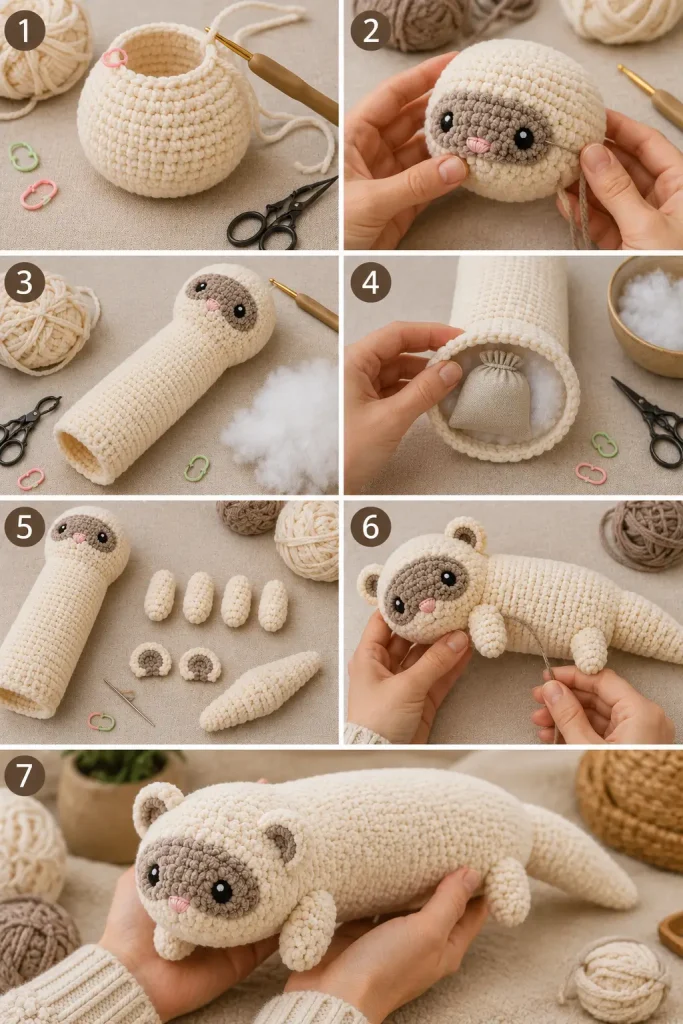
Head
Use cream yarn and 6 mm hook.
Round 1
Make a MR and work 6 sc into the ring. (6)
Round 2
Inc in each st around. (12)
Round 3
Repeat around: sc in next st, inc in next st. (18)
Round 4
Repeat around: sc in next 2 sts, inc in next st. (24)
Round 5
Repeat around: sc in next 3 sts, inc in next st. (30)
Rounds 6–9
Sc in each st around. (30)
Round 10
Repeat around: sc in next 3 sts, dec. (24)
Round 11
Repeat around: sc in next 2 sts, dec. (18)
Stuff the head lightly.
Do not fasten off. Continue to the body.
Face Patch
Use soft taupe yarn and 6 mm hook.
Round 1
Make a MR and work 6 sc into the ring. (6)
Round 2
Inc in each st around. (12)
Round 3
Repeat around: sc in next st, inc in next st. (18)
FO, leaving a long tail for sewing.
Flatten the circle slightly into an oval with your hands.
Sew it to the front of the head.
Body
Continue from the head using cream yarn.
Round 12
Repeat around: sc in next 2 sts, inc in next st. (24)
Rounds 13–28
Sc in each st around. (24)
Insert the weighted pouch into the lower body if using one.
Add stuffing around the pouch so the body stays soft and rounded.
Round 29
Repeat around: sc in next 2 sts, dec. (18)
Round 30
Repeat around: sc in next st, dec. (12)
Round 31
Dec around. (6)
FO and close the opening.
Ears
Make 2 using cream yarn.
Round 1
Make a MR and work 5 sc into the ring. (5)
Round 2
Inc in each st around. (10)
Round 3
Sc in each st around. (10)
FO, leaving a long tail for sewing.
Flatten each ear slightly.
Legs
Make 4 using cream yarn.
Round 1
Make a MR and work 6 sc into the ring. (6)
Round 2
Inc in each st around. (12)
Rounds 3–4
Sc in each st around. (12)
Stuff lightly.
Round 5
Repeat around: sc in next st, dec. (8)
FO, leaving a long tail for sewing.
Tail
Use cream yarn.
Round 1
Make a MR and work 6 sc into the ring. (6)
Round 2
Repeat around: sc in next st, inc in next st. (9)
Rounds 3–10
Sc in each st around. (9)
Stuff lightly as you go.
Round 11
Repeat around: sc in next st, dec. (6)
FO, leaving a long tail for sewing.
Face
Attach eyes between Rounds 7–8 of the head, spaced about 5–6 stitches apart.
If embroidering eyes, make two small vertical black stitches.
Use pink yarn to embroider a tiny nose at the center of the face patch.
Optional: Add two tiny blush stitches under the eyes with soft pink yarn.
Assembly
Sew the face patch onto the lower front of the head.
Sew the ears to the top sides of the head.
Sew the four legs along the lower body, two near the front and two near the back.
Sew the tail to the back of the body.
Check that all pieces are secure.
Weave in all ends carefully.
Gently shape the head, body, legs, and tail with your hands.
Weighted Insert Instructions
Cut two small rectangles of cotton fabric.
Sew around three sides to make a pouch.
Fill the pouch with weighted pellets.
Do not overfill it. The pouch should still bend slightly.
Sew the final side closed securely.
Place the pouch inside the lower body before the body is fully closed.
Add fiberfill around the pouch so the crochet fabric does not stretch too tightly.
For best safety, the weighted pouch should be double-stitched.
Tips & Variations
Use cream and taupe for a classic ferret look.
Use beige and white for a softer nursery-style plush.
Use gray and cream for a sweet winter ferret.
For a smaller plush, use worsted weight yarn and a smaller hook.
For an extra floppy plush, stuff the body lightly and keep the weighted pouch near the lower belly.
For a child-safe version, skip the weighted insert and embroider the eyes.
For a more kawaii style, make the face patch slightly larger and keep the nose very small.
FAQ
Is this weighted ferret beginner-friendly?
Yes. The shapes are simple, and the project uses mostly single crochet, increases, and decreases. Sewing the pieces neatly is the main finishing step.
Can I make it without weight?
Yes. You can skip the weighted insert and use only fiberfill. It will still be a soft plush ferret.
Is this safe for children?
For young children, do not use safety eyes or loose pellets. Embroider the eyes and either skip the weight or use a very securely sewn internal pouch.
What yarn works best?
Super bulky chenille or blanket yarn gives the softest plush result. Worsted weight yarn can also be used for a smaller amigurumi version.
Can I resize the pattern?
Yes. Use a different yarn weight and hook size. The stitch count can stay the same, but the finished plush will change size.
Conclusion
The Kawaii Weighted Ferret is a soft, comforting crochet plush with a long cuddly body, sweet face, little legs, and cozy handmade charm. It is cute enough for kawaii amigurumi lovers, simple enough for confident beginners, and special enough to make as a thoughtful handmade gift.
Make it with soft chenille yarn for a plush, huggable finish, and use the weighted insert only when it is safely sealed inside a fabric pouch. The result is a sweet crochet ferret that feels gentle, lovable, and wonderfully cozy to hold.



