Introduction
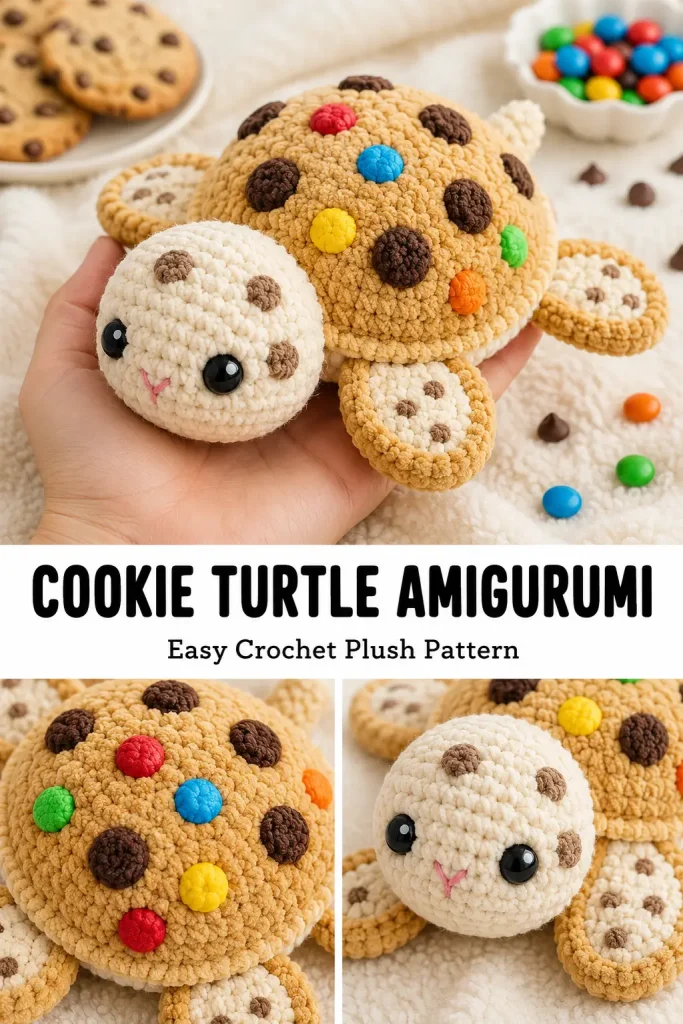
A cookie turtle is one of those crochet ideas that feels instantly cute, cozy, and a little unexpected. It has the sweet round shape of a turtle, but the shell looks like a soft chocolate chip cookie topped with colorful candy sprinkles. The result is playful, giftable, and perfect for anyone who loves kawaii amigurumi patterns with a fun dessert twist.
This original crochet pattern is designed to be buildable, beginner-friendly, and realistic to make. The turtle uses simple amigurumi shapes, soft plush yarn, easy sewn-on pieces, and small decorative details that bring the cookie theme to life without making the project too complicated.
It makes a lovely handmade plush toy, market item, birthday gift, nursery shelf decoration, or cute crochet collection piece. The finished turtle is soft, chubby, and full of personality.
Description
This Cookie Turtle Amigurumi is made with a creamy turtle body, a golden cookie-style shell, chocolate chip spots, and colorful candy dots on top. The head is round and soft with large black eyes, tiny chocolate chip markings, and a sweet kawaii expression. The four flippers are shaped like small cookie pieces with cream centers and chocolate chip details, helping the whole plush feel cohesive and extra cute.
The texture is plush, fluffy, and huggable when made with chenille or blanket yarn. The shape is low, rounded, and slightly chunky, like a tiny turtle carrying a cookie on its back. It is a beginner crochet project with a fun finish, using basic single crochet rounds, increases, decreases, and simple assembly.
Materials
- Super bulky chenille yarn in cream for the turtle body and head
- Super bulky chenille yarn in golden tan for the cookie shell and flipper edges
- Small amount of dark brown yarn for chocolate chips
- Small amounts of red, blue, yellow, green, and orange yarn for candy dots
- Black safety eyes, 12–14 mm, or black embroidery yarn for child-safe eyes
- 6 mm crochet hook
- Yarn needle
- Stitch marker
- Scissors
- Polyester fiberfill
Finished Size
Approximate finished size using super bulky plush yarn:
- Length: 9–11 inches
- Width: 7–8 inches across the flippers
- Height: 4–5 inches
Finished size may change depending on yarn thickness, hook size, and stuffing.
Gauge
Gauge is not critical for this plush, but your stitches should be tight enough to hold stuffing securely.
If you see gaps between stitches, use a smaller hook.
Abbreviations
- MR: magic ring
- ch: chain
- sc: single crochet
- inc: increase, 2 sc in the same stitch
- dec: invisible decrease
- sl st: slip stitch
- st: stitch
- sts: stitches
- FO: fasten off
Pattern Notes
This pattern is worked mostly in continuous rounds.
Use a stitch marker to mark the first stitch of each round.
Stuff the head and body firmly but do not overstuff the flippers.
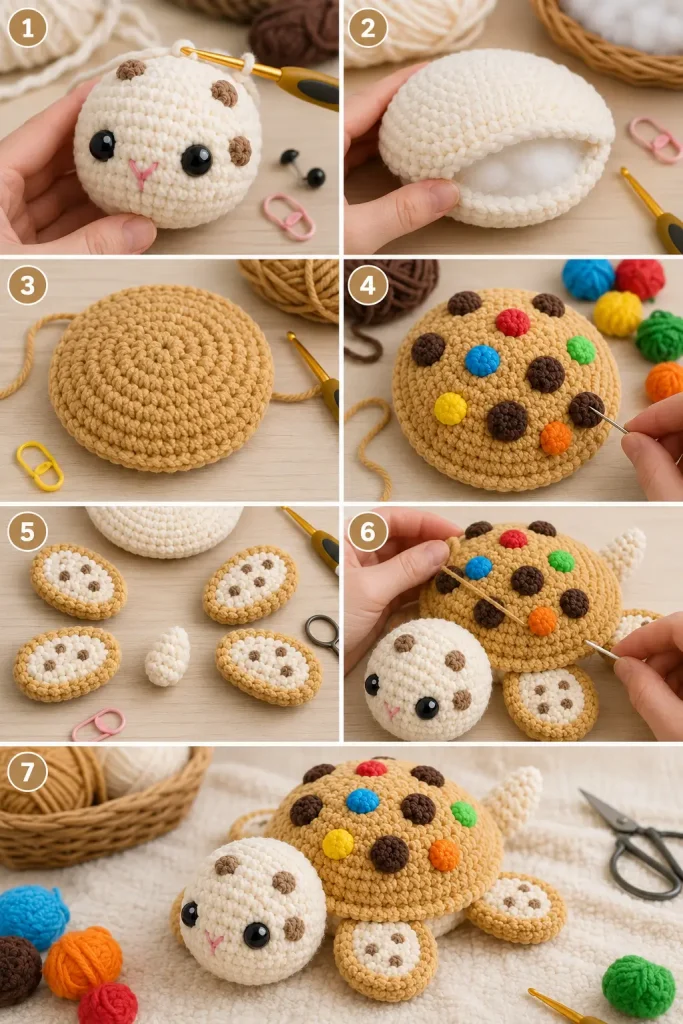
The shell is made separately and sewn to the top of the body.
Chocolate chips and candy dots are sewn on as appliqués.
For a child-safe version, embroider the eyes instead of using safety eyes.
Step-by-Step Instructions
Head
Use cream yarn and 6 mm hook.
Round 1
Make a MR and work 6 sc into the ring. (6)
Round 2
Inc in each st around. (12)
Round 3
Repeat around: sc in next st, inc in next st. (18)
Round 4
Repeat around: sc in next 2 sts, inc in next st. (24)
Rounds 5–7
Sc in each st around. (24)
Insert safety eyes between Rounds 5 and 6, spaced about 5 stitches apart.
Round 8
Repeat around: sc in next 2 sts, dec. (18)
Begin stuffing the head.
Round 9
Repeat around: sc in next st, dec. (12)
Round 10
Dec around. (6)
FO and close the opening.
Body
Use cream yarn and 6 mm hook.
Round 1
Ch 9.
Sc in 2nd ch from hook, sc in next 6 ch, 3 sc in last ch.
Turn to work on the opposite side of the chain.
Sc in next 6 ch, 2 sc in last ch. (18)
Round 2
Inc in first st, sc in next 6 sts, inc in next 3 sts, sc in next 6 sts, inc in last 2 sts. (24)
Round 3
Repeat once: sc in next st, inc in next st.
Sc in next 6 sts.
Repeat 3 times: sc in next st, inc in next st.
Sc in next 6 sts.
Repeat 2 times: sc in next st, inc in next st. (30)
Rounds 4–6
Sc in each st around. (30)
Round 7
Repeat around: sc in next 3 sts, dec. (24)
Stuff the body firmly, keeping it slightly oval and low.
Round 8
Repeat around: sc in next 2 sts, dec. (18)
Round 9
Repeat around: sc in next st, dec. (12)
Round 10
Dec around. (6)
FO and close the opening.
Cookie Shell
Use golden tan yarn and 6 mm hook.
Round 1
Make a MR and work 6 sc into the ring. (6)
Round 2
Inc in each st around. (12)
Round 3
Repeat around: sc in next st, inc in next st. (18)
Round 4
Repeat around: sc in next 2 sts, inc in next st. (24)
Round 5
Repeat around: sc in next 3 sts, inc in next st. (30)
Round 6
Repeat around: sc in next 4 sts, inc in next st. (36)
Round 7
Sc in each st around. (36)
FO, leaving a long tail for sewing.
This piece should look like a thick round cookie shell.
Chocolate Chips
Make 8–10 using dark brown yarn.
Round 1
Make a MR and work 5 sc into the ring.
Join with sl st.
FO, leaving a long tail for sewing.
These do not need to be perfectly round. Slightly uneven chips look more like real cookie pieces.
Candy Dots
Make 5–7 using red, blue, yellow, green, and orange yarn.
Round 1
Make a MR and work 6 sc into the ring.
Join with sl st.
FO, leaving a long tail for sewing.
Keep the candy dots small and flat so the shell does not become too bulky.
Front Flippers
Make 2.
Start with cream yarn.
Round 1
Make a MR and work 6 sc into the ring. (6)
Round 2
Inc in each st around. (12)
Round 3
Sc in each st around. (12)
Switch to golden tan yarn.
Round 4
Sc in each st around. (12)
Round 5
Repeat around: sc in next st, dec. (8)
Do not stuff heavily. Add only a tiny amount of fiberfill if needed.
Flatten the opening.
Sc through both layers across to close.
FO, leaving a long tail for sewing.
Back Flippers
Make 2.
Start with cream yarn.
Round 1
Make a MR and work 6 sc into the ring. (6)
Round 2
Inc in each st around. (12)
Switch to golden tan yarn.
Round 3
Sc in each st around. (12)
Round 4
Repeat around: sc in next st, dec. (8)
Flatten the opening.
Sc through both layers across to close.
FO, leaving a long tail for sewing.
Tail
Use cream yarn.
Round 1
Make a MR and work 5 sc into the ring. (5)
Round 2
Sc in each st around. (5)
Round 3
Sc in each st around. (5)
FO, leaving a long tail for sewing.
Do not stuff the tail.
Face Details
Use dark brown yarn to sew 3–5 small chocolate chip spots on the head.
Use pink yarn to embroider a tiny nose centered between and slightly below the eyes.
Optional: Use dark brown yarn to embroider a small smile under the nose.
If you are not using safety eyes, embroider two small black oval eyes instead.
Decorating the Shell
Lay the cookie shell flat.
Place the dark brown chocolate chips randomly across the shell.
Place the colorful candy dots between the chocolate chips.
Do not overcrowd the shell. Leave some golden tan space visible so it still looks like a cookie.
Pin the pieces in place first.
Sew each chip and candy dot securely to the shell.
Weave the ends to the back of the shell.
Assembly
Place the cookie shell on top of the cream body.
Center it so the shell covers the upper body but does not hide the head attachment area.
Sew the shell securely around the edge.
Sew the head to the front of the body, slightly under the shell edge.
Sew the two front flippers to the front sides of the body.
Sew the two back flippers to the back sides of the body.
Sew the tail to the back center of the body.
Check that all pieces are secure.
Weave in all remaining ends.
Gently shape the turtle with your hands so the body stays low and rounded.
Tips & Variations
Use blanket yarn or chenille yarn for the softest plush result.
For a classic cookie look, use golden tan for the shell and dark brown chocolate chips only.
For a birthday party style, add colorful candy dots in bright primary colors.
For a softer nursery version, use pastel candy dots instead of bright colors.
If you want the turtle to be smaller, use worsted weight yarn with a smaller hook.
If you want a firmer plush, stuff the body and head more tightly.
If you want a squishier plush, stuff lightly and keep the flippers soft.
For young children, embroider all face details and avoid plastic safety eyes.
FAQ
Is this Cookie Turtle Amigurumi beginner-friendly?
Yes. This pattern uses simple amigurumi shapes, mostly single crochet, increases, and decreases. The decorating and assembly take the most time, but the crochet steps are simple.
What yarn gives the softest result?
Super bulky chenille or blanket yarn gives the softest plush crochet toy texture. It also makes the turtle larger and more huggable.
Can I make this without candy dots?
Yes. You can make the shell with only chocolate chips for a classic cookie turtle look.
Can I resize the pattern?
Yes. Use a thinner yarn and smaller hook for a mini turtle, or thicker yarn and a larger hook for a jumbo plush.
Is this safe for kids?
For children under 3, use embroidered eyes instead of safety eyes and sew every piece securely. Always check small sewn-on details before gifting.
Conclusion
The Cookie Turtle Amigurumi is a sweet and playful crochet plush that combines a cozy turtle shape with a fun cookie-inspired shell. It is soft, chubby, colorful, and full of handmade charm.
This easy amigurumi pattern is a lovely choice for plush crochet lovers, birthday gifts, kawaii collections, or market makes. With its golden cookie shell, chocolate chips, candy dots, and tiny turtle face, it is the kind of cute crochet project people will remember and want to save for later.




Absolutamente geniales tus creaciones. Inspiran amor. Gracias.