Introduction
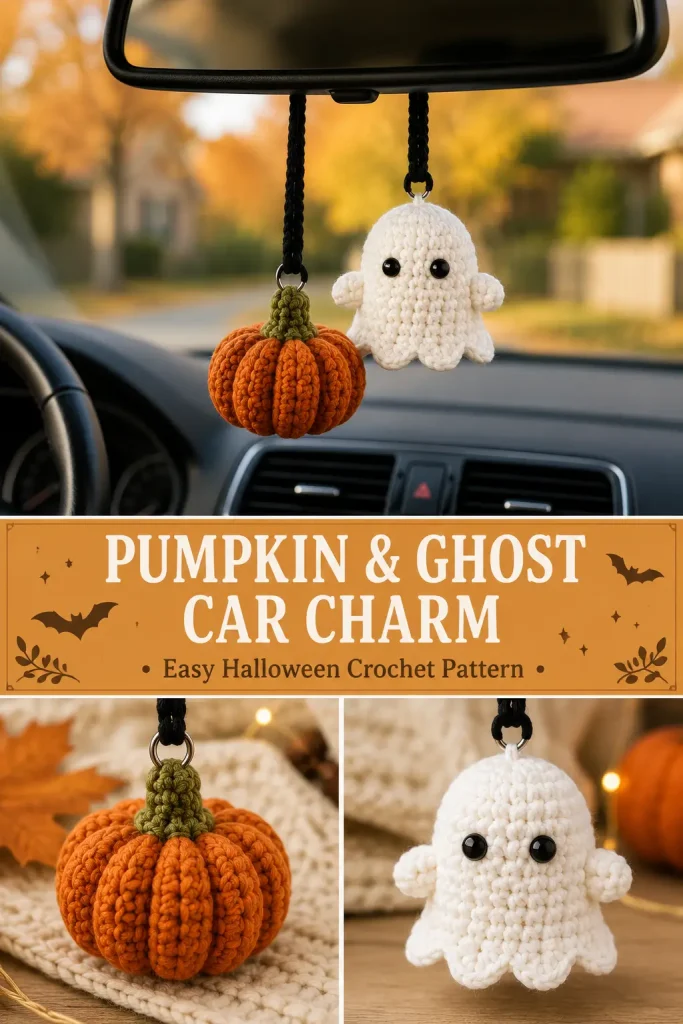
A tiny crochet car charm is such a cute way to bring handmade personality into your space. This little pumpkin and ghost duo feels perfect for fall, Halloween, cozy car decor, market gifts, or a small seasonal project you can finish without needing a lot of yarn.
This Crochet Pumpkin & Ghost Car Charm is an original pattern inspired by the idea in your screenshot: two small crochet ornaments hanging together from a car mirror, one pumpkin and one sweet ghost. The instructions below are created fresh with clear stitch counts, shaping, hanging cords, assembly, and safety notes so the design is buildable and unique.
The finished charm has a soft orange pumpkin with ribbed shaping, a small green stem, and a white ghost with rounded body, scalloped bottom, and cute black eyes. Both pieces hang from separate black cords so they dangle nicely side by side.
Description
This project includes two small amigurumi-style crochet pieces: a mini pumpkin and a mini ghost. The pumpkin is worked as a round stuffed ball, then shaped with yarn wraps to create deep pumpkin ridges. A small green stem is sewn to the top.
The ghost is worked from the top down in continuous rounds, with a rounded head and slightly wider body. The bottom edge has little scallops so it looks like a floating ghost. Simple black eyes give it a cute, friendly expression.
The two charms are attached to black crochet cords and joined at the top into one hanging loop. You can hang it from a car mirror, door hook, wall peg, Halloween tree, or craft booth display.
Materials
- Worsted weight yarn in burnt orange for the pumpkin
- Worsted weight yarn in cream or white for the ghost
- Small amount of olive green yarn for the pumpkin stem
- Small amount of black yarn for the hanging cords
- Small amount of black yarn or embroidery thread for ghost eyes
- 3.5 mm crochet hook
- Yarn needle
- Scissors
- Stitch marker
- Polyester fiberfill
- Optional: small black safety eyes for display-only version
Finished Size
Approximate finished size:
- Pumpkin: 2.25 inches wide
- Ghost: 2.5 inches tall
- Hanging cords: 6–7 inches
- Full charm drop length: about 9–10 inches
You can adjust the cord length depending on where you want to hang it.
Gauge
Gauge is not strict, but your stitches should be tight enough to hold stuffing.
If stuffing shows through, use a smaller hook.
Abbreviations
- MR: magic ring
- ch: chain
- sc: single crochet
- hdc: half double crochet
- dc: double crochet
- inc: increase, 2 sc in the same stitch
- dec: invisible decrease
- sl st: slip stitch
- st: stitch
- sts: stitches
- FO: fasten off
Pattern Notes
The pumpkin is worked in continuous rounds.
The pumpkin ridges are made after stuffing by wrapping yarn around the finished ball.
The ghost is worked from the top down.
The hanging cords are made separately and attached securely.
For car use, keep the charm small so it does not block your view.
Do not use heavy beads or hard embellishments.
Step-by-Step Instructions
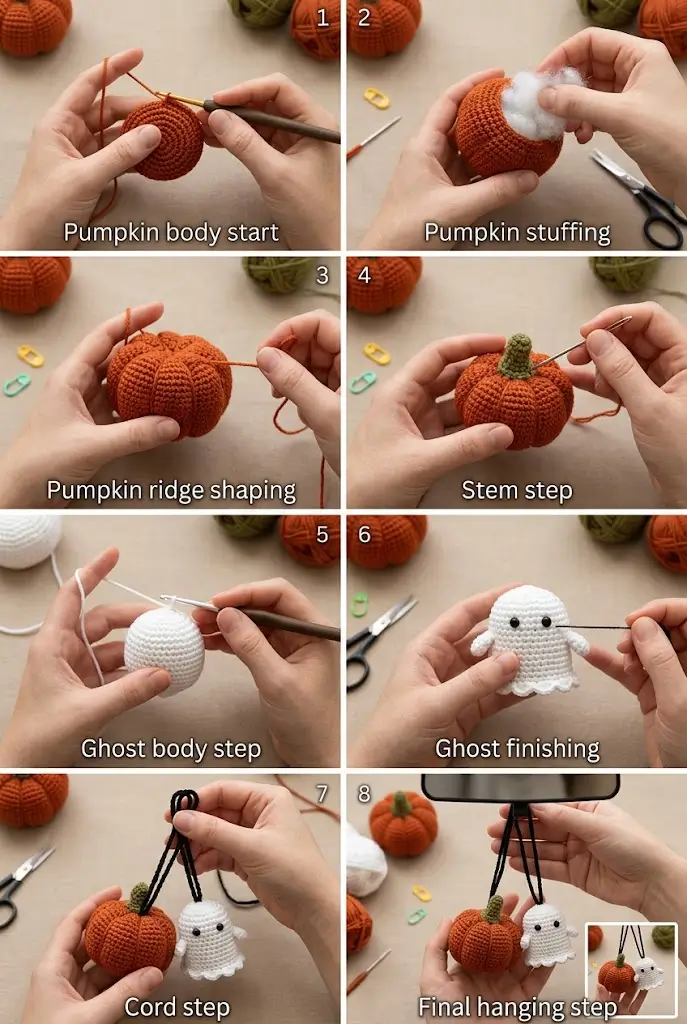
Pumpkin Body
Use burnt orange yarn.
Round 1
Make a MR.
Work 6 sc into the ring. (6)
Round 2
Inc in each st around. (12)
Round 3
Repeat around: sc in next st, inc in next st. (18)
Round 4
Repeat around: sc in next 2 sts, inc in next st. (24)
Round 5
Repeat around: sc in next 3 sts, inc in next st. (30)
Rounds 6–10
Sc in each st around. (30)
Round 11
Repeat around: sc in next 3 sts, dec. (24)
Round 12
Repeat around: sc in next 2 sts, dec. (18)
Begin stuffing the pumpkin firmly.
Round 13
Repeat around: sc in next st, dec. (12)
Add more stuffing if needed.
Round 14
Dec around. (6)
FO, leaving a long tail about 24 inches.
Close the opening with the yarn tail.
Pumpkin Ridge Shaping
Thread the long orange tail onto a yarn needle.
Insert the needle through the center bottom of the pumpkin and bring it out through the center top.
Pull gently to create a dip.
Wrap the yarn down the outside of the pumpkin and insert again through the bottom center, bringing it back out the top center.
Pull gently to form the first ridge.
Repeat this 5 more times, spacing the wraps evenly around the pumpkin.
You should have about 6 pumpkin sections.
Do not pull so tightly that the pumpkin becomes flat. It should stay round and plush.
Secure the yarn at the top and weave in the end.
Pumpkin Stem
Use olive green yarn.
Round 1
Make a MR.
Work 5 sc into the ring. (5)
Rounds 2–4
Sc in each st around. (5)
FO, leaving a long tail for sewing.
Stuff lightly only if needed.
Sew the stem to the top center of the pumpkin, covering the ridge wraps.
Ghost Body
Use cream or white yarn.
Round 1
Make a MR.
Work 6 sc into the ring. (6)
Round 2
Inc in each st around. (12)
Round 3
Repeat around: sc in next st, inc in next st. (18)
Round 4
Repeat around: sc in next 2 sts, inc in next st. (24)
Rounds 5–8
Sc in each st around. (24)
Round 9
Repeat around: sc in next 3 sts, inc in next st. (30)
Rounds 10–12
Sc in each st around. (30)
Begin stuffing the ghost. Keep the head rounded but do not overstuff the bottom.
Ghost Bottom Scallops
Round 13
Repeat around: sl st in next st, skip next st, 5 dc in next st, skip next st.
Continue this repeat around the bottom edge.
Join with sl st to the first sl st.
FO and weave in the end.
This creates the wavy ghost bottom.
Ghost Face
Use black yarn or embroidery thread.
Place the eyes between Rounds 6 and 7, about 5 stitches apart.
Embroider each eye as a small filled oval or French knot.
Optional: add a tiny curved smile between the eyes.
Keep the face simple and cute.
For display-only charms, you may use small safety eyes, but embroidered eyes are better for a soft lightweight car charm.
Ghost Side Arms
Make 2 using cream or white yarn.
Arm
Ch 5.
Sc in 2nd ch from hook.
Sc in next ch.
Hdc in next ch.
Dc in last ch.
FO, leaving a tail for sewing.
Sew one arm to each side of the ghost around Rounds 9–10.
Angle the arms slightly outward.
Pumpkin Hanging Cord
Use black yarn.
Join yarn securely to the top of the pumpkin stem.
Ch 45, or chain until the cord measures about 6–7 inches.
FO, leaving a tail.
Do not attach the top yet.
Ghost Hanging Cord
Use black yarn.
Join yarn securely to the top center of the ghost.
Ch 42, or chain until the cord is slightly shorter or the same length as the pumpkin cord.
FO, leaving a tail.
Joining the Hanging Cords
Hold both cords together at the top.
Adjust the lengths so the pumpkin and ghost hang side by side, with the ghost slightly higher or level with the pumpkin.
Tie the two cord ends together securely.
To make a mirror loop, chain 20–25 more stitches with black yarn, then join back to the top knot with a sl st.
FO and weave in ends tightly.
You can also tie the cords directly around the mirror stem.
Optional Neater Hanging Loop
If you want a stronger loop, make this separately.
Use black yarn.
Ch 35.
Sl st in 2nd ch from hook and in each ch across.
FO.
Fold into a loop and sew both ends to the joined top of the pumpkin and ghost cords.
This makes a thicker, cleaner hanging loop.
Assembly Check
Before using the charm, check:
- Pumpkin is firmly stuffed and shaped
- Stem is sewn securely
- Ghost is stuffed lightly and evenly
- Ghost scallops are neat
- Eyes are embroidered securely
- Arms are sewn tightly
- Hanging cords are strong
- Top loop is secure
- The charm is not too long for safe car use
Finishing
Weave in all yarn tails.
Trim any fuzzy ends.
Gently shape the pumpkin ridges.
Smooth the ghost body with your hands.
Hang the charm and check how it balances.
If one side hangs too low, adjust the cord length before securing the final knot.
Size Adjustments
Smaller Charm
Use sport weight yarn and a 2.5 mm hook.
Work the same pattern.
This makes a lighter charm for small cars or keychains.
Larger Decor Ornament
Use blanket yarn and a 5 mm hook.
Make the cord thicker and shorter.
Use it as wall decor or Halloween tree decor instead of a car charm.
Shorter Drop
Use ch 30–35 for each hanging cord.
This is better for car mirror safety.
Longer Decor Hanging
Use ch 55–60 for wall hooks, but avoid long cords in the car.
Tips & Variations
Use burnt orange for a classic pumpkin look.
Use cream or ivory for a soft ghost instead of bright white.
Use sage green for the pumpkin stem for a muted handmade style.
Use black cords for the closest look to the screenshot.
Use brown cords for a warmer fall look.
Add a tiny blush stitch to the ghost cheeks for a sweeter version.
Make two pumpkins and one ghost for a fuller Halloween hanging charm.
Skip safety eyes and use embroidery if the charm will be handled often.
For a cleaner finish, lightly brush the yarn tails into the inside of the pieces before closing.
FAQ
Is this pumpkin and ghost car charm beginner-friendly?
Yes. This pattern is beginner-friendly if you know basic amigurumi rounds, increases, decreases, and simple sewing.
Is this the exact pattern from the photo?
No. This is a new original crochet pattern based on the visible idea: a mini pumpkin and ghost hanging car charm. The stitch counts, shaping, assembly, and finishing are original.
Can I hang this from my car mirror?
Yes, but keep it small and make sure it does not block your view while driving. Always follow local safety rules.
What yarn works best?
Worsted weight cotton or acrylic yarn works well. Cotton gives a firmer shape, while acrylic gives a softer plush look.
Can I turn this into a keychain?
Yes. Use thinner yarn, make shorter cords, and attach a metal keyring to the top loop.
Conclusion
The Crochet Pumpkin & Ghost Car Charm is a cute seasonal project that is quick, cozy, and full of Halloween charm. The little ribbed pumpkin and sweet white ghost look adorable hanging together, whether you use them in your car, on a wall hook, or as fall decor.
Make one in classic orange and white, or try softer colors like terracotta, ivory, sage, and black for a modern handmade autumn look.



