Intro
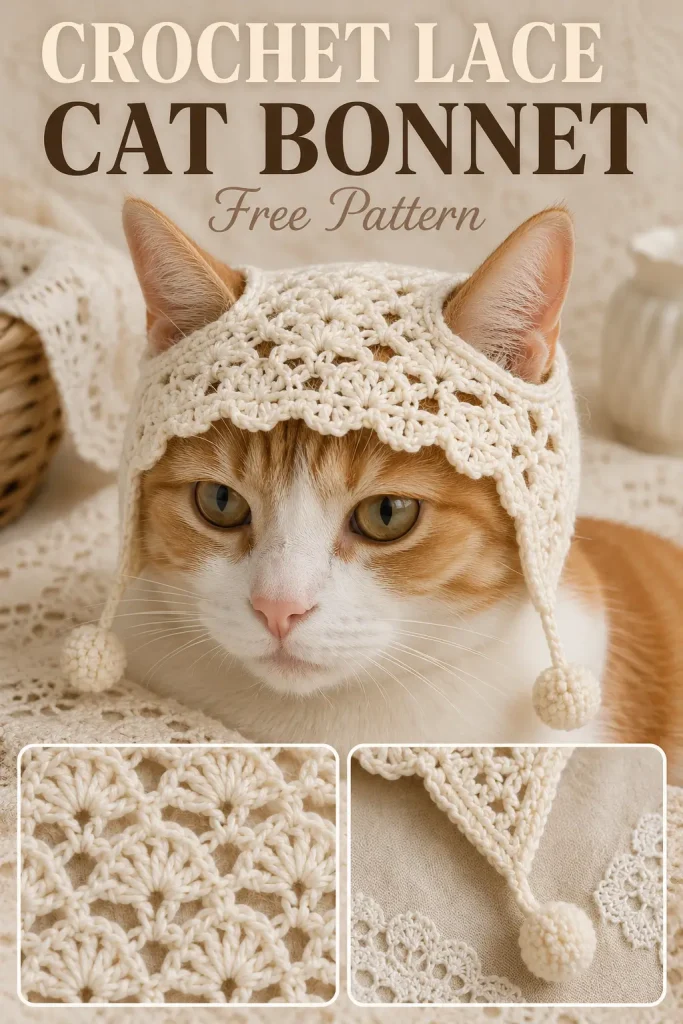
This delicate crochet cat bonnet is a sweet handmade accessory for gentle photo moments, cozy indoor styling, or a special crochet gift for a cat lover. The open lace texture gives it a soft vintage look, while the shaped ear openings help the bonnet sit naturally around the cat’s ears without covering them.
The design is light, decorative, and full of charming details. It uses a cream cotton yarn, open lace shell sections, a neat lower border, shaped side points, and tiny pom-pom ties for a playful finish.
Description
This crochet cat bonnet is made in a soft cream color with an airy lace texture across the top and sides. The main bonnet sits like a curved cap over the cat’s head, leaving two tall ear openings shaped into the design. The front edge has a small textured border that frames the forehead, while the sides taper down into little points under the ears. Each lower point ends with a short tie and a small rounded pom-pom, giving the bonnet a gentle vintage handmade style. The finished piece is lightweight, breathable, and decorative rather than heavy or bulky.
Materials
- Sport weight or light DK cotton yarn in cream
- 3.0 mm crochet hook
- Yarn needle
- Scissors
- Stitch markers
- Small pom-pom maker or fork for pom-poms
- Measuring tape
Abbreviations
- ch = chain
- sl st = slip stitch
- sc = single crochet
- hdc = half double crochet
- dc = double crochet
- tr = treble crochet
- sk = skip
- st = stitch
- sts = stitches
- sp = space
- rep = repeat
Pattern Notes
- This pattern uses US crochet terms.
- The bonnet is worked flat in a lace panel, then lightly shaped with borders and side ties.
- The ear openings are created by leaving two shaped gaps in the upper section.
- This is a decorative crochet accessory. Always supervise pets while wearing handmade items.
- Adjust the starting chain for your cat’s head size. The bonnet should sit softly and never feel tight.
Step-by-Step Instructions
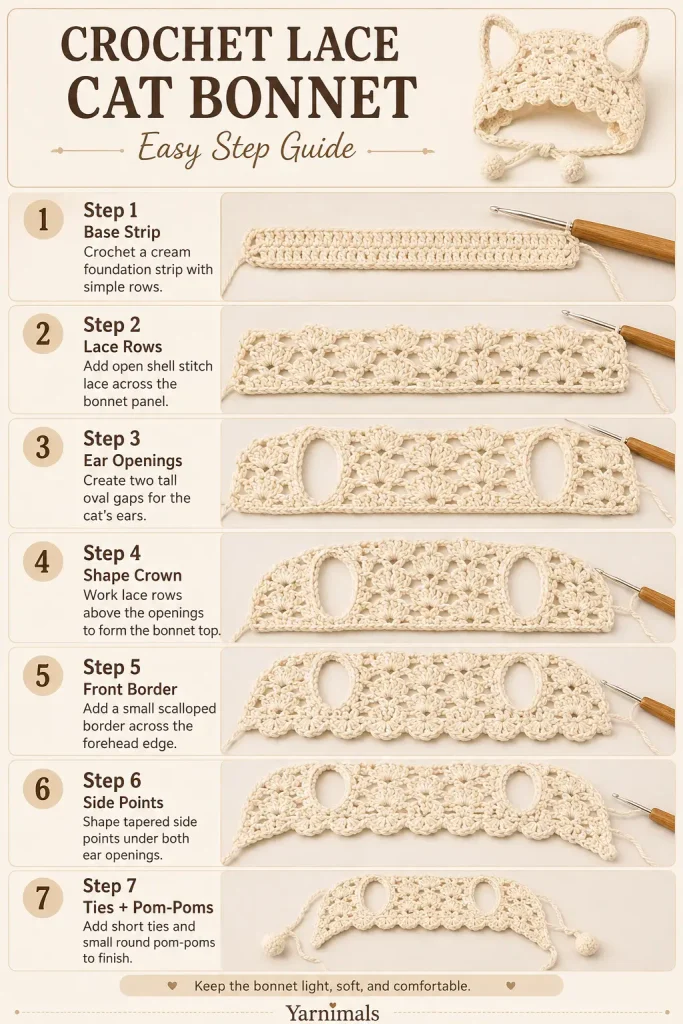
Bonnet Base
Ch 55.
Row 1: Sc in the 2nd ch from hook and in each ch across. Turn.
54 sc
Row 2: Ch 3, dc in the next st, ch 1, sk 1 st, dc in the next 2 sts, rep from across. Turn.
Row 3: Ch 1, sc in each st and ch-1 sp across. Turn.
54 sc
Row 4: Ch 4, sk 2 sts, dc in next st, ch 1, sk 1 st, dc in next st, rep across. Turn.
Row 5: Ch 1, sc in each st and ch sp across. Turn.
First Lace Section
Row 6: Ch 3, dc in same st, sk 2 sts, 5 dc in next st, sk 2 sts, 2 dc in next st, rep across. Turn.
Row 7: Ch 1, sc in first st, ch 3, sk 2 sts, sc in center dc of shell, ch 3, sk 2 sts, sc between shell groups, rep across. Turn.
Row 8: Ch 3, 4 dc in first ch-3 sp, sc in next sc, 5 dc in next ch-3 sp, sc in next sc, rep across. Turn.
Row 9: Ch 1, sc evenly across. Turn.
Ear Opening Row
This row creates the two open spaces for the cat’s ears.
Row 10: Ch 3, dc in next 8 sts, ch 9, sk 8 sts, dc in next 18 sts, ch 9, sk 8 sts, dc in remaining sts. Turn.
You should now have two open ear gaps.
Shape Around Ear Openings
Row 11: Ch 1, sc in each dc across. Work 10 sc around each ch-9 ear opening. Continue sc across the row. Turn.
Row 12: Ch 3, dc in next st, ch 1, sk 1 st, dc in next 2 sts, rep across, working evenly around the ear opening edges. Turn.
Row 13: Ch 1, sc in each st and ch sp across. Turn.
Upper Lace Crown
Row 14: Ch 4, sk 2 sts, dc in next st, ch 1, sk 1 st, dc in next st, rep across. Turn.
Row 15: Ch 1, sc in each st and ch sp across. Turn.
Row 16: Ch 3, dc in same st, sk 2 sts, 5 dc in next st, sk 2 sts, 2 dc in next st, rep across. Turn.
Row 17: Ch 1, sc in each st across. Do not fasten off.
Front Forehead Border
Turn the bonnet so you are working across the front lower edge.
Row 1: Ch 1, sc evenly across the lower front edge. Turn.
Row 2: Ch 1, sc in first st, ch 3, sk 1 st, sc in next st, rep across. Turn.
Row 3: Ch 1, work 3 sc in each ch-3 sp across, sc in final st.
This creates the small textured scalloped edge across the forehead.
Back Edge Border
Attach yarn to one back corner.
Row 1: Ch 1, sc evenly across the back edge. Turn.
Row 2: Ch 1, sc in each st across.
Fasten off.
Side Point Shaping
Attach yarn to the lower side edge under one ear opening.
Row 1: Ch 1, work 10 sc evenly down the side edge. Turn.
Row 2: Ch 1, sc in each st across. Turn.
Row 3: Ch 1, sc2tog, sc across until last 2 sts, sc2tog. Turn.
Row 4: Ch 1, sc in each st across. Turn.
Row 5: Ch 1, sc2tog, sc across until last 2 sts, sc2tog. Turn.
Row 6: Ch 1, sc2tog across until 1 or 2 sts remain.
Fasten off.
Repeat on the other side.
Ear Opening Border
Attach yarn to the edge of one ear opening.
Round 1: Ch 1, sc evenly around the full ear opening. Sl st to join.
Round 2: Ch 1, sc in each st around. Sl st to join.
Fasten off.
Repeat for the second ear opening.
This gives each ear hole a neat, soft frame.
Side Ties
Attach yarn to the bottom point of one side.
Ch 18.
Sl st in the 2nd ch from hook and in each ch back to the point.
Fasten off securely.
Repeat on the other side.
Small Pom-Poms
Make 2 small pom-poms using cream yarn.
Wrap yarn around a fork or small pom-pom maker 25–35 times.
Tie tightly through the center.
Cut the loops open.
Trim into a small round pom-pom.
Sew one pom-pom to the end of each side tie.
Finishing
Weave in all ends carefully.
Shape the lace with your fingers.
Lightly steam or block the bonnet if needed, keeping the ear openings rounded and the lace pattern open.
Check the fit gently. The bonnet should rest lightly on the head, with the ears passing comfortably through the openings.
Tips & Variations
Use cotton yarn for the cleanest lace texture and best stitch definition. A soft cotton blend also works well if you want a slightly gentler feel.
For a more vintage look, use ivory, cream, linen beige, or soft oatmeal yarn. For a playful style, try pale pink, dusty blue, lavender, or sage green.
If the bonnet feels too loose, use a smaller hook or reduce the starting chain by a few stitches. If it feels too tight, increase the starting chain and add a few stitches between the ear openings.
For a cleaner finish, block the bonnet gently after crocheting. This helps the lace open up and keeps the front edge from curling.
Keep the ties short and soft. This pattern is meant to be decorative, so avoid long cords or heavy embellishments that may bother the cat.
FAQ
Is this crochet cat bonnet beginner-friendly?
This pattern is best for confident beginners who are comfortable with basic stitches, simple lace rows, and shaping around openings.
Can I adjust the size?
Yes. Add or remove chains from the starting chain, and adjust the space between the ear openings to fit your cat comfortably.
What yarn works best for this pattern?
Light cotton yarn works best because it creates a clean lace texture and keeps the bonnet lightweight.
Conclusion
This crochet lace cat bonnet is a charming little project with a soft vintage feel and sweet handmade details. The airy stitch pattern, shaped ear openings, tiny side points, and pom-pom ties make it a beautiful accessory for careful styling, photos, or a thoughtful handmade gift for a cat lover. Save this pattern and try it in your favorite soft yarn colors.




Thank for the patterns.
Thank you for the patterns! They are so wonderful! Can’t wait to try the 3 I downloaded:
Crochet Lace Hat Bonnet, Crochet Cat Ring Dish and Flower Edge Crochet Coaster. I’ll let you know how it goes!