Pattern Style
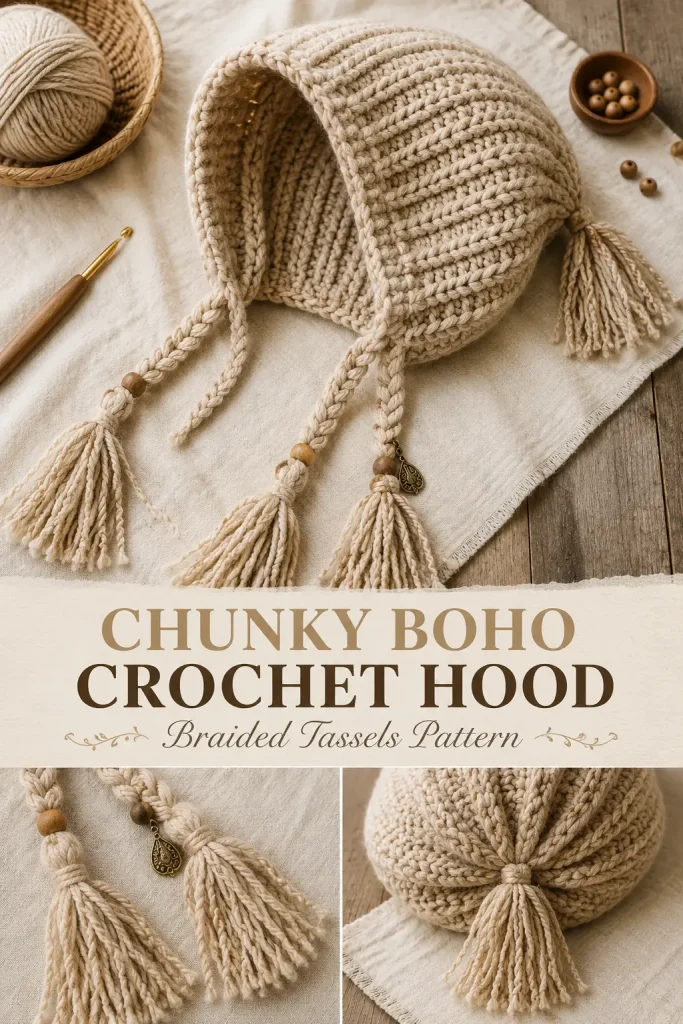
This is an oversized crochet hood made with chunky yarn. It has:
- A deep hood shape
- Ribbed crochet texture
- Rounded/gathered back
- Long front side ties
- Braided yarn tassels
- Fringe details
- Optional wooden beads, buttons, charms, lace, or fabric strips
This is an original handmade-style pattern inspired by the visual design, not a copy of any existing paid pattern.
Materials
- Super bulky yarn, size 6, or two strands of worsted weight held together
- Crochet hook: 8 mm to 10 mm
- Scissors
- Yarn needle
- Stitch markers
- Optional: wooden beads, large button, metal charm, lace ribbon, fabric strips
Suggested yarn colors:
- oatmeal beige
- taupe
- soft gray
- cream
- earthy brown
- dusty mushroom
- mixed neutral scraps for tassels
Abbreviations
- ch = chain
- sl st = slip stitch
- sc = single crochet
- hdc = half double crochet
- dc = double crochet
- fpdc = front post double crochet
- bpdc = back post double crochet
- BLO = back loop only
- st = stitch
- sts = stitches
- rep = repeat
Finished Size
Adult size, oversized hood.
Approximate finished measurements:
- Hood height: 13–15 inches
- Hood depth from forehead to back: 12–14 inches
- Front opening: 22–25 inches around
- Ties/tassels: 18–26 inches long
You can make it smaller by using a smaller hook or fewer rows.
Crochet Instructions
1. Main Hood Rectangle
This part creates the main ribbed hood fabric.
Chain 42.
Row 1: Dc in the 4th ch from hook and in each ch across. Turn.
You should have 40 dc including the turning chain.
Row 2: Ch 3, fpdc around next st, bpdc around next st, rep across the row, dc in top of turning chain. Turn.
Row 3: Ch 3, fpdc around fpdc sts and bpdc around bpdc sts across, dc in top of turning chain. Turn.
Rows 4–22: Repeat Row 3.
You should now have a thick ribbed rectangle.
For a deeper hood, work 2–4 more rows.
For a smaller hood, stop around Row 18–20.
2. Shape the Back of the Hood
Fold the rectangle in half so the first row and last row meet at the back.
The ribbed rows should run from the front opening toward the back of the head.
Using a yarn needle or slip stitch seam, join the back edge together from the top down about 8–9 inches.
Leave the lower back slightly open for a softer draped shape.
Fasten off and weave in ends.
3. Gathered Back Detail
To create the gathered look at the back:
Cut a long piece of yarn.
Weave the yarn in and out around the lower back opening.
Pull gently to gather the back slightly.
Tie securely.
Do not pull too tightly. The back should look softly cinched, not puckered flat.
You can attach a tassel over this gathered section later.
4. Front Edge Border
Attach yarn to the bottom front edge of the hood.
Round 1: Ch 1, sc evenly around the entire front opening. Work 2 sc into corners if needed to keep the edge smooth. Sl st to join.
Round 2: Ch 1, sc in each st around. Sl st to join.
Round 3: Ch 1, crab stitch around the front edge, or work one more round of sc if you prefer a softer border.
Fasten off.
This creates the thick finished edge around the face opening.
5. Side Earflap Panels
These panels create the long side sections where the tassels and braids attach.
Lay the hood flat with the front opening facing you.
Mark both lower front corners.
Attach yarn to one lower front corner.
Row 1: Ch 2, work 10 hdc evenly along the lower side edge. Turn.
Row 2: Ch 2, hdc in each st across. Turn.
Row 3: Ch 2, hdc2tog, hdc across until last 2 sts, hdc2tog. Turn.
Row 4: Ch 2, hdc in each st across. Turn.
Row 5: Ch 2, hdc2tog, hdc across until last 2 sts, hdc2tog. Turn.
Fasten off.
Repeat on the other side.
These side panels should taper slightly and hang near the cheeks.
6. Textured Side Trim
To copy the raised, handmade boho look from the image, add a textured trim along each side.
Attach yarn at the top of one side edge near the front opening.
Work sl st or surface crochet down the side edge.
For a raised rope-style trim:
Ch 1, sc into the edge, ch 1, sc into next edge space, repeat down the side.
Fasten off.
Repeat on the other side.
This adds the thick decorative line along the sides of the hood.
7. Long Front Braids
Cut 12 strands of yarn for each side.
Each strand should be about 36–44 inches long, depending on how long you want the ties.
For each side:
Fold the strands in half.
Pull the folded center through the bottom of the earflap panel.
Pull the yarn ends through the loop to attach.
Divide the strands into 3 groups.
Braid until the braid is about 14–18 inches long.
Tie a knot at the end.
Leave loose yarn below the knot as fringe.
Repeat on the other side.
8. Large Boho Tassels
Make one or two large tassels for the front ties.
Wrap yarn around a book or cardboard about 25–35 times.
Slide the yarn off carefully.
Tie one strand around the top.
Cut the bottom loops.
Wrap another strand around the upper tassel neck several times.
Tie securely and trim the ends.
Attach tassels to the ends of the braids or to the side panels.
For the layered look, mix:
- yarn strands
- thin fabric strips
- lace ribbon
- neutral scrap yarn
- slightly darker beige or brown strands
9. Back Tassel
To create the back view like the image:
Make a medium-large tassel using the same method.
Attach it over the gathered back section.
Secure it tightly with yarn.
Trim the tassel unevenly for a relaxed handmade look.
You can add a few lighter and darker strands for a rustic texture.
10. Optional Beads, Buttons, and Charms
Add decorative details after the hood is complete.
Ideas:
- Sew one large wooden button near one side of the hood.
- Add a small metal charm to one braid.
- Thread wooden beads onto the tassel ends.
- Tie lace strips into the tassels.
- Add a small ring charm at the bottom of one tie.
Make sure heavy charms are attached securely so they do not pull the crochet out of shape.
11. Optional Fringe Along the Sides
Cut short yarn strands about 8–12 inches long.
Attach them randomly along the lower side edges and near the tassel area.
Use a lark’s head knot:
Fold one strand in half.
Pull the loop through a stitch.
Pull the ends through the loop.
Tighten gently.
Trim the fringe to your desired length.
For a messy boho look, keep the fringe slightly uneven.
Finishing
Weave in all yarn ends.
Steam lightly if needed, but do not flatten the ribbed texture.
Shape the hood with your hands.
Try it on and adjust the braids or tassels if needed.
Customization Tips
For a softer winter hood, use plush or wool-blend yarn.
For a more rustic boho style, use neutral yarn with small color variations.
For a lighter hood, use bulky yarn instead of super bulky and increase the number of rows.
For a tighter face opening, work one extra round of sc around the front edge.
For a more dramatic hood, make the main rectangle taller and deeper before seaming.
For the closest look to the image, use oatmeal beige yarn, chunky ribbing, long messy tassels, and layered neutral fringe.
Quick Pattern Summary
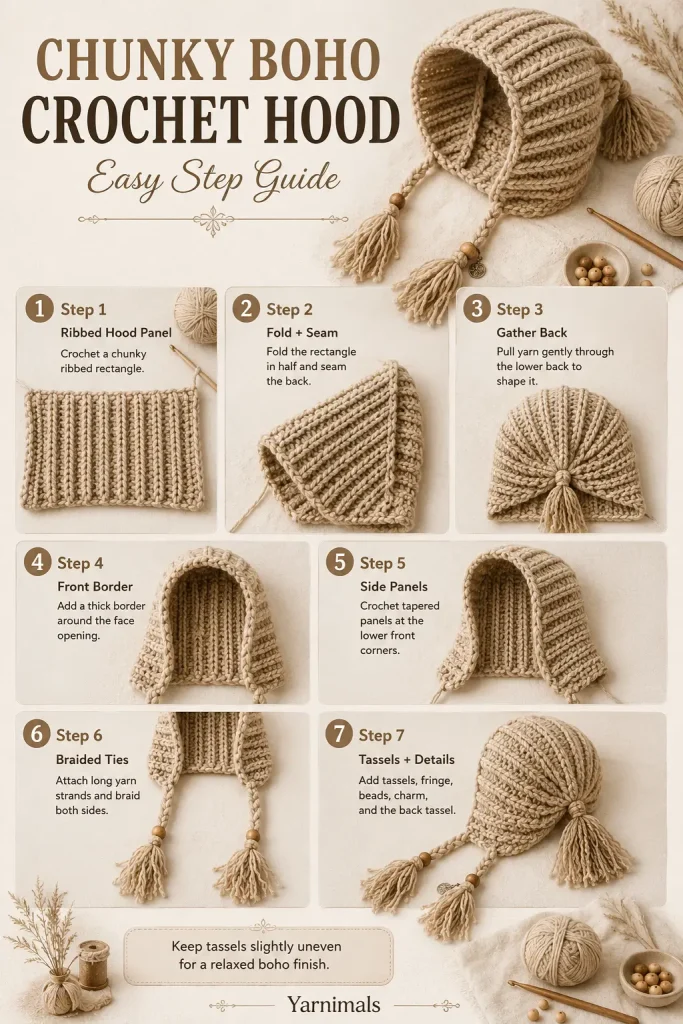
- Crochet a chunky ribbed rectangle.
- Fold and seam the back to form the hood.
- Gather the lower back slightly.
- Add a thick front border.
- Crochet tapered side panels.
- Add surface trim along the sides.
- Attach long braids to the front corners.
- Add large tassels, fringe, beads, buttons, and charms.
This gives you the full boho hood look: chunky, cozy, textured, oversized, and decorated with long handmade tassels.




The advertised picture of your boho hood is quite different from the picture in the pattern you offer.
Could you please send me the pattern for the more interesting hood instead of the basic one?
Thank you