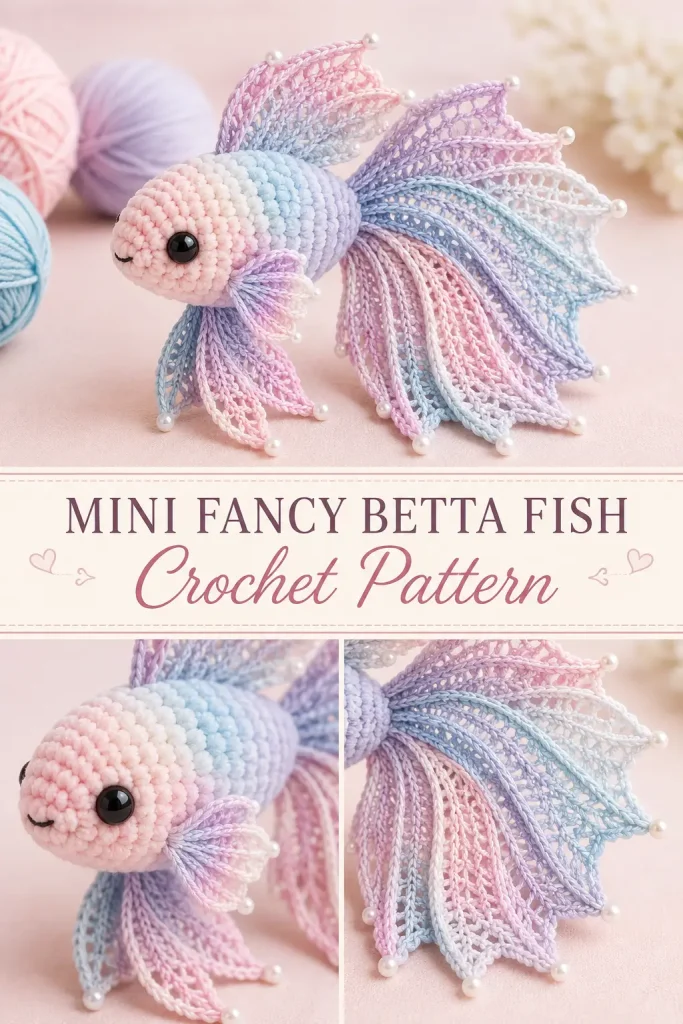
This mini fancy betta fish is a beautiful crochet project for anyone who loves soft amigurumi with dramatic details. The body is small and plush, while the fins are light, flowing, and delicate, giving the fish that elegant betta-style shape.
The pastel color blend makes it feel dreamy and magical, especially with soft pink, lavender, and baby blue tones. You can keep it simple as a plush crochet toy or add tiny beads and metallic thread for a decorative fantasy fish finish.
This is an original amigurumi pattern inspired by the visible betta fish design. It is written to help you create the same style of soft mini fish with a rounded body, large flowing tail, side fins, delicate fin panels, and sweet face details.
Description
This crochet betta fish has a rounded stuffed body, a soft tapered tail base, two small side fins, a large layered fan tail, and flowing top and bottom fins. The body is made with plush pastel yarn, while the fins are made with finer cotton yarn for a light lace-like look. Optional tiny beads can be added to the fin tips, and a very thin metallic thread can be carried through the fins for a subtle shimmer. The finished fish is soft, decorative, and perfect as a plush crochet toy, nursery shelf decor, bag charm, mobile ornament, or handmade gift.
Materials
- Soft chenille or velvet yarn in pastel gradient colors for the body
- Fine cotton yarn in pastel pink, lavender, baby blue, or cream for the fins
- Optional very thin metallic thread for subtle shine
- 3.5 mm or 4.0 mm crochet hook for the body
- 2.5 mm or 3.0 mm crochet hook for the fins
- 10 mm safety eyes
- Polyester stuffing
- Yarn needle
- Scissors
- Stitch markers
- Small beads, optional for fin tips
- Sewing needle and strong thread, optional for beads
Abbreviations
- MR = magic ring
- ch = chain
- sl st = slip stitch
- sc = single crochet
- hdc = half double crochet
- dc = double crochet
- tr = treble crochet
- inc = increase
- dec = decrease
- st = stitch
- sts = stitches
- BLO = back loop only
- rep = repeat
Pattern Notes
- This pattern uses US crochet terms.
- The body is worked in continuous rounds.
- Use a stitch marker to mark the first stitch of each round.
- The body is stuffed firmly before closing.
- The fins are made separately and sewn on.
- For a soft toy for small children, do not use beads or safety eyes. Embroider the eyes instead.
- The large tail is made from several separate fin panels layered around the back of the body.
- Finished size is about 15 cm long, depending on yarn, hook, and tension.
Step-by-Step Instructions
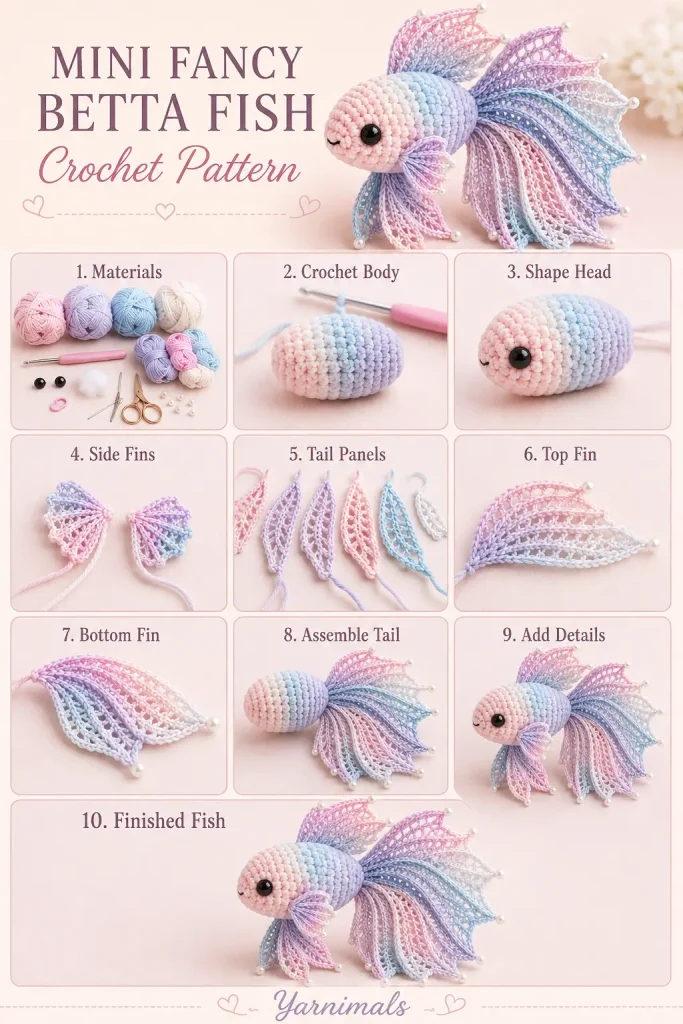
Body
Use chenille yarn and the larger hook.
Round 1
MR, work 6 sc into the ring.
6 sts
Round 2
Inc in each st around.
12 sts
Round 3
Sc in next st, inc in next st.
Rep around.
18 sts
Round 4
Sc in next 2 sts, inc in next st.
Rep around.
24 sts
Round 5
Sc in each st around.
24 sts
Round 6
Sc in next 3 sts, inc in next st.
Rep around.
30 sts
Rounds 7–10
Sc in each st around.
30 sts
Insert safety eyes between Rounds 5 and 6, spacing them about 6 stitches apart on the front of the head.
Round 11
Sc in each st around.
30 sts
Round 12
Sc in next 3 sts, dec.
Rep around.
24 sts
Rounds 13–15
Sc in each st around.
24 sts
Begin stuffing the head and body firmly.
Round 16
Sc in next 2 sts, dec.
Rep around.
18 sts
Round 17
Sc in each st around.
18 sts
Round 18
Sc in next st, dec.
Rep around.
12 sts
Add more stuffing before the opening gets too small.
Round 19
Dec around.
6 sts
Fasten off, leaving a long tail. Sew the opening closed.
This narrow end will become the back of the fish where the tail panels are attached.
Mouth Detail
Thread a small piece of pink or matching yarn onto a yarn needle.
Embroider a tiny curved mouth below the eyes.
Make the mouth subtle and small so the fish keeps a sweet soft expression.
Knot securely inside the body and hide the yarn tail.
Side Fins
Make 2 using fine cotton yarn and the smaller hook.
Row 1
Ch 7.
Sc in 2nd ch from hook.
Hdc in next ch.
Dc in next 2 ch.
Hdc in next ch.
Sc in last ch.
Ch 1, turn.
Row 2
Sc in first st.
Hdc in next st.
2 dc in each of next 2 sts.
Hdc in next st.
Sc in last st.
Ch 1, turn.
Row 3
Sl st in first st.
Sc in next st.
Hdc in next st.
Dc in next 2 sts.
Hdc in next st.
Sc in next st.
Sl st in last st.
Fasten off, leaving a long tail for sewing.
Repeat for the second side fin.
Shape each fin gently with your fingers.
Large Tail Fin Panels
Make 7 to 9 panels using fine cotton yarn and the smaller hook.
For a fuller tail like the image, make 9 panels.
Row 1
Ch 5.
Sc in 2nd ch from hook and in each ch across.
4 sc
Ch 1, turn.
Row 2
Inc in first st.
Sc in next 2 sts.
Inc in last st.
6 sc
Ch 1, turn.
Row 3
Sc in first st.
Ch 2, skip next st.
Sc in next st.
Ch 2, skip next st.
Sc in next st.
Sc in last st.
Ch 1, turn.
Row 4
Inc in first st.
Sc in each st and ch-sp across.
Inc in last st.
8 sts
Ch 1, turn.
Row 5
Sc in first st.
Ch 3, skip next st.
Sc in next st.
Ch 3, skip next st.
Sc in next st.
Ch 3, skip next st.
Sc in last st.
Ch 1, turn.
Row 6
Inc in first st.
Sc in each st and ch-sp across.
Inc in last st.
10 sts
Ch 1, turn.
Row 7
Sc in first st.
Ch 4, skip next st.
Sc in next st.
Ch 4, skip next st.
Sc in next st.
Ch 4, skip next st.
Sc in next st.
Ch 4, skip next st.
Sc in last st.
Ch 1, turn.
Row 8
Sc in each st and ch-sp across.
Ch 1, turn.
Row 9: Scalloped Edge
Sc in first st.
Skip next st.
Work 5 dc in next st.
Skip next st.
Sc in next st.
Repeat across the outer edge as evenly as possible.
Fasten off, leaving a long tail for sewing.
Optional Beaded Tail Tips
If using beads, sew one tiny bead to the top of each scallop point.
Keep beads lightweight so the fins still move softly.
Do not add beads if the fish is for a baby or small child.
Dorsal Fin
This is the flowing fin along the top of the fish.
Use fine cotton yarn.
Row 1
Ch 24.
Sc in 2nd ch from hook and in each ch across.
23 sc
Ch 1, turn.
Row 2
Sc in first st.
Ch 3, skip next st.
Sc in next st.
Rep across.
Ch 1, turn.
Row 3
In each ch-3 space, work:
Sc, hdc, 3 dc, hdc, sc.
Repeat across all spaces.
Fasten off, leaving a long tail for sewing.
Bottom Flowing Fin
Use fine cotton yarn.
Row 1
Ch 22.
Sc in 2nd ch from hook and in each ch across.
21 sc
Ch 1, turn.
Row 2
Sc in first st.
Ch 4, skip next st.
Sc in next st.
Rep across.
Ch 1, turn.
Row 3
In each ch-4 space, work:
Sc, hdc, dc, tr, dc, hdc, sc.
Repeat across.
Fasten off, leaving a long tail for sewing.
This bottom fin should look slightly longer and more delicate than the top fin.
Optional Long Fin Strands
To make the fins look more flowing, add a few thin yarn strands to the bottom and tail.
Cut 8–12 strands of fine cotton yarn about 8–10 cm long.
Attach them with a lark’s head knot along the lower tail and bottom fin.
Trim unevenly for a natural betta fin look.
If using metallic thread, add only 2–3 very thin strands so the shimmer stays subtle.
Tail Assembly
Place the body with the back end facing you.
Arrange the tail panels around the back opening in a fan shape.
Use 3 panels across the top, 3 panels across the middle, and 3 panels across the lower section if making 9 panels.
Overlap the bases slightly so the tail looks full.
Sew each panel securely to the back of the body.
Use the yarn tails to stitch through the base of each panel several times.
Do not sew the outer edges together. The panels should stay loose and flowing.
After all panels are attached, gently spread them into a large fan shape.
Attach the Dorsal Fin
Place the dorsal fin along the top back of the fish, starting slightly behind the head and ending near the tail.
Sew along the straight edge of the fin.
Leave the scalloped edge free so it stands up softly.
Attach the Bottom Fin
Place the bottom fin along the lower back of the body.
Sew the straight edge to the underside of the fish.
Let the long scalloped edge hang freely.
Attach the Side Fins
Place one small side fin on each side of the body, slightly behind the eyes.
Sew only the inner base edge of each fin.
Let the outer rounded edge remain loose.
Make sure both fins are even before weaving in the ends.
Optional Metallic Thread Detail
Thread very thin metallic thread onto a sewing needle.
Weave it lightly through the tail panels and fin edges.
Do not cover the crochet stitches.
Use only a few tiny shimmer lines so the fish still looks soft and pastel.
Knot securely and hide the thread ends inside the fin stitches.
Finishing
Weave in all yarn tails carefully.
Check that the tail panels are firmly attached.
Fluff and separate the fins with your fingers.
Shape the tail into a soft fan.
Add final stuffing adjustments if needed before closing any hidden gaps.
The finished fish should have a rounded plush body, sweet face, soft side fins, and a dramatic flowing betta-style tail.
Tips & Variations
Use pastel gradient chenille yarn for a dreamy fish body.
Use pink, lavender, blue, and cream cotton yarn for the fins.
For a bold betta fish, try red, orange, black, and gold.
For a fantasy version, use aqua, lilac, silver, and pale pink.
If your tail feels too heavy, make fewer panels or use thinner cotton yarn.
If your fins curl too much, lightly block them before sewing.
For a baby-safe version, embroider the eyes and skip all beads.
For a decorative version, add tiny beads only to fin tips and keep them very secure.
FAQ
Is this mini betta fish beginner-friendly?
It is best for advanced beginners. The body is simple amigurumi, but the fins and assembly require patience.
Can I make the fish without beads?
Yes. The beads are optional. The fish still looks beautiful with just the lacy fin edges.
What yarn works best for the body?
Soft chenille or velvet yarn creates the plush rounded body shown in the design. You can also use cotton or acrylic, but the fish will look less fluffy.
Can I make the fins larger?
Yes. Add more rows to the tail panels or make extra panels for a fuller tail. Keep the base narrow so the tail attaches neatly to the body.
Conclusion
This mini fancy betta fish crochet pattern is a beautiful project for anyone who loves soft amigurumi with delicate details. The plush body, pastel colors, flowing fins, and tiny face make it feel magical and handmade.
Create one in soft pink and blue like the sample, or try your own fantasy fish colors for a special crochet gift, ornament, or decorative plush.




They all looking Beautiful.