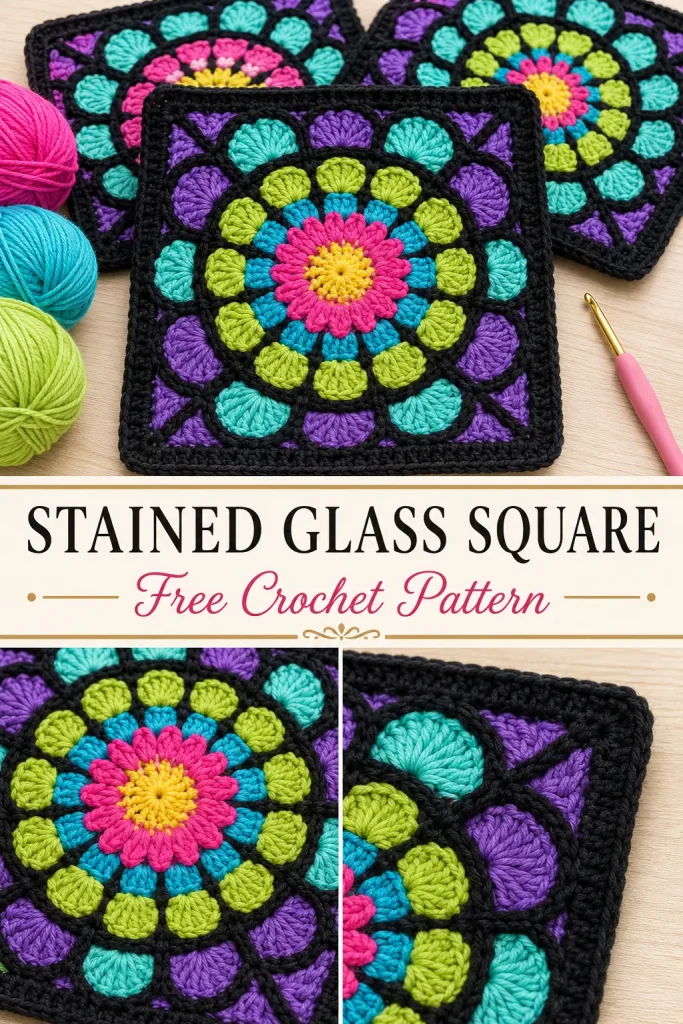
If you love bold color and dramatic contrast, this stained glass crochet square is such a fun project to make. It has a bright mandala-style center, jewel-toned shell details, and a strong black frame that gives it that beautiful stained glass look.
This square is perfect for making blankets, cushion covers, tote bags, wall hangings, or patchwork projects. The colorful center makes every square feel special, while the black border helps the whole design pop.
Description
This crochet square features a round multicolor center worked in bright shades like pink, turquoise, lime, purple, and aqua, followed by a ring of colorful shells and a bold black squaring round. The black edging acts like the leading in stained glass, outlining the color sections and giving the motif its signature window-inspired look. The finished square is rich in texture, vibrant in color, and easy to mix and match for larger crochet projects.
Materials
- DK weight or light worsted yarn
- Black yarn for the stained glass outline and border
- Bright contrast yarns in several shades such as:
- hot pink
- turquoise
- lime green
- purple
- aqua
- yellow
- bright blue
- 4.0 mm crochet hook
- Scissors
- Yarn needle
- Stitch markers, optional
- Blocking mat and pins, optional
Abbreviations
- MR = magic ring
- ch = chain
- sl st = slip stitch
- sc = single crochet
- hdc = half double crochet
- dc = double crochet
- tr = treble crochet
- sp = space
- st = stitch
- sts = stitches
- sk = skip
- rep = repeat
Pattern Notes
- Skill level: easy to intermediate
- This is an original square inspired by the stained glass look in the image.
- The square begins as a circle, then is shaped into a square with black yarn.
- For the stained glass effect, use black as the final framing color.
- You can change colors as often as you like in the shell round for a true multicolor look.
- Fasten off neatly when changing colors often.
- Blocking helps the square sit nice and flat.
- Finished square size is about 6.5 to 7.5 inches depending on yarn, hook, and tension.
Step-by-Step Instructions
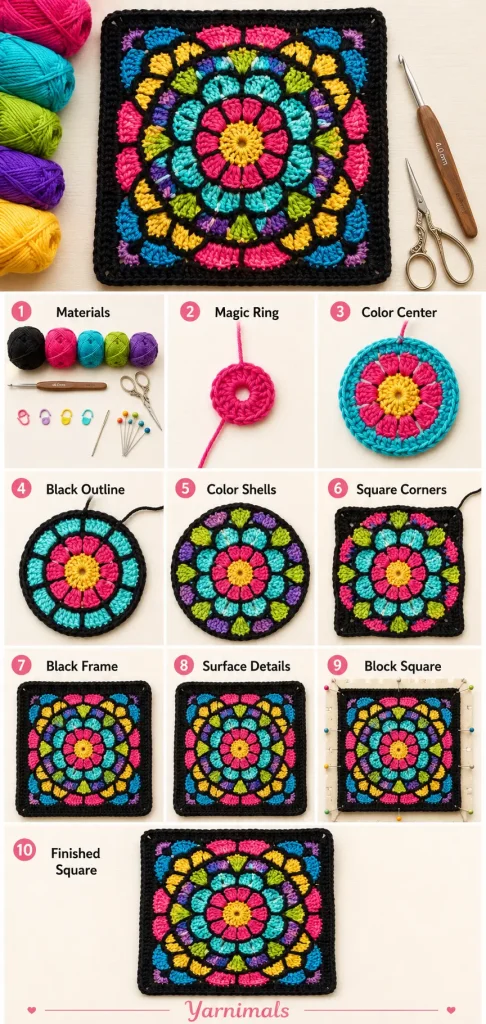
Color Key
You can follow this sample color flow or use your own bright mix:
- Round 1: hot pink
- Round 2: turquoise
- Round 3: lime green
- Round 4: black
- Round 5: mixed bright colors
- Rounds 6 to 8: black
Round 1
With hot pink, make a MR.
Ch 3, counts as first dc.
Work 11 dc into the ring.
Pull ring closed and join with sl st to top of beginning ch 3.
You should have 12 dc.
Round 2
Join turquoise.
Ch 2.
Work 2 hdc in each st around.
Join with sl st.
You should have 24 hdc.
Round 3
Join lime green.
Ch 3, counts as first dc.
Work 1 dc in next st, 2 dc in next st.
Rep from around.
Join with sl st.
You should have 36 dc.
Round 4
Join black.
Ch 1.
Sc in next 2 sts, ch 2, sk next st.
Rep from around.
Join with sl st to first sc.
You should have 12 ch-2 spaces around the motif.
Round 5
This is the colorful stained glass petal or shell round.
You may use one color for the whole round, alternate every shell, or rotate through several bright colors for the best stained glass look.
Join your chosen color in any ch-2 sp.
Work 6 dc in the ch-2 sp.
In the next ch-2 sp, work 6 dc.
Continue working 6 dc in each ch-2 sp around.
Join with sl st to the first dc of the first shell.
You should have 12 shells total.
Color idea:
Try changing color every 1 or 2 shells using pink, aqua, purple, lime, yellow, and turquoise.
Fasten off.
Round 6 – Squaring Round
This round turns the circle into a square.
With black, lay the motif flat and identify the shell spaces so that you divide the motif into 4 equal sides. Since there are 12 shells, each side will contain 3 shells.
Choose a gap just before the first shell of one side and join black there.
In that gap, work:
Ch 4, 2 tr, ch 2, 3 tr.
This is your first corner.
Now work across the first side as follows:
- hdc in each of the 6 dc of shell 1
- sc in the gap between shell 1 and shell 2
- hdc in each of the 6 dc of shell 2
- sc in the gap between shell 2 and shell 3
- hdc in each of the 6 dc of shell 3
In the next gap, work:
3 tr, ch 2, 3 tr.
This is the next corner.
Repeat this pattern 3 more times around:
- 3 shells per side
- 1 sc in each gap between shells on the side
- 3 tr, ch 2, 3 tr in each corner gap
Join with sl st to the top of beginning ch 4.
You now have a square shape.
Round 7
Still using black, ch 1.
Work 1 sc in each st across each side.
In each corner ch-2 sp, work:
sc, ch 2, sc.
Continue around and join with sl st.
Round 8
Still using black, ch 3, counts as first dc.
Work 1 dc in each st across each side.
In each corner ch-2 sp, work:
2 dc, ch 2, 2 dc.
Join with sl st to top of beginning ch 3.
Fasten off.
Optional Round 9
For a slightly wider black frame, join black and work 1 sc in each st around.
In each corner ch-2 sp, work:
sc, ch 2, sc.
Fasten off and weave in ends.
Optional Surface Stained Glass Detail
If you want even more stained glass effect, use black yarn and work surface slip stitches on the front of the square.
You can add surface slip stitches:
- around the edge of the center circle
- around the lime green round
- around selected shell sections
Keep these stitches loose so the square stays flat.
This step is optional, but it gives a stronger stained glass window look.
Joining Squares for a Bigger Project
To make a blanket, pillow, or bag, crochet multiple squares and join them together.
You can join them by:
- whipstitching with black yarn
- slip stitching through the back loops
- join-as-you-go with single crochet
Using black for joining helps keep the stained glass look consistent.
Tips & Variations
- Use black as the outer border for the strongest stained glass effect.
- Try jewel tones like fuchsia, turquoise, emerald, purple, gold, and teal.
- Use the same Round 1 to Round 4 colors for every square, then vary the shell colors.
- For a softer version, use navy or charcoal instead of black.
- For a bold blanket, make all squares different in the shell round but keep the black squaring round the same.
- Block each square before joining for a cleaner finish.
- If the shell round feels too ruffled, check your tension and try a slightly smaller hook for that round.
- If the square curls inward, block it or add the optional Round 9.
FAQ
Is this a granny square?
It is a crochet square motif, but it is not a traditional granny square. It starts as a round mandala-style center and is then turned into a square.
Can beginners make this pattern?
Yes, confident beginners can make it. The stitches are simple, but the color changes and the squaring round require a little attention.
What can I make with stained glass squares?
These squares are great for blankets, tote bags, cushion covers, table mats, and decorative wall pieces.
Do I have to change colors so often?
No. You can simplify the design by using one color for the shell round, but using multiple bright colors gives the square its stained glass charm.
Conclusion
This stained glass crochet square is such a beautiful way to play with color. The bright center, colorful shell ring, and bold black framing come together to create a striking crochet motif that looks artistic, modern, and full of personality.
Make just one for a small project, or crochet a whole stack for a colorful blanket or bag. It is a lovely crochet square pattern when you want something eye-catching, cheerful, and fun to build.




I love this pattern. Unfortunately I am unable to print, which means pdf patterns don’t work for me.
Is it available in paper format? I’d be happy to purchase a single pattern or book, preferably with colour photos and step by step instructions.
Thanks
Thank you for letting me know about the PDF download issue. It has now been fixed, and the download button should work normally again. Please try downloading the pattern one more time. Sorry for the trouble, and thank you for your patience!
I have entered my email account and it keeps saying something has gone wrong so I’m unable to download the pdf
Thank you for letting me know about the PDF download issue. It has now been fixed, and the download button should work normally again. Please try downloading the pattern one more time. Sorry for the trouble, and thank you for your patience!