Crochet Christmas Tree Keychain Pattern – A Cute Little Holiday Bag Charm
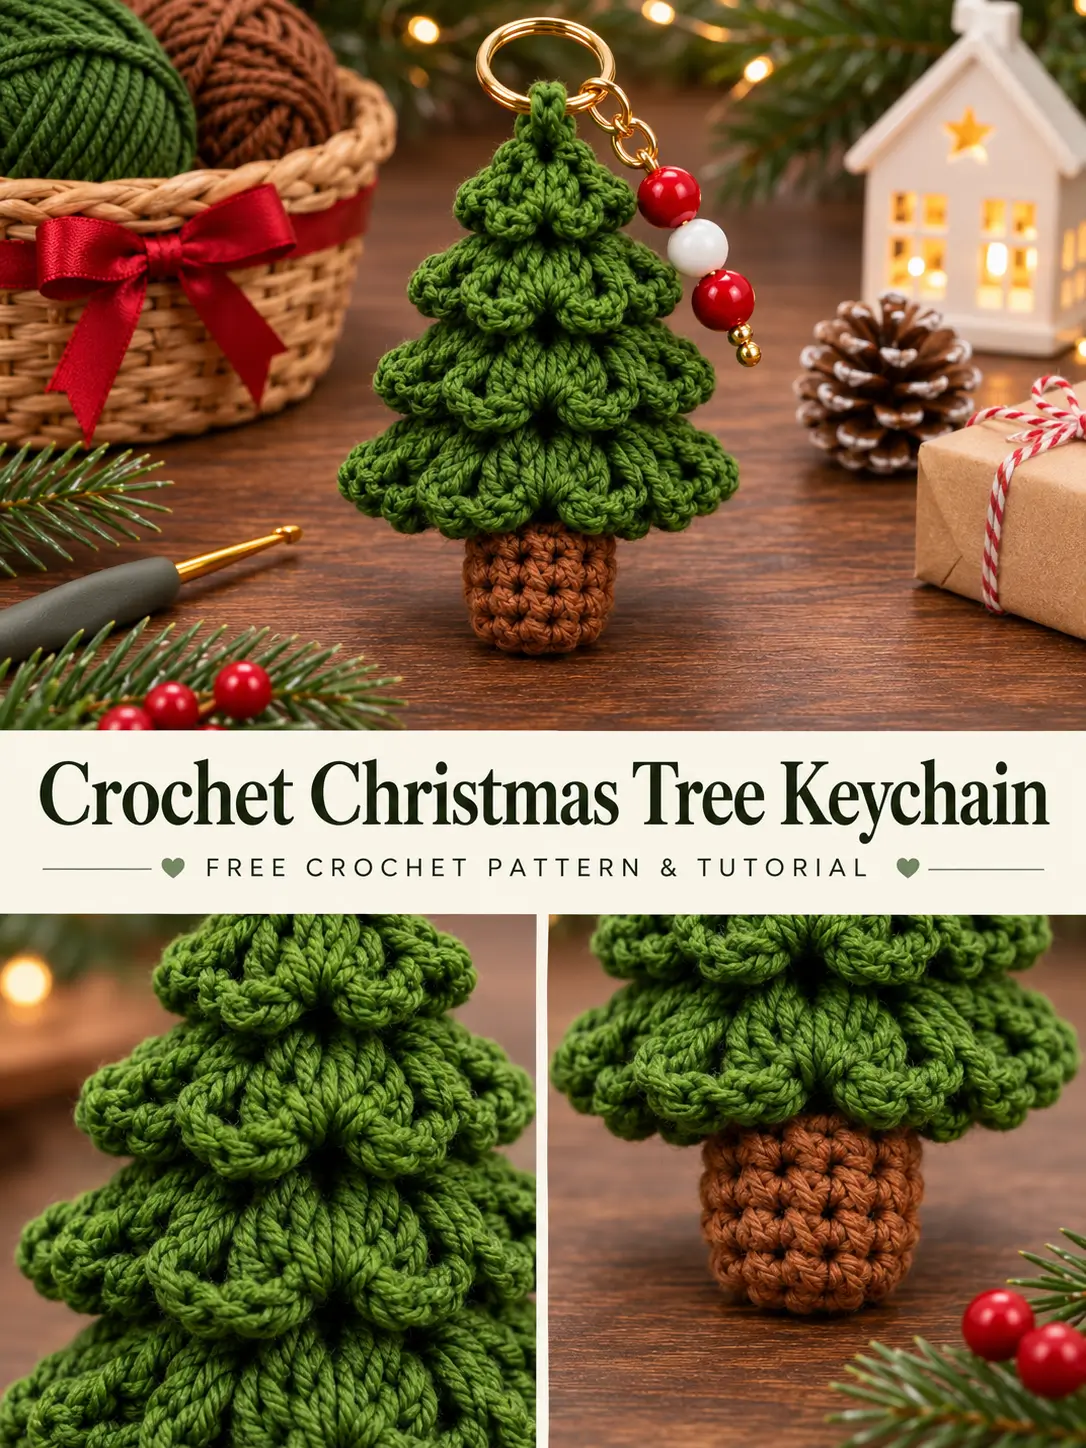
If you love tiny crochet projects that look adorable without using much yarn, this crochet Christmas tree keychain is a fun holiday project to try!
With its chunky-looking green branches, little brown trunk, and shiny gold keyring, this miniature Christmas tree makes a lovely handmade accessory for purses, backpacks, keys, or Christmas gift bags.
What makes this design especially cute is the layered texture. Instead of a flat Christmas tree, we’re creating three overlapping sections with raised puff stitches and softly scalloped edges. The result is a tiny tree with a full, dimensional appearance.
And although those fluffy-looking branches might seem complicated, the construction is surprisingly approachable once you learn the puff stitch.
This is an original three-tier crochet pattern inspired by the appearance of a textured Christmas tree charm. It uses individual crocheted triangles rather than a folded granny square, so you can follow the instructions without needing to guess how to fold or transform a square.
Let’s make one!
Why You’ll Love This Crochet Christmas Tree Keychain
There are so many reasons to add this miniature tree to your holiday crochet list.
- It’s a small project. You only need modest amounts of green and brown yarn.
- It has beautiful texture. Puff stitches give the branches a soft, raised look.
- It’s customizable. Try classic forest green, sage green, snowy white, or even sparkly holiday yarn.
- It makes a thoughtful handmade gift. Attach it to a stocking, gift bag, purse, or backpack.
- It’s a great way to practice puff stitches. The repeating rows help you get comfortable with this decorative stitch.
- It’s easy to make multiples. Once you understand the construction, you can create several trees in different colors.
These little crochet trees are especially charming when attached to wrapped holiday gifts. The recipient gets a decorative gift topper that can later become a bag charm or Christmas ornament.
Crochet Christmas Tree Keychain Pattern Details
| Detail | Information |
|---|---|
| Skill level | Confident beginner |
| Crochet terminology | US terms |
| Main stitches | Single crochet, half double crochet, puff stitch |
| Construction | Six triangular panels, one trunk, assembly |
| Recommended yarn | DK-weight cotton or cotton blend |
| Crochet hook | 3.0 mm |
| Estimated size | Approximately 2½–3½ inches tall |
| Gauge | Not critical |
| Finishing | Light stuffing, sewing, hanging loop |
The finished size is an estimate rather than a tested measurement. Your results will depend on yarn thickness, hook size, and tension.
Materials You’ll Need
Gather the following supplies before starting:
- Green DK-weight cotton or cotton-blend yarn (approximately 40–60 yards)
- Small amount of brown DK-weight yarn (approximately 5 yards)
- 3.0 mm crochet hook
- Yarn needle
- Scissors
- Stitch marker
- Small amount of polyester fiberfill
- Gold split keyring, approximately 20–25 mm
- Small gold jump ring
- Strong matching yarn or nylon cord for reinforcing the hanger
- Optional red and white beads for decoration
- Optional gold jewelry headpin and jewelry pliers
Yarn tip: Cotton and cotton-blend yarns are lovely choices because they help the tree hold its shape and show off the puff-stitch texture.
If you’re using acrylic yarn, choose one with good stitch definition and avoid overstuffing the panels.
You can also experiment with a slightly smaller hook for a firmer fabric. For a keychain, tighter stitches generally work better than loose, floppy stitches.
Crochet Abbreviations (US Terms)
| Abbreviation | Meaning |
|---|---|
| ch | Chain |
| sc | Single crochet |
| hdc | Half double crochet |
| sl st | Slip stitch |
| st(s) | Stitch(es) |
| inc | Increase: 2 sc in one stitch |
| PS | Puff stitch |
| RS | Right side |
| WS | Wrong side |
Parentheses indicate stitch counts at the end of each row.
Special Stitch: Puff Stitch (PS)
The puff stitch is what gives this little Christmas tree its beautiful raised texture.
Here’s how to make it:
- Yarn over.
- Insert your hook into the indicated stitch.
- Yarn over and pull up a tall loop.
- Repeat Steps 1–3 three more times in the same stitch.
- You should now have nine loops on your hook.
- Yarn over and pull through all nine loops.
- Chain 1 tightly to secure the puff.
Important: For this pattern, the completed puff, including its closing chain, counts as one stitch.
When working the next row, insert your hook into the closing chain at the top of the puff. Do not count that chain as an additional stitch.
Try to pull every puff loop to approximately the same height. Consistent loops make the tree branches look fuller and more even.
Before You Begin: Understanding the Tree Construction
This Christmas tree is made from three overlapping green tiers.
Each tier contains two matching triangular panels: one for the front and one for the back.
The front panel also gets a decorative scalloped edge.
Here’s how the pieces are organized:
| Tree tier | Rows | Final width | Number of panels |
|---|---|---|---|
| Small top tier | 1–6 | 7 stitches | 2 |
| Medium tier | 1–10 | 11 stitches | 2 |
| Large bottom tier | 1–14 | 15 stitches | 2 |
That means you will crochet six green triangular panels altogether.
The matching panels are sewn together with a little stuffing, then the three tiers are stacked from largest to smallest.
A small brown crochet trunk is attached to the bottom, and a sturdy hanging loop finishes the charm.
Pattern note: All the triangular panels start with the same instructions. You simply stop at a different row depending on which size you’re making.
The beginning chain and turning chains do not count as stitches.
Step 1: Crochet the Green Christmas Tree Panels
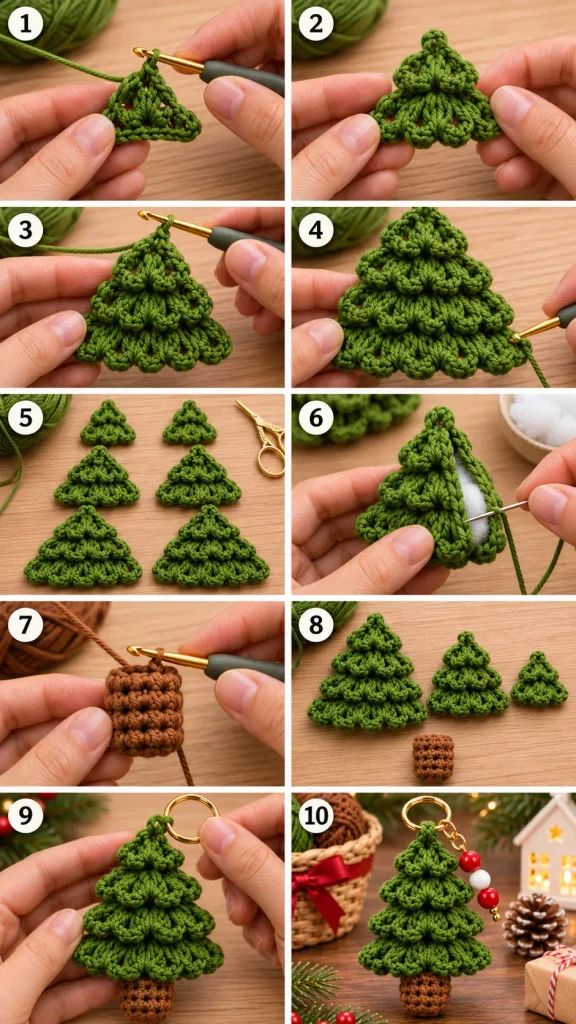
Using green yarn and a 3.0 mm crochet hook, begin the first triangle.
Small Christmas Tree Panel
Row 1 (RS): Ch 2. Work 3 sc in the second chain from the hook. (3 sts)
Row 2 (WS): Ch 1, turn. Sc in each stitch across. (3 sts)
Row 3 (RS): Ch 1, turn. Inc in the first stitch, PS in the next stitch, inc in the last stitch. (5 sts)
Row 4 (WS): Ch 1, turn. Sc in each stitch across. (5 sts)
Row 5 (RS): Ch 1, turn. Inc in the first stitch, PS in the next stitch, sc in the next stitch, PS in the next stitch, inc in the last stitch. (7 sts)
Row 6 (WS): Ch 1, turn. Sc in each stitch across. (7 sts)
Your small triangle is now complete.
Fasten off and leave a tail for sewing.
Make a second small triangle using Rows 1–6.
You should have two matching seven-stitch-wide triangles.
Medium Christmas Tree Panel
Begin another triangle by repeating Rows 1–6 above.
Then continue:
Row 7 (RS): Ch 1, turn. Inc in the first stitch, PS in the next stitch, sc in the next stitch; repeat from * to * once more. PS in the next stitch, inc in the last stitch. (9 sts)
Row 8 (WS): Ch 1, turn. Sc in each stitch across. (9 sts)
Row 9 (RS): Ch 1, turn. Inc in the first stitch, PS in the next stitch, sc in the next stitch; repeat from * to * two more times. PS in the next stitch, inc in the last stitch. (11 sts)
Row 10 (WS): Ch 1, turn. Sc in each stitch across. (11 sts)
Fasten off, leaving a sewing tail.
Repeat Rows 1–10 to make a second matching medium triangle.
You should now have two medium triangles, each ending with 11 stitches.
Large Christmas Tree Panel
For the largest tier, begin another triangle and follow Rows 1–10.
Then continue:
Row 11 (RS): Ch 1, turn. Inc in the first stitch, PS in the next stitch, sc in the next stitch; repeat from * to * three more times. PS in the next stitch, inc in the last stitch. (13 sts)
Row 12 (WS): Ch 1, turn. Sc in each stitch across. (13 sts)
Row 13 (RS): Ch 1, turn. Inc in the first stitch, PS in the next stitch, sc in the next stitch; repeat from * to * four more times. PS in the next stitch, inc in the last stitch. (15 sts)
Row 14 (WS): Ch 1, turn. Sc in each stitch across. (15 sts)
Fasten off, leaving a sewing tail.
Repeat Rows 1–14 to make the second large triangle.
You now have all six triangular pieces!
Before moving on: Check the final stitch counts. Your two small panels should each have seven stitches across their bottom row, the medium panels 11, and the large panels 15.
If the counts don’t match, fix them before joining the pieces. Matching panels will be much easier to sew neatly.
Step 2: Add the Pretty Scalloped Branch Edges
The rounded edges are one of the details that give this crochet Christmas tree its soft, layered appearance.
We’ll use small half-double-crochet shells to create a decorative finish.
Choose one panel from each matching pair to become the front of the tree.
Only these three front panels need the decorative edging.
Scalloped Edging Pattern
With the last row complete, turn your work so that the right side faces you and the bottom edge is ready to work into.
Ch 1.
Sl st in the first stitch.
Then repeat the following sequence across the row:
3 hdc in the next stitch, sl st in the next stitch.
Continue until you reach the end of the row.
Your finished edging should contain:
- Small triangle: 3 scallops
- Medium triangle: 5 scallops
- Large triangle: 7 scallops
Fasten off and weave in the ending tails.
The scallops should sit slightly below the straight bottom edge, creating little rounded branches.
Tip: If the scallops look too flat, gently shape them with your fingers. Avoid pulling them tightly, because the extra fullness is what creates their decorative appearance.
Step 3: Join and Lightly Stuff the Green Tiers
Now we’ll turn the flat triangles into soft, dimensional pieces.
Take the two matching small triangles.
Place them together with their wrong sides facing inward and their pointed ends aligned.
Make sure the puff stitches face outward.
Using green yarn and a yarn needle, whipstitch around both sloping sides and the straight bottom edges, matching the corresponding stitches as closely as possible.
Leave a small opening before finishing the seam.
Insert just a little polyester stuffing into the triangle.
You only need enough to create a slightly raised shape.
Don’t overstuff! This is a keychain, not a plush toy. Too much stuffing can make the tiers bulky and prevent them from overlapping neatly.
Close the remaining opening securely and weave in the yarn ends.
Keep the decorative scallops free along the front edge as you sew. Avoid flattening them into the seam.
Repeat the same process for the medium and large triangles.
You should finish with three lightly stuffed green tiers:
- One small tier
- One medium tier
- One large tier
Each tier should have a rounded, textured front and a matching back.
Step 4: Crochet the Brown Christmas Tree Trunk
The little brown trunk gives the tree a finished, miniature Christmas-tree shape.
Using brown yarn:
Round 1: Make a magic ring and work 6 sc into the ring. (6 sts)
Round 2: Inc in each stitch around. (12 sts)
Round 3: Sc in each stitch around. (12 sts)
Round 4: Sc in each stitch around. (12 sts)
Round 5: Sc in each stitch around. (12 sts)
Round 6: Sc in each stitch around. (12 sts)
Round 7: Sc in each stitch around. (12 sts)
Fasten off, leaving approximately a 10-inch yarn tail for sewing.
Lightly stuff the trunk.
Flatten the open top so that six stitches sit across the front and six across the back.
Using the yarn tail, sew the opening closed through both layers.
Your trunk should look like a short, softly rounded brown cylinder.
Optional adjustment: If you prefer a shorter trunk, stop after Round 5 or 6 instead. Keep the same 12-stitch circumference.
Step 5: Assemble Your Crochet Christmas Tree
This is the fun part where the separate pieces finally start looking like a Christmas tree!
Arrange the Layers
Place the large green tier on your work surface with its pointed top facing upward.
Center the medium tier on top of it, with both pointed tops aligned.
Position the small tier over the medium one, again aligning the top points.
The lower portions of the larger triangles should remain visible beneath the smaller tiers.
Aim to leave approximately four rows of the larger triangle exposed below the tier above it.
The scalloped edge of each smaller tier should form a distinct row of branches.
Look at your tree before sewing anything.
You should see a narrow top, a wider middle, and an even wider bottom, creating the familiar Christmas tree silhouette.
Sew the Tiers Together
Once you’re happy with the placement, pin or temporarily secure the layers.
Using green yarn and a yarn needle, stitch the small tier to the medium tier at several hidden points.
Then attach the medium tier to the large tier.
Secure the overlapping areas near the left side, center, and right side, and reinforce the aligned top points.
Use several small stitches at each attachment point so that the pieces don’t shift when the keychain is handled.
Try to keep the sewing stitches hidden between the tiers.
Important: Avoid pulling the yarn so tightly that the puff stitches become flattened. The raised texture is one of the prettiest features of this design.
Attach the Brown Trunk
Turn the assembled tree over.
Place the brown trunk behind the center of the largest green tier.
Tuck the closed upper end of the trunk slightly beneath the bottom green edge.
Leave most of the brown trunk visible.
Using the long brown yarn tail, sew the trunk securely to the back and lower seam of the green tree.
Reinforce the attachment with several passes of the needle.
Turn your tree over again.
You should now have a complete miniature Christmas tree, ready for its hanging loop!
Step 6: Add the Keychain Hanging Loop
A secure hanging loop is especially important if you plan to attach this tree to a purse, backpack, or set of keys.
For the crocheted version, hold two strands of green yarn together.
Insert your hook through a strong stitch at the top point of the tree, catching the overlapping layers.
Pull the doubled yarn through to form a loop.
Ch 8.
Sl st back into the same attachment point to form a small hanging loop.
Fasten off, leaving long tails.
Thread the tails onto a yarn needle and stitch them through the upper layers several times.
Secure them on the back and weave in the ends.
For a charm that will be used frequently, you can reinforce the crocheted loop with strong nylon cord.
Attach the Gold Keyring
Using jewelry pliers, open a small metal jump ring sideways.
Slip the jump ring through the crocheted hanging loop.
Add the gold split keyring.
Close the jump ring completely, making sure the ends meet without a gap.
Your little crochet tree can now hang from a bag, backpack, or keyring.
Durability tip: A reinforced hanger is preferable for everyday use. Yarn loops can wear down from repeated friction against metal findings, especially when attached to heavy keys.
Step 7: Add Optional Christmas Beads
If you want an extra festive detail, add a tiny bead charm beside the tree.
Red and white beads look especially pretty against the green yarn and gold keychain hardware.
For a simple bead dangle, you’ll need:
- Two small red beads
- One small white bead
- Gold jewelry headpin
- Small jump ring
- Jewelry pliers
Slide the beads onto the headpin in the following order:
Red → White → Red
Make a secure wrapped loop at the top of the headpin using jewelry pliers.
Trim and tuck the cut wire end.
Attach the bead dangle to a separate jump ring beside the Christmas tree.
You can also skip the beads for a simpler, minimalist design.
Beads and metal findings are small parts that can detach, so keep the finished charm away from young children and pets. It is not intended as a baby toy.
How to Make Your Crochet Christmas Tree Look Neat
A few little details can make a big difference in the finished project.
1. Keep Your Puff Stitches Even
Try to draw up each puff loop to the same height.
Uneven loops can make some branches look larger than others.
If your puffs are too tight, loosen your tension slightly when drawing up the loops.
2. Use a Consistent Hook Size
Using the same hook for every green triangle helps ensure the matching front and back panels are the same size.
If you’re switching yarns, make a sample triangle first to check the texture and firmness.
3. Don’t Add Too Much Stuffing
Light stuffing helps give the tiers dimension without making them bulky.
If the tree feels too round, remove a little stuffing before closing the seams.
4. Take Your Time With Assembly
The arrangement of the three tiers creates the recognizable Christmas tree shape.
Before sewing them together, check that each section is centered and the branches overlap evenly.
5. Reinforce the Hanging Loop
If you’re making these as bag charms or gifts, take extra care when attaching the keyring.
The hanger is the part most likely to experience pulling and friction during use.
Fun Ways to Customize Your Christmas Tree Keychain
Once you’ve made the classic green-and-brown version, there are lots of cute variations to try.
Snowy White Christmas Tree
Use cream or white yarn for the green tiers and a warm brown yarn for the trunk.
The puff stitches create a soft, snow-covered effect.
Sage Green Christmas Tree
Choose muted sage green yarn for a more subtle, modern holiday look.
Pair it with a simple gold keyring and skip the beads for a minimalist finish.
Sparkly Holiday Tree
Try green yarn with a subtle metallic strand for a little Christmas sparkle.
Make sure the yarn is comfortable to crochet with and doesn’t make the puff stitches too stiff.
Mini Christmas Ornament
Instead of attaching a metal keyring, make a longer reinforced hanging loop.
Hang the finished tree on a Christmas tree, wreath, or seasonal display.
Christmas Gift Topper
Tie the little tree onto a wrapped gift or holiday gift bag.
It’s a charming way to add something handmade, and the recipient can reuse it as a decoration afterward.
What Yarn Works Best for This Project?
Because this is a small textured crochet accessory, yarn choice affects both the appearance and durability.
Cotton yarn gives the stitch pattern good definition. It can help the scalloped edges and puff stitches maintain their shape.
Cotton-blend yarn is another nice option if you want a balance of structure and softness.
Acrylic yarn can work too, especially if you already have small amounts left over from other crochet projects.
For the pictured style of miniature tree, I recommend starting with DK-weight yarn and a 3.0 mm hook.
If you’d like a larger version, you can experiment with worsted-weight yarn and an appropriately sized hook. Expect the finished size to change.
If you’re new to choosing yarn, this is also a great project for learning how fiber type and hook size affect stitch definition.
Common Problems and Easy Fixes
My Tree Looks Flat
The pattern is intended to be dimensional, but only lightly stuffed.
If your tree looks completely flat, gently add a little more stuffing to each tier before closing it.
If it’s already assembled, you can also try fluffing the puff stitches carefully with your fingers.
My Tree Looks Too Bulky
This usually happens when there’s too much stuffing or the tiers are sewn too tightly against one another.
Use less stuffing and allow the scalloped edges to sit naturally over the lower sections.
My Triangle Edges Aren’t Even
Check the stitch count at the end of each row.
Remember that every increase adds one additional stitch, while the puff stitch counts as one stitch, including its closing chain.
The triangle should grow by two stitches on each puff-stitch increase row.
My Puff Stitches Look Different Sizes
Focus on pulling up every loop to a consistent height.
If some loops are shorter, the finished puff will look smaller.
Practice a few puff stitches with scrap yarn if necessary before continuing.
My Keychain Hangs Crooked
Check whether the hanging loop is attached at the center of the top point.
Also make sure the three green layers are centered over one another and the trunk is attached in the middle.
You can add a few hidden securing stitches to straighten the layers.
Frequently Asked Questions
Is this Christmas tree keychain beginner-friendly?
Yes, it’s suitable for confident beginners who already know how to chain, single crochet, turn rows, and sew crochet pieces together.
The puff stitch is the main technique that may be new.
Once you’ve practiced a few puffs, the pattern follows a simple, repeating structure.
Can I make this keychain without stuffing?
Yes.
You can leave the green tiers unstuffed for a flatter, lighter charm.
The puff stitches will still add some texture, although the finished tree won’t have quite as much dimension.
You can also use a very thin layer of stuffing if you prefer a compromise between flat and puffy.
Can I turn this into a Christmas ornament?
Absolutely!
Replace the metal keyring with a longer hanging loop made from yarn, ribbon, or cord.
It would look lovely hanging from a Christmas tree or attached to a holiday garland.
Can I use leftover yarn?
Yes, provided you have enough yarn to make matching front and back panels.
Small amounts of green and brown yarn are ideal for this type of project.
Using different shades of green for the tiers can also create a fun layered effect.
How do I make the tree smaller?
Use thinner yarn and a smaller hook, while keeping the same stitch counts.
You may need to adjust the stuffing quantity and choose a smaller keyring to suit the finished size.
How do I care for the finished keychain?
Spot-clean the crochet with a little cool water and mild soap when needed.
Avoid soaking the metal hardware unnecessarily, and allow the yarn to dry completely.
Check the hanging loop and metal findings occasionally for wear.
Can I sell finished keychains made with this pattern?
You can use this original pattern to make finished handmade items for personal use, gifting, or sale.
If you’re selling them, make sure the hanging loop and hardware are securely attached, describe the materials accurately, and follow any applicable product safety requirements.
Avoid presenting the finished item as a toy for small children.
More Small Crochet Projects to Try
If you enjoyed making this miniature Christmas tree, you might also love making other quick crochet accessories and holiday decorations.
Mini crochet stars, tiny stockings, snowflakes, little crochet hearts, and small amigurumi ornaments are all fun projects to explore.
A collection of tiny crochet decorations can also become a set of handmade gift toppers or a festive garland.
And if you particularly enjoyed the raised texture in this project, look for more crochet designs that use puff stitches, bobbles, and other dimensional stitches.
These techniques can make even simple crochet shapes look wonderfully detailed.
Final Thoughts
This crochet Christmas tree keychain is a sweet way to turn a little green yarn into something festive, textured, and useful.
The three layered sections give the tree its full shape, the puff stitches make the branches stand out, and the tiny brown trunk adds that finishing touch.
Whether you make one for your own bag, add it to a wrapped present, or crochet a few as handmade holiday gifts, it’s a lovely little project to enjoy during the Christmas season.
Try it in classic green first, then experiment with other colors to create your own miniature forest of crochet Christmas trees.
Save this crochet Christmas tree keychain pattern for your next holiday crafting session! 🎄