Adorable Crochet Pumpkin Coaster Pattern – Free Fall Crochet Tutorial
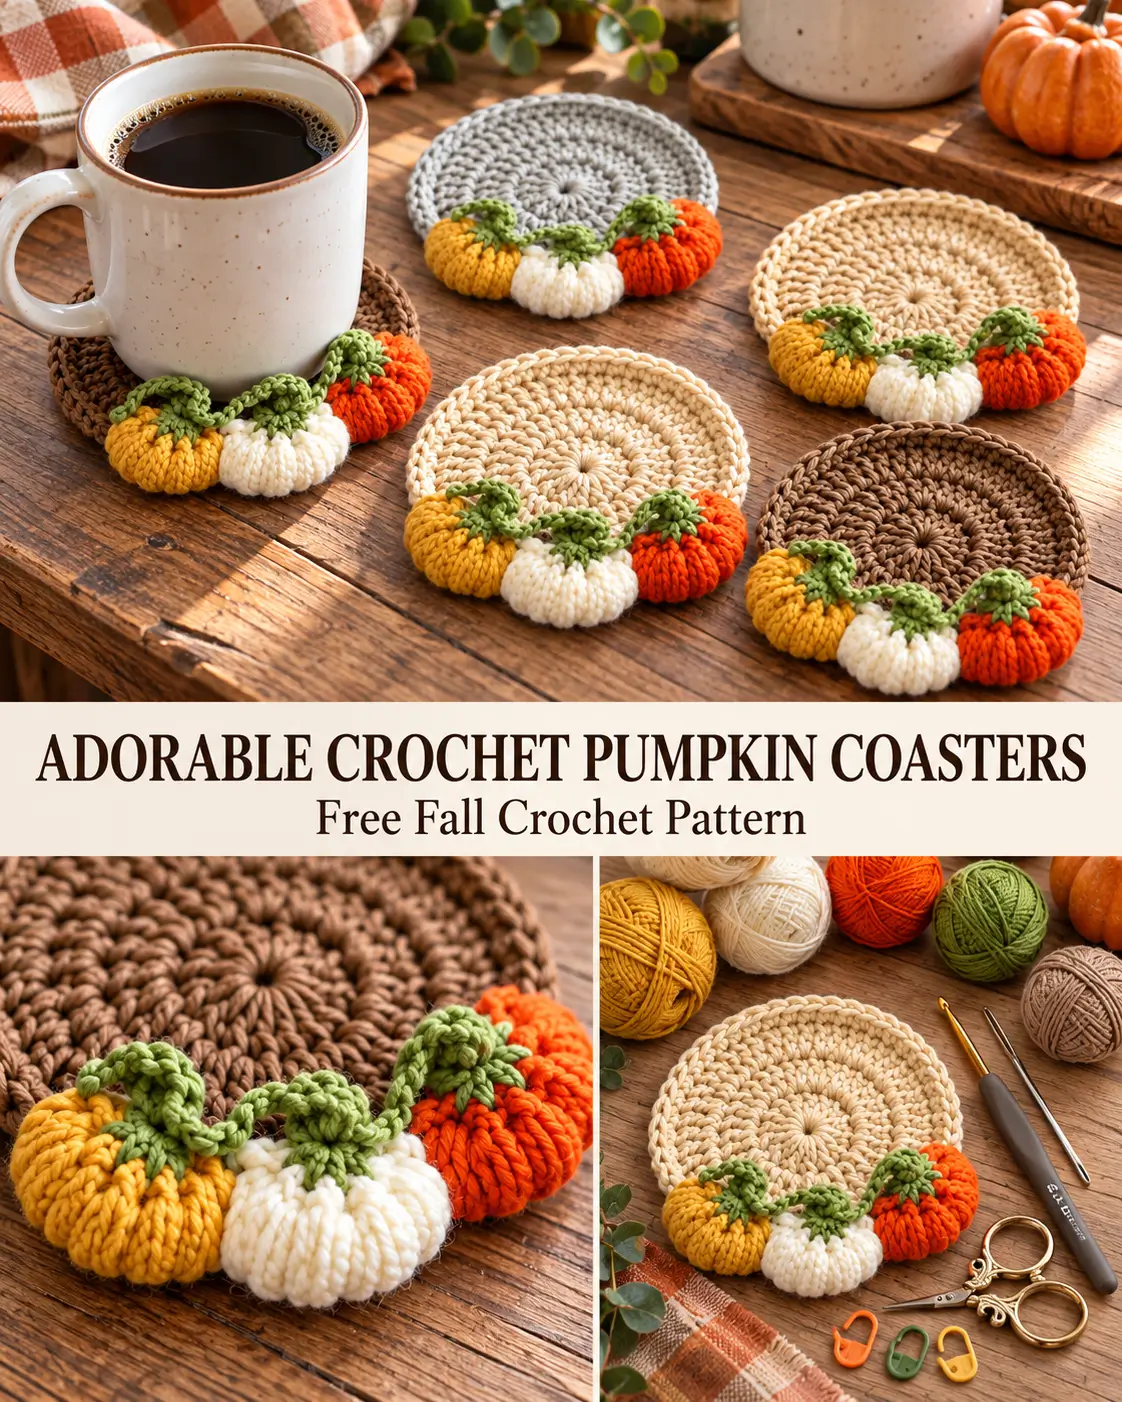
Looking for a cute fall crochet project that combines cozy autumn colors with a practical handmade accessory? This adorable crochet pumpkin coaster is a wonderful way to bring a little seasonal charm to your coffee table.
The design features a beautifully textured circular crochet coaster decorated with three tiny pumpkins in golden yellow, creamy white, and bright orange. Small green stems, delicate leaves, and curling vines connect the pumpkins along the outer edge, creating a cheerful autumn-inspired finish.
The little pumpkins look almost like miniature harvest decorations, giving an otherwise simple coaster a surprisingly charming appearance.
You can crochet the circular base in warm beige, natural cream, soft gray, or rich coffee brown. Each background color creates a slightly different look while allowing the colorful pumpkin decorations to stand out.
Although the finished project looks detailed, it uses familiar crochet techniques, including half double crochet, single crochet, back-loop-only stitches, and simple sewing.
This free crochet pumpkin coaster pattern walks you through making every component, from the circular base to the final decorative vines.
Why You’ll Love This Crochet Pumpkin Coaster
This charming autumn project has several features that make it especially enjoyable to crochet.
- Adorable miniature pumpkins: Three small raised pumpkins decorate one side of the coaster.
- Beautiful fall colors: Golden yellow, ivory, pumpkin orange, and leafy green create a lovely harvest-inspired combination.
- Practical circular base: The center remains flat so you can comfortably place a coffee mug on it.
- Great for using leftover yarn: Each miniature pumpkin requires only a small amount of yarn.
- Customizable design: Make matching coasters in cream, beige, taupe, brown, or gray.
- Perfect for fall gifts: A matching set makes a thoughtful handmade housewarming or Thanksgiving gift.
The most attractive detail is the contrast between the smooth circular center and the three-dimensional pumpkin decorations.
Crochet Pumpkin Coaster Pattern Details
Skill level: Adventurous beginner to intermediate
Crochet terminology: US terms
Construction: Circular base worked in joined rounds, with separately crocheted pumpkin embellishments
Recommended yarn: Worsted-weight (#4) cotton
Recommended hook: 4.0 mm (G/6)
Approximate base diameter: 4–5 inches, depending on gauge
Pumpkin decorations: 3 per coaster
Main stitches: Chain, slip stitch, single crochet, half double crochet, and back-loop-only single crochet
Special techniques: Magic ring, increases, sewing, and shaping small crochet pieces
The finished dimensions will depend on yarn thickness, hook size, and tension. Measure your coaster as you work, particularly if you want it to accommodate a large coffee mug.
Materials You’ll Need
For one pumpkin coaster, prepare:
- Worsted-weight cotton yarn in beige, cream, brown, or light gray for the circular base
- Golden yellow cotton yarn for the first pumpkin
- Ivory or white cotton yarn for the second pumpkin
- Bright orange cotton yarn for the third pumpkin
- Leaf green cotton yarn for the stems, leaves, and vines
- 4.0 mm crochet hook
- Yarn needle
- Scissors
- Stitch markers
- Measuring tape
- Optional tiny amount of washable fiberfill
Yarn Recommendations
Cotton yarn is a good choice for crochet coasters because it absorbs condensation, provides clear stitch definition, and generally holds its shape through repeated use.
Choose a smooth, medium-weight cotton for the circular base.
For the pumpkins, use cotton yarn of approximately the same thickness so all three decorations have similar proportions.
The tiny pumpkins can be left unstuffed or filled very lightly to create a rounded appearance.
Avoid heavily stuffing them because they should remain small enough to sit along the coaster’s outer edge rather than underneath the mug.
Crochet Abbreviations
| Abbreviation | Meaning |
|---|---|
| MR | Magic ring |
| ch | Chain |
| sl st | Slip stitch |
| sc | Single crochet |
| hdc | Half double crochet |
| BLO | Back loop only |
| st / sts | Stitch / stitches |
| inc | Increase |
| rep | Repeat |
| RS | Right side |
| WS | Wrong side |
Special Stitch: Half Double Crochet Increase
Work 2 half double crochet stitches into the same stitch.
This increases your stitch count by one.
Special Stitch: Back-Loop-Only Single Crochet
Insert your hook through the back loop of the indicated stitch, yarn over, and pull up a loop.
Yarn over and pull through both loops on your hook.
Working through the back loops creates the raised ridges used for the miniature pumpkins.
Important Pattern Notes
Before beginning, keep these construction details in mind.
- The circular coaster is worked in joined rounds.
- The starting chain 1 does not count as a stitch.
- Join each round with a slip stitch into its first actual stitch.
- Do not crochet into the joining slip stitch or turning chain.
- The pumpkin pieces are worked flat in rows before being sewn into small rounded shapes.
- Each pumpkin uses the same instructions, with only the yarn color changing.
- The green decorative pieces are made separately and sewn into position.
- Attach the pumpkins along the outer edge so the center of the coaster remains flat.
Step-by-Step Instructions
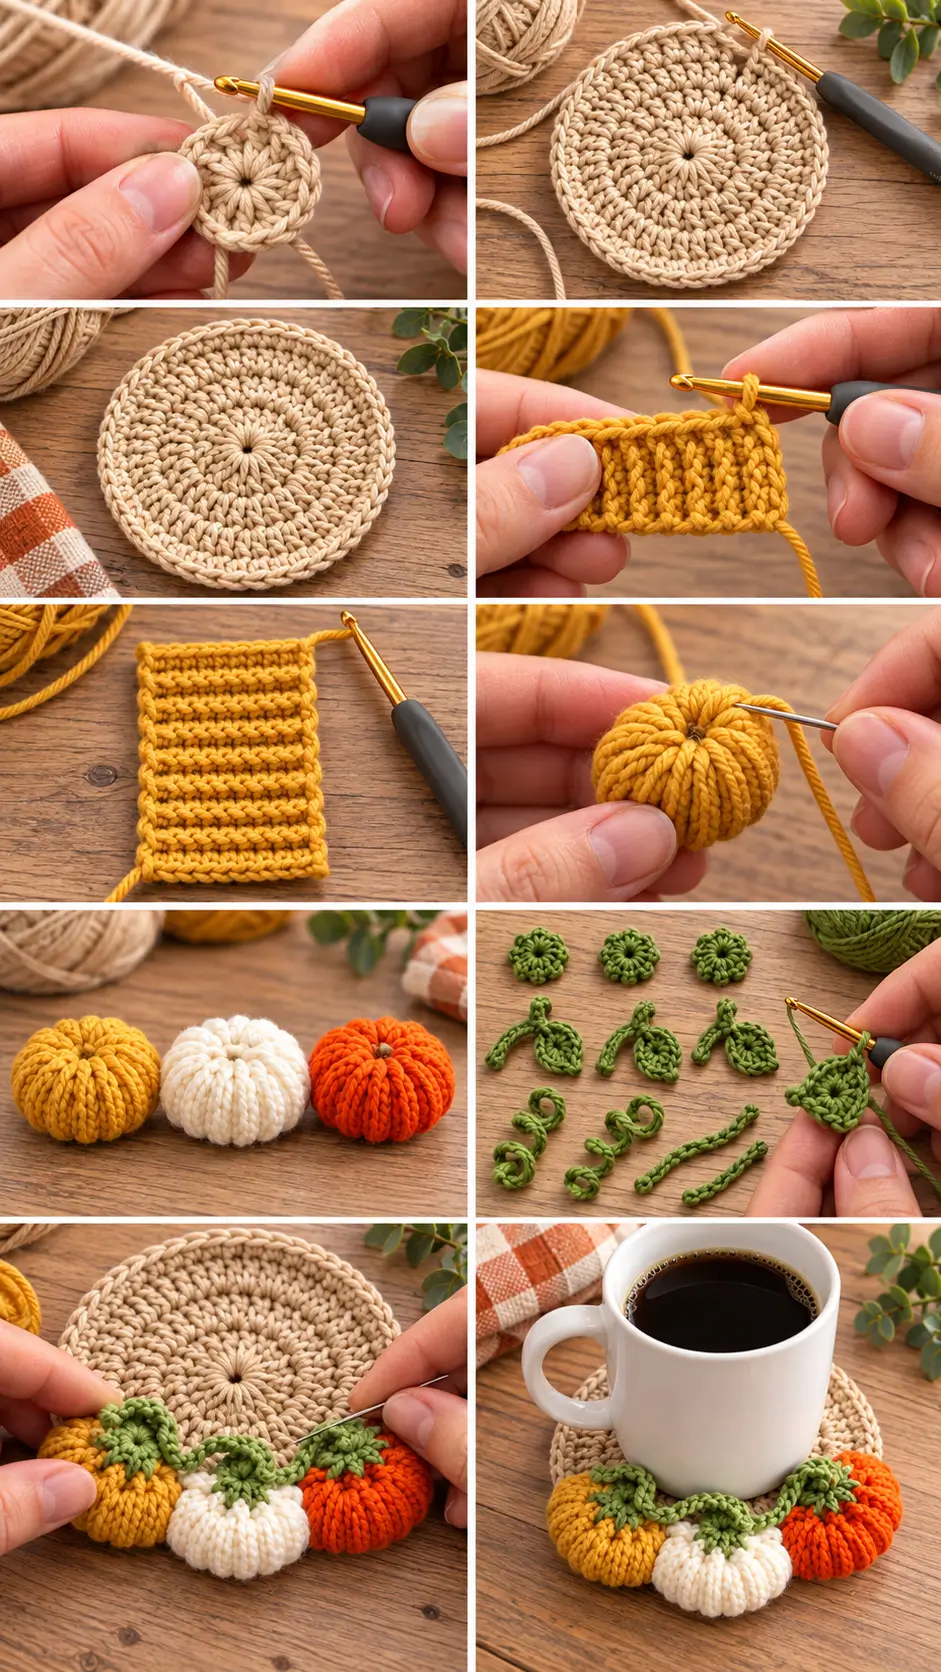
Part 1: Crochet the Circular Coaster Base
The circular base is the foundation of the entire project.
It is worked using half double crochet stitches, which produce a relatively dense, sturdy fabric suitable for a reusable coaster.
You can make the base in any neutral color.
For this example, we’ll use warm beige cotton yarn.
Step 1 – Make the Magic Ring
Begin with your beige yarn and a 4.0 mm crochet hook.
Make a magic ring.
Chain 1.
Work 10 half double crochet stitches into the magic ring.
Gently pull the yarn tail to close the center opening.
Join with a slip stitch into the first half double crochet.
Round 1: 10 hdc.
You should now have a small, flat circular center.
Do not count the starting chain as a stitch.
Step 2 – Increase Around the Circle
Round 2:
Chain 1.
Work 2 hdc into every stitch around.
Join with a slip stitch into the first hdc.
Stitch count: 20 hdc.
Your circle should begin expanding evenly.
Step 3 – Continue Increasing
Round 3:
Chain 1.
Work the following sequence:
- 1 hdc in the next stitch.
- 2 hdc in the following stitch.
Repeat this sequence 10 times.
Join with a slip stitch.
Stitch count: 30 hdc.
Step 4 – Crochet the Fourth Round
Round 4:
Chain 1.
Work 1 hdc in each of the next 2 stitches, then 2 hdc in the next stitch.
Repeat from * to * 10 times.
Join with a slip stitch.
Stitch count: 40 hdc.
At this stage, the coaster should resemble a small, evenly shaped circle.
Step 5 – Crochet the Fifth Round
Round 5:
Chain 1.
Work 1 hdc in each of the next 3 stitches, then 2 hdc in the following stitch.
Repeat the sequence 10 times.
Join with a slip stitch.
Stitch count: 50 hdc.
Continue keeping the circle flat as you work.
If your stitches begin pulling inward, check your tension and confirm that you haven’t missed any increases.
Step 6 – Crochet the Sixth Round
Round 6:
Chain 1.
Work 1 hdc in each of the next 4 stitches, then 2 hdc in the following stitch.
Repeat 10 times.
Join with a slip stitch.
Stitch count: 60 hdc.
Your circular base is now large enough to begin evaluating its final size.
For smaller coffee cups, you may prefer to stop increasing at this point and add the finishing border.
For a more generous coaster, continue with Round 7.
Step 7 – Complete the Final Increase Round
Round 7:
Chain 1.
Work 1 hdc in each of the next 5 stitches, then 2 hdc in the following stitch.
Repeat 10 times.
Join with a slip stitch.
Stitch count: 70 hdc.
This is the final increase round for the standard-size coaster.
Lay the work on a flat surface and check its shape.
If it lies reasonably flat, continue to the border.
Step 8 – Add the Simple Crochet Border
Round 8:
Chain 1.
Work 1 sc in every stitch around.
Join with a slip stitch into the first sc.
Stitch count: 70 sc.
Fasten off, leaving enough yarn to weave in securely.
This round gives the circular base a neat finished edge without adding excessive thickness.
Circular Base Stitch Count Summary
| Round | Stitch count |
|---|---|
| 1 | 10 |
| 2 | 20 |
| 3 | 30 |
| 4 | 40 |
| 5 | 50 |
| 6 | 60 |
| 7 | 70 |
| 8 | 70 |
The increases are distributed evenly throughout the circle.
Helpful tip: The suggested 10-increase construction is a starting point. If your particular cotton yarn produces significant cupping or ruffling, adjust your hook size or the increase spacing after testing a sample. The finished coaster should lie flat rather than forming a shallow bowl.
Part 2: Crochet the Three Miniature Pumpkins
Now it’s time to make the colorful pumpkins that decorate the outside of the coaster.
You will crochet three miniature pumpkins:
- One golden yellow pumpkin
- One ivory-white pumpkin
- One bright orange pumpkin
Each uses the same stitch pattern.
These little pumpkins are made from ribbed crochet rectangles that are sewn into rounded shapes.
The back-loop stitches create raised lines resembling the natural grooves of a pumpkin.
Step 9 – Crochet the First Pumpkin
Using golden yellow yarn:
Chain 7.
Row 1
Work 1 sc into the second chain from your hook.
Continue working 1 sc in each remaining chain.
Chain 1 and turn.
Stitch count: 6 sc.
Row 2
Work 1 sc in the back loop only of each stitch across.
Chain 1 and turn.
Stitch count: 6 sc.
Rows 3–15
Repeat Row 2.
Each row contains 6 BLO single crochet stitches.
Chain 1 and turn at the end of each row.
Row 16
Work 1 BLO sc in each of the 6 stitches.
Do not make another turning chain.
Fasten off, leaving a long yarn tail approximately 20–24 inches.
You should now have a small ribbed rectangle containing 16 rows.
The raised ridges will become the pumpkin’s vertical grooves once the rectangle is shaped.
Step 10 – Shape the Miniature Pumpkin
Place the ribbed rectangle on a flat surface.
Bring the first and last rows together.
Using the long yarn tail and a yarn needle, sew these two edges together to form a short tube.
Keep the raised ribbing facing outward.
Now follow these instructions:
- Use the attached yarn tail to make small running stitches around the row-end loops of one open end of the tube.
- Pull the yarn gently to gather and close this opening.
- Secure the gathered opening with a few stitches.
- Pass the needle through the inside of the tube toward the opposite opening.
- If desired, add a very small pinch of washable fiberfill.
- Stitch around the row-end loops of the second opening.
- Pull gently to gather and close it.
- Pass the needle through the center of the pumpkin from top to bottom.
- Pull just enough to create a slightly flattened, rounded pumpkin shape.
- Secure the shaping yarn without distorting the ribs.
Leave a useful yarn tail for attaching the pumpkin to the coaster later.
How Your Pumpkin Should Look
Your first pumpkin should resemble a small, plump, ribbed ball with a slightly flattened top and bottom.
The back-loop ridges should run vertically around its body.
Avoid pulling the shaping yarn too tightly.
The goal is a rounded miniature pumpkin, not a tightly compressed knot of stitches.
Step 11 – Make the White Pumpkin
Switch to ivory or white cotton yarn.
Repeat the entire pumpkin pattern:
Ch 7.
Row 1: Sc in second ch from hook and in every remaining ch. (6 sc)
Rows 2–16: Ch 1, turn, sc BLO in each stitch across. (6 sc)
For Row 16, omit the final turning chain and fasten off with a long tail.
Shape the rectangle into a pumpkin using the same assembly method.
This second pumpkin should be approximately the same size as the first.
Step 12 – Make the Orange Pumpkin
Using bright pumpkin-orange yarn, repeat the same instructions a third time.
Work 16 rows of the ribbed stitch pattern and shape the rectangle into a miniature pumpkin.
You should now have three small, rounded pumpkins.
Arrange them on the table in the following order:
Golden yellow – Ivory white – Bright orange
This arrangement creates the colorful autumn border featured in the finished design.
Part 3: Crochet the Green Pumpkin Tops
Each miniature pumpkin needs a small green top to complete its appearance.
We’ll make a small green cap and a separate stem-and-leaf piece for each pumpkin.
Step 13 – Make the Green Caps
Using leaf-green yarn:
Make a magic ring.
Chain 1.
Work 5 sc into the magic ring.
Pull the ring closed.
Join with a slip stitch into the first sc.
Fasten off, leaving a yarn tail approximately 8 inches long.
Stitch count: 5 sc.
This creates a tiny green circle that will sit on top of the pumpkin.
Make 3 green caps in total.
Step 14 – Crochet the Green Stem and Leaf
Using the same green yarn:
Chain 4.
Work a slip stitch into the second chain from the hook.
Work 1 slip stitch into each of the next 2 chains.
You have formed a small green stem approximately three chain stitches long.
Now, without fastening off:
Chain 5.
Work into this new chain as follows:
- Slip stitch in the second chain from the hook.
- Single crochet in the next chain.
- Half double crochet in the next chain.
- Single crochet in the final chain.
Slip stitch into the base of the stem, where the leaf chain began.
Fasten off, leaving a long tail for sewing.
You now have a small stem with a pointed green leaf attached to one side.
Make 3 stem-and-leaf pieces.
Step 15 – Attach the Pumpkin Tops
Place a small green cap on the gathered top of the golden yellow pumpkin.
Using a yarn needle and the green yarn tail, sew it securely into position.
Next, place the green stem-and-leaf piece over the cap.
Attach the bottom of the stem to the middle of the green cap.
Angle the leaf slightly toward the side.
Repeat this process with the white and orange pumpkins.
Make sure the pieces are secure, but avoid pulling the green stitches so tightly that the pumpkins lose their rounded shape.
All three pumpkins should now have recognizable green tops.
Part 4: Crochet the Curly Green Vines
The connecting vines are one of the most decorative details in this coaster.
They visually join the three pumpkins and give the design a natural, trailing appearance.
Step 16 – Make the First Curly Vine
Using green yarn:
Chain 11.
Work 2 sc into the second chain from the hook.
Continue working 2 sc into each remaining chain.
You will have:
20 sc worked across 10 chains.
The extra stitches cause the chain to curl naturally into a small spiral.
Fasten off, leaving a long tail for sewing.
Gently arrange the spiral with your fingers.
Do not pull it straight.
Step 17 – Make a Second Curly Vine
Repeat the same instructions:
Chain 11.
Work 2 sc into each of the 10 chains, beginning with the second chain from the hook.
Fasten off with a long tail.
You now have 2 small, curly green vines.
These can be attached beside the pumpkin stems to create a more playful autumn look.
Step 18 – Make the Connecting Vines
To create green strands between the pumpkins, make two simple crochet chains.
First connecting vine:
Chain 9 using green yarn.
Fasten off, leaving a yarn tail at each end.
Second connecting vine:
Chain 9 again.
Fasten off, leaving tails for sewing.
These chains will be positioned between the pumpkins.
If your pumpkins sit farther apart, add a few additional chains as needed.
The connecting vines should rest loosely across the pumpkin tops without pulling the decorations inward.
Part 5: Assemble the Pumpkin Coaster
Now that all the pieces are ready, it’s time to bring the design together.
Step 19 – Arrange the Three Pumpkins
Place the circular coaster base on a flat surface with the right side facing up.
Position the golden yellow pumpkin along the lower-left edge.
Place the ivory pumpkin at the lower center.
Position the orange pumpkin along the lower-right edge.
The three pumpkins should form a gentle curved line following the circular border.
Some of each pumpkin may extend slightly beyond the outer edge of the coaster.
This is intentional.
However, the center of the coaster must remain flat.
Before sewing, place an empty mug in the center to confirm that its base will not rest on the raised pumpkins.
Step 20 – Attach the Yellow Pumpkin
Thread a yarn needle with the yarn tail from the golden yellow pumpkin.
Position the pumpkin near the lower-left edge of the coaster.
Stitch through a small area on the pumpkin’s underside and the upper loops of several stitches along the coaster’s outer edge.
Use several secure stitches, but avoid sewing tightly through the entire width of the pumpkin.
The pumpkin should remain plump and dimensional.
Secure the yarn tail on the back of the coaster.
Step 21 – Attach the White Pumpkin
Place the ivory pumpkin beside the yellow pumpkin.
Allow the sides of the two pumpkins to touch or overlap slightly.
Sew the underside of the white pumpkin to the outer edge of the circular coaster.
Keep the stitches firm enough to hold the embellishment securely without pulling the circular base out of shape.
Step 22 – Attach the Orange Pumpkin
Position the orange pumpkin beside the white pumpkin.
Sew it into place using the same attachment technique.
You should now have three raised pumpkins along one section of the outer border.
Turn the coaster over and inspect the back.
Make sure all attachment yarn tails are secured.
Lay the coaster flat again to confirm that the circular base has not become distorted.
Part 6: Add the Green Vines and Final Details
Step 23 – Connect the Pumpkin Tops
Take one of the straight green chains you made earlier.
Position it between the green tops of the yellow and white pumpkins.
Use its yarn tails to sew one end near the yellow pumpkin’s stem and the other end near the white pumpkin’s stem.
Allow the chain to curve naturally.
Repeat with the second green chain, connecting the white and orange pumpkins.
The connecting vines should create a soft green line across the tops of the three miniature pumpkins.
Step 24 – Attach the Curly Vines
Place the first curly vine beside the yellow pumpkin’s stem.
Use the yarn tail to sew its starting end securely into place.
Allow the spiral to extend gently toward the center or upper side of the coaster.
Attach the second curly vine beside the orange or white pumpkin.
Adjust the direction of the spirals until the arrangement looks balanced.
You can tack down one or two additional points of each vine if necessary, but leave most of the coils free to maintain their curled shape.
Step 25 – Secure All Decorative Pieces
Check the entire coaster carefully.
Make sure:
- The three pumpkins are securely attached.
- Each green cap is firmly sewn in place.
- The stems and leaves are attached.
- The connecting vines are not excessively tight.
- The curly vines retain their shape.
- No loose yarn tails are visible on the right side.
- The flat center remains suitable for a mug.
Thread any remaining tails onto a yarn needle and weave them securely into nearby stitches.
Trim the excess yarn.
Step 26 – Shape and Finish the Coaster
Lay your completed crochet pumpkin coaster on a clean, flat surface.
Gently smooth the circular base with your fingers.
If necessary, lightly dampen the base and reshape it, following the yarn’s care instructions.
Avoid aggressively stretching the little pumpkins or their green vines.
Allow the coaster to dry completely before placing a mug on it.
Your adorable fall pumpkin coaster is now complete!
How to Make the Coaster Larger or Smaller
This pattern can be customized to suit your favorite mugs.
For a Smaller Coaster
Stop the circular base after Round 6.
You will have 60 hdc stitches before adding the finishing border.
Work one sc into each stitch around to create a neat edge.
Then attach the three miniature pumpkins as instructed.
Check that enough flat space remains for the mug.
For a Larger Coaster
Continue increasing after Round 7.
Optional Round 8:
Chain 1.
Work 1 hdc in each of the next 6 stitches, then 2 hdc in the next stitch.
Repeat 10 times.
Join with a slip stitch.
Stitch count: 80 hdc.
Then add a finishing border with 1 sc in each stitch around.
Border stitch count: 80 sc.
A larger base provides additional room for a coffee mug or small cup.
You can also adjust the size by changing the yarn weight and hook size, although doing so will affect the proportions of the miniature pumpkins.
Beautiful Fall Color Combinations
One of the nicest features of this design is how different it looks in various autumn color palettes.
1. Classic Harvest Colors
Use a rich coffee-brown circular base with golden yellow, ivory, and orange pumpkins.
Finish the decorations with medium leaf-green stems and vines.
This creates a warm, traditional fall appearance.
2. Soft Farmhouse Neutrals
Choose a cream-colored base with pale mustard, white, and muted terracotta pumpkins.
Use sage green for the decorative leaves.
The result is subtle, cozy, and well suited to modern farmhouse decor.
3. Rustic Gray and Orange
Work the main circle in light gray.
Add bright pumpkin-orange, ivory, and golden yellow embellishments.
This combination creates a noticeable contrast between the neutral background and colorful decorations.
4. Warm Autumn Beige
Use light beige or caramel cotton yarn for the base.
The neutral background allows the little orange and golden pumpkins to stand out while keeping the overall appearance soft and inviting.
5. Matching Fall Coaster Set
Make several coasters using different background colors.
For example:
- Coffee brown
- Soft gray
- Natural cream
- Golden beige
- Pale sage green
Keep the three miniature pumpkin colors consistent across the entire set.
This creates a coordinated collection that looks especially pretty on an autumn coffee table.
Helpful Tips for Crocheting the Pumpkin Coaster
Keep the Circular Base Flat
The circular base must lie flat to function properly as a coaster.
If it starts curling upward, check your tension and increase placement.
If it begins ruffling, the round may have too many stitches for your yarn and gauge.
Always check the shape before attaching the decorations.
Make the Pumpkins the Same Size
Use the same hook size, yarn weight, foundation chain, and number of rows for all three pumpkins.
This will help keep their proportions consistent.
Different yarn fibers may produce slight size variations even when the stitch counts match.
Don’t Overstuff the Pumpkins
Only a tiny amount of filling is needed to create a rounded appearance.
Overstuffing can make the pumpkins too large and cause them to sit awkwardly against the circular base.
For a flatter version, omit the stuffing entirely.
Position the Decorations Carefully
The miniature pumpkins belong along the outer edge rather than in the center.
If you sew them too far inward, they may interfere with a mug.
Test the placement before attaching any decorations permanently.
Use Smooth Cotton Yarn
Smooth cotton yarn helps show the circular stitches and raised pumpkin ridges clearly.
It is also generally more practical for reusable coasters than fluffy or heavily textured yarn.
Avoid Tightening the Vines
The green connecting chains should sit loosely between the pumpkins.
Pulling them too tightly may distort the decorations or curl the circular base.
Common Problems and Solutions
Why Is My Circular Coaster Curling?
Your hook may be too small, your tension may be too tight, or the increase rate may not suit your yarn.
Try loosening your tension or adjusting the hook size.
A properly constructed coaster should lie reasonably flat.
Why Are My Pumpkins Uneven?
Check that each miniature pumpkin contains the same number of stitches and rows.
All three should begin with chain 7 and use 16 rows of crochet.
Make sure the gathered openings are closed evenly.
Why Does My Pumpkin Look Like a Ball Instead of a Pumpkin?
The ribbed stitches provide the vertical grooves, while the final shaping helps flatten the body.
Pass the shaping yarn through the center and pull gently to create an indentation.
Avoid pulling excessively or the pumpkin may become distorted.
Why Are My Curly Vines Not Curling?
The spirals are formed by placing two single crochet stitches into each foundation chain.
If you work only one single crochet into each chain, the strand will remain relatively straight.
Make sure you are working two stitches into every chain along the spiral.
Why Doesn’t My Mug Sit Flat?
The pumpkins may be positioned too close to the center.
Move the decorations toward the outer edge, allowing the center of the circular base to remain unobstructed.
Also check that the woven-in yarn tails have not created large knots beneath the mug.
Frequently Asked Questions
Is This Crochet Pumpkin Coaster Suitable for Beginners?
This pattern is best for adventurous beginners who are comfortable with basic crochet stitches.
The circular base is relatively straightforward.
The miniature pumpkins require working through the back loops, gathering small pieces, and sewing the finished embellishments into position.
Can I Use Acrylic Yarn?
You can use acrylic yarn for decorative versions, but 100% cotton is generally preferable for functional drink coasters.
Cotton absorbs condensation and usually tolerates moderate warmth better than acrylic.
Avoid exposing any crocheted coaster to direct flames, extremely hot cookware, or temperatures beyond the yarn’s care recommendations.
Can I Make the Pumpkins Without Stuffing?
Yes.
The ribbed rectangles can be gathered and shaped without adding fiberfill.
They will look slightly flatter, which can be useful if you prefer a less bulky coaster.
Can I Make the Pumpkin Decorations Removable?
Yes, although the pattern uses permanent sewing for stability.
If you want removable pumpkins, you could attach them using small sewn-on fastening components suitable for your intended use.
For regularly used and washed coasters, firmly sewn decorations are usually simpler and more secure.
Can I Make a Matching Pumpkin Garland?
Absolutely.
The miniature ribbed pumpkins can also be used as decorative embellishments for a fall garland.
Simply make several pumpkins, attach their green tops, and connect them with a crocheted chain.
Can I Make This Design Without the Green Vines?
Yes.
The three pumpkins will still create a recognizable autumn design.
However, the green stems, leaves, and connecting vines are what give this particular coaster its distinctive harvest-inspired appearance.
How Should I Wash the Finished Coaster?
Follow the washing instructions on your yarn label.
For a coaster with dimensional embellishments, gentle washing is preferable.
After washing, reshape the circular base and arrange the pumpkin decorations.
Allow the entire project, including any filling inside the pumpkins, to dry thoroughly.
Can I Use This Pattern for Thanksgiving Decorations?
Definitely.
The warm neutral base, colorful pumpkins, and green vines make the coaster a lovely addition to fall and Thanksgiving table settings.
You could create a matching set for guests or include several coasters in a handmade seasonal gift basket.
More Fall Crochet Projects to Try
If you enjoy making autumn-inspired crochet accessories, there are plenty of ways to continue the seasonal theme.
Try creating simple pumpkin appliqués for kitchen towels, textured fall dishcloths in earthy cotton colors, small crochet pumpkins for decorative bowls, or matching leaf-shaped coasters.
You could also use the miniature pumpkins from this pattern to decorate a crochet basket, seasonal garland, or handmade gift wrap.
Working several related projects in coordinating colors is a lovely way to build a cohesive autumn collection.
Final Thoughts
This adorable crochet pumpkin coaster transforms a simple circular base into a charming handmade autumn decoration.
The flat crocheted center provides a practical space for your favorite coffee mug, while the tiny golden yellow, ivory, and orange pumpkins add beautiful seasonal detail.
The green stems, leaves, and curling vines bring the entire design together, giving the coaster an inviting harvest-inspired appearance.
You can customize the background color, experiment with different pumpkin shades, or make several coordinating coasters for your fall table.
Best of all, the design combines straightforward crochet stitches with a few creative finishing techniques, making it a satisfying project for anyone who enjoys decorative handmade accessories.
Grab your favorite autumn-colored yarn and crochet hook, and enjoy making this sweet little pumpkin coaster for your cozy fall mornings!