Stacked Mosaic Crochet Pumpkins With Colorful Raised Details
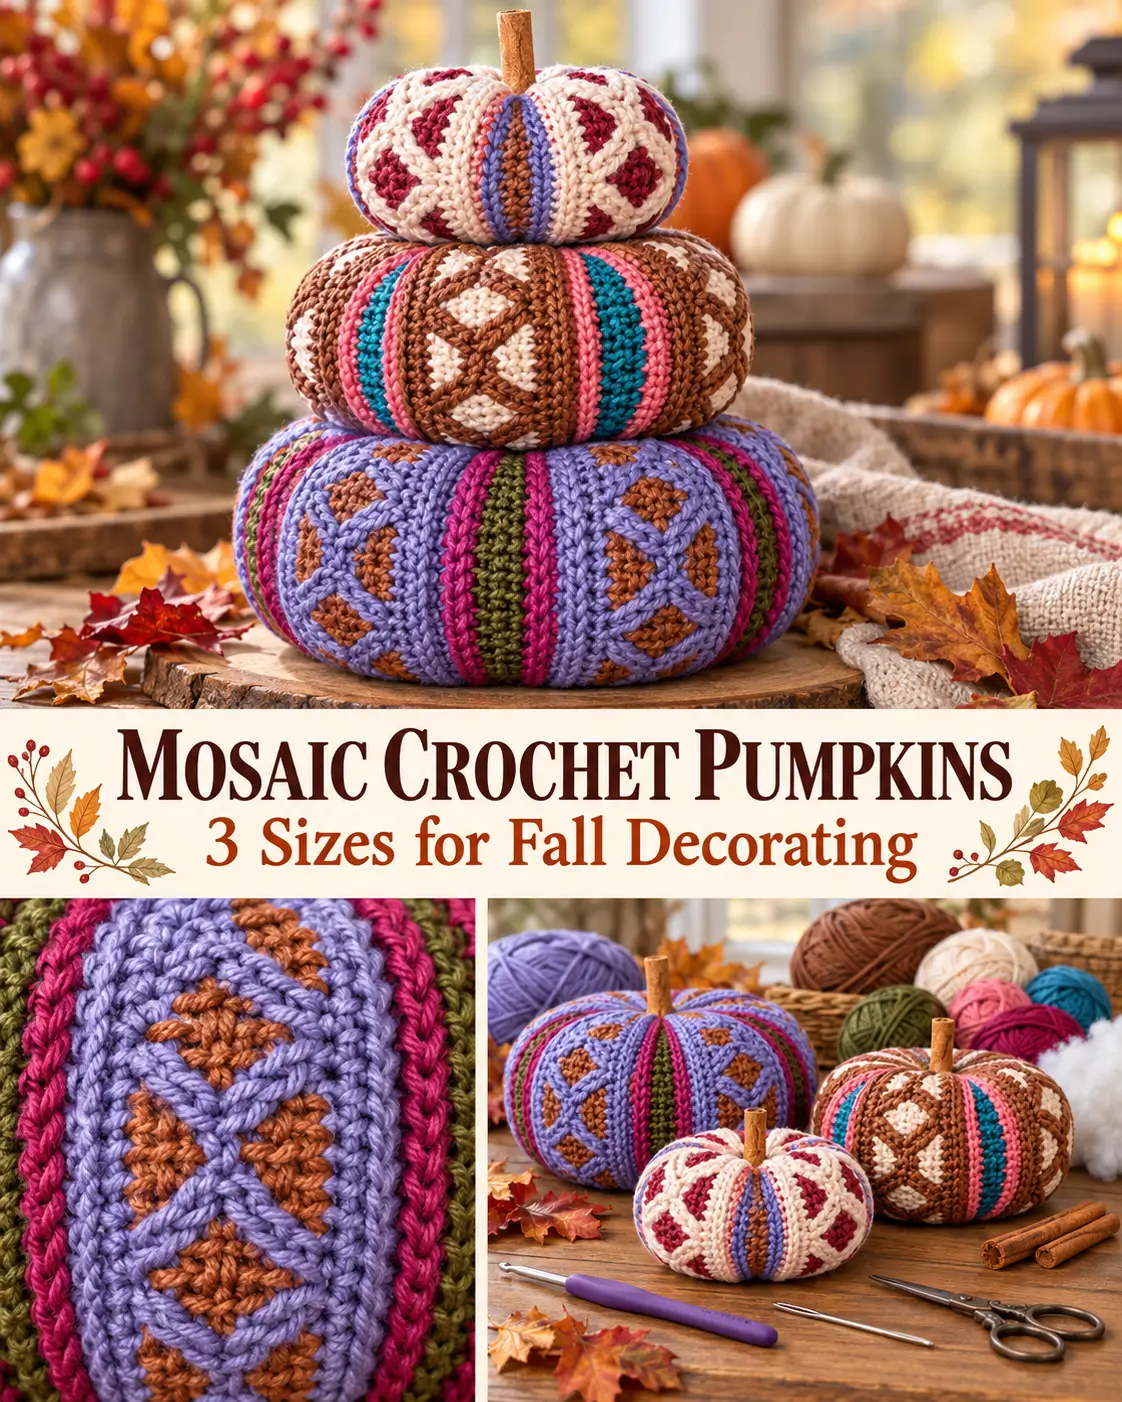
These decorative crochet pumpkins combine overlay mosaic crochet, bold contrasting colors, dimensional shaping, and a simple stuffed construction to create the richly patterned stacked-pumpkin look.
Each pumpkin begins as a flat rectangular mosaic panel. The short edges are joined to turn the panel into a tube, the bottom is gathered closed, the pumpkin is stuffed, and the top is cinched shut. A long shaping strand is then passed through the center several times to create deep pumpkin sections.
The three finished pumpkins are different sizes so they can be displayed individually or stacked from largest to smallest.
This version uses an original repeating diamond mosaic motif with colorful vertical accents to create the same decorative, highly textured style while keeping the construction logical and repeatable.
Finished Sizes
Approximate finished dimensions after stuffing and shaping:
Small Pumpkin
12 inches / 30.5 cm circumference
about 4 inches / 10 cm high
Medium Pumpkin
15 inches / 38 cm circumference
about 5 inches / 12.5 cm high
Large Pumpkin
18 inches / 46 cm circumference
about 6 inches / 15 cm high
Your finished measurements may vary slightly depending on stuffing and how tightly you sculpt the sections.
Materials
- Medium weight #4 / worsted yarn in several coordinating colors
- 4 mm crochet hook
- Polyester fiberfill
- Yarn needle with a large eye
- Scissors
- Stitch markers
- Wooden dowel, twig, or cinnamon stick for the stem
- Optional craft glue for securing the stem
For the most defined mosaic texture, choose smooth yarn rather than very fuzzy yarn.
Suggested Color Palettes
The three pumpkins should coordinate without being identical.
Small Pumpkin
Main Color: warm cream
Mosaic Color: cranberry red
Accent Stripe 1: dusty rose
Accent Stripe 2: muted periwinkle
Medium Pumpkin
Main Color: cocoa brown
Mosaic Color: warm cream
Accent Stripe 1: coral pink
Accent Stripe 2: turquoise
Large Pumpkin
Main Color: dusty lavender / periwinkle
Mosaic Color: warm brown
Accent Stripe 1: raspberry pink
Accent Stripe 2: olive or moss green
You can substitute any four coordinating colors.
Skill Level
Intermediate
You should know how to make:
- chain
- single crochet
- slip stitch
- double crochet
- working in the back loop only
- working into a stitch two rows below
- seaming
- gathering
- basic embroidery or surface crochet
The mosaic pattern looks complicated, but only one yarn color is used in each row.
Abbreviations
US crochet terminology:
ch — chain
sc — single crochet
sl st — slip stitch
dc — double crochet
BLO — back loop only
FLO — front loop only
MDC — mosaic double crochet
st / sts — stitch / stitches
MC — main color
CC — mosaic contrast color
Gauge
In the mosaic pattern:
16 stitches × 14 rows = approximately 4 inches / 10 cm
Gauge is useful because the width of the flat panel becomes approximately the circumference of the finished pumpkin.
The fabric should be dense enough that stuffing does not show through.
If your stitches are loose, move down to a 3.5 mm hook.
If the fabric is extremely stiff, move up slightly.
Understanding Overlay Mosaic Crochet
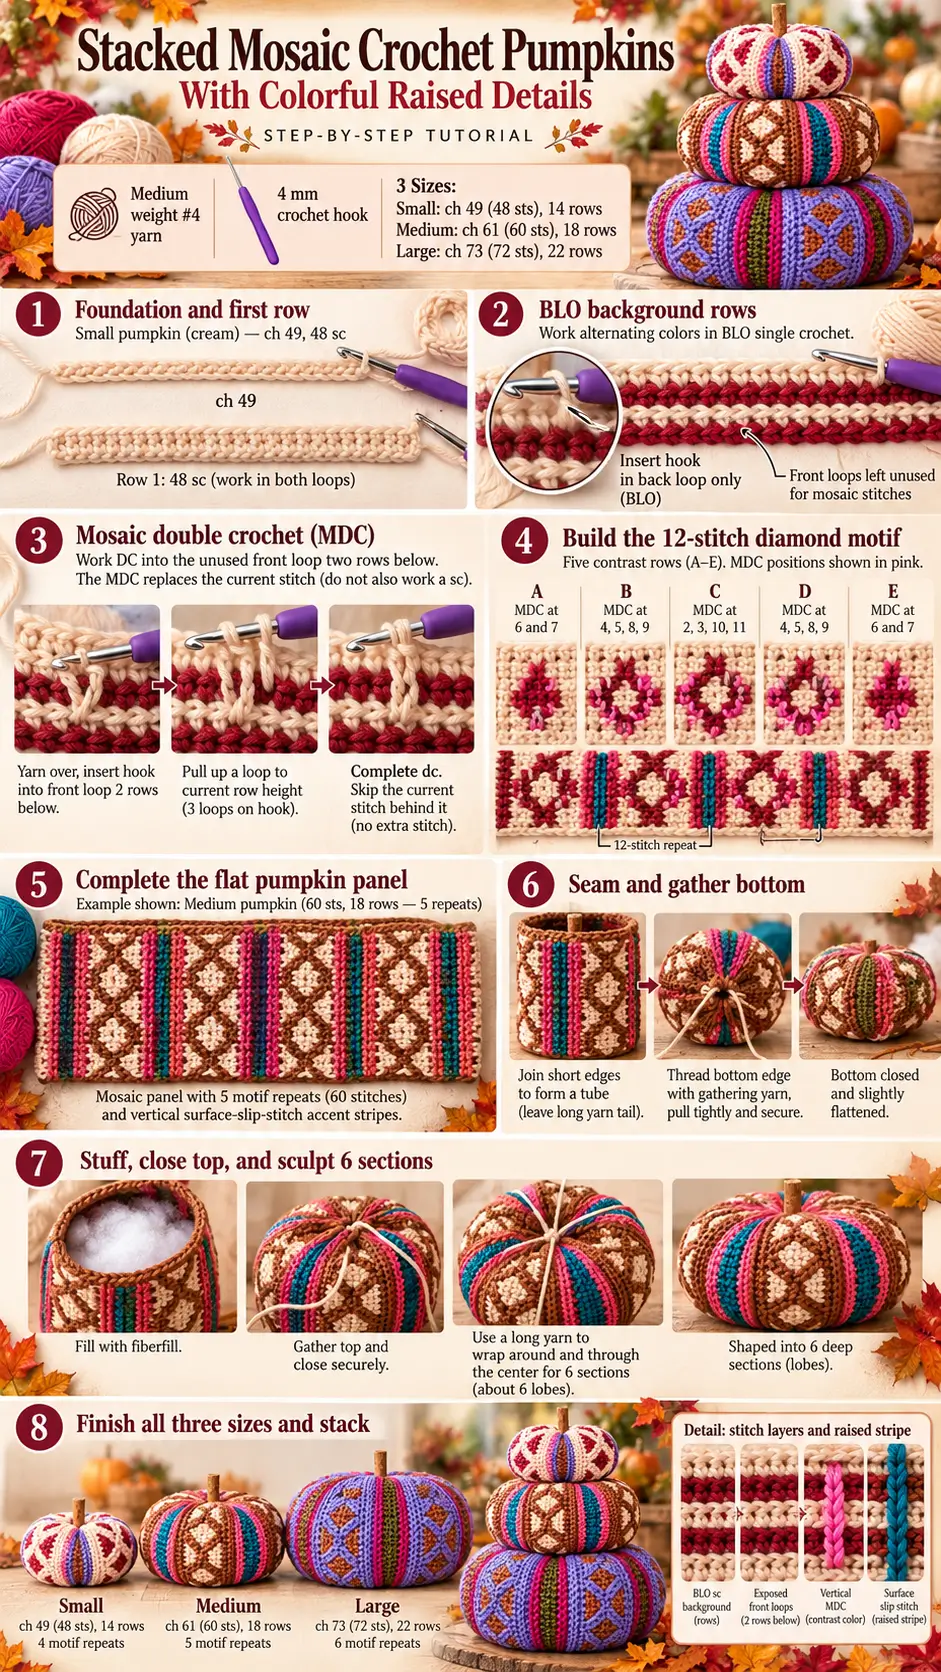
This pattern uses a simple overlay mosaic technique.
Every row is worked from the right side.
You do not turn the work.
At the end of each row:
- fasten off
- return to the beginning edge
- attach the next color
- work the next row in the same direction
The loose yarn ends will later be hidden inside the pumpkin.
Standard Mosaic Stitch — sc BLO
Unless instructed to make a mosaic double crochet, work:
1 sc through the back loop only
The unused front loop remains available for a mosaic stitch two rows later.
Special Stitch — Mosaic Double Crochet
The mosaic double crochet reaches over the row immediately below and anchors into a front loop two rows below.
Yarn over.
Locate the stitch in the same vertical column two rows below.
Insert the hook through the unused:
front loop
of that stitch.
Yarn over.
Pull up a loop to the height of the current row.
You have:
3 loops on the hook
Yarn over.
Pull through 2 loops.
Yarn over.
Pull through the final 2 loops.
One:
MDC
is complete.
The MDC lies on the front of the intermediate row and creates the raised colorwork effect.
Important Mosaic Rule
When making an MDC:
do not also work into the current-row stitch directly behind it.
The MDC replaces that stitch position.
Your stitch count must remain unchanged.
The 12-Stitch Diamond Repeat
The decorative motif repeats every:
12 stitches
The pattern uses five contrast-color mosaic rows.
Within each 12-stitch repeat, count the stitches:
1 through 12
The five mosaic placements are:
Motif Row A
MDC in:
6 and 7
Motif Row B
MDC in:
4, 5, 8 and 9
Motif Row C
MDC in:
2, 3, 10 and 11
Motif Row D
Repeat Motif Row B.
Motif Row E
Repeat Motif Row A.
This creates a large outlined diamond or oval-shaped mosaic motif.
Visual Chart
Each group below represents 12 stitches.
X = MDC
– = sc BLO
Row A
– – – – – X X – – – – –
Row B
– – – X X – – X X – – –
Row C
– X X – – – – – – X X –
Row D
– – – X X – – X X – – –
Row E
– – – – – X X – – – – –
Repeat the same 12-stitch sequence across the entire row.
PANEL SIZES
Each pumpkin uses a stitch count divisible by 12.
Small
Foundation:
48 stitches
Rows:
14
This gives:
4 mosaic repeats across
Medium
Foundation:
60 stitches
Rows:
18
This gives:
5 mosaic repeats across
Large
Foundation:
72 stitches
Rows:
22
This gives:
6 mosaic repeats across
SMALL PUMPKIN
Foundation
With MC:
Ch:
49
Beginning in the second chain from the hook:
sc across.
48 sc
Fasten off.
Do not turn.
Return to the beginning edge.
Small Pumpkin — Base Band
The small pumpkin begins with one plain two-row color pair.
Row 2 — CC
Attach CC.
Sc BLO in every stitch across.
48 sts
Fasten off.
Return to beginning.
The mosaic motif begins next.
Mosaic Pair 1
Row 3 — MC
Attach MC.
Sc BLO across.
Fasten off.
Row 4 — CC — Motif A
Repeat across all four 12-stitch sections:
Sc BLO in positions:
1–5
MDC in:
6–7
Sc BLO in:
8–12
Repeat across.
Fasten off.
Mosaic Pair 2
Row 5 — MC
Sc BLO across.
Fasten off.
Row 6 — CC — Motif B
Within every 12 stitches:
Sc BLO:
1–3
MDC:
4–5
Sc BLO:
6–7
MDC:
8–9
Sc BLO:
10–12
Repeat across.
Fasten off.
Mosaic Pair 3
Row 7 — MC
Sc BLO across.
Fasten off.
Row 8 — CC — Motif C
Within each 12-stitch repeat:
Sc BLO in:
1
MDC in:
2–3
Sc BLO in:
4–9
MDC in:
10–11
Sc BLO in:
12
Repeat across.
Fasten off.
This is the widest part of the diamond.
Mosaic Pair 4
Row 9 — MC
Sc BLO across.
Fasten off.
Row 10 — CC — Motif D
Repeat Motif B:
MDC in:
4, 5, 8 and 9
All other stitches:
sc BLO
Mosaic Pair 5
Row 11 — MC
Sc BLO across.
Fasten off.
Row 12 — CC — Motif E
Repeat Motif A:
MDC in:
6 and 7
All other stitches:
sc BLO
Small Pumpkin — Upper Band
Row 13 — MC
Sc BLO across.
Fasten off.
Row 14 — CC
Sc BLO across.
Fasten off.
The small pumpkin panel is complete.
MEDIUM PUMPKIN
The medium pumpkin uses:
60 stitches
and:
18 rows
Foundation:
Ch:
61
Sc in second chain and across.
60 sc
The medium version has a wider plain band above and below the same central mosaic motif.
Medium Lower Band
Work:
Row 2 — CC
Sc BLO across.
Row 3 — MC
Sc BLO across.
Row 4 — CC
Sc BLO across.
Fasten off after every row and restart from the same edge.
Medium Mosaic Section
Work the same five motif pairs:
Row 5 — MC
Sc BLO.
Row 6 — CC
Motif A.
Row 7 — MC
Sc BLO.
Row 8 — CC
Motif B.
Row 9 — MC
Sc BLO.
Row 10 — CC
Motif C.
Row 11 — MC
Sc BLO.
Row 12 — CC
Motif D.
Row 13 — MC
Sc BLO.
Row 14 — CC
Motif E.
Medium Upper Band
Row 15 — MC
Sc BLO.
Row 16 — CC
Sc BLO.
Row 17 — MC
Sc BLO.
Row 18 — CC
Sc BLO.
Fasten off.
LARGE PUMPKIN
The large pumpkin uses:
72 stitches
and:
22 rows
Foundation:
Ch:
73
Sc in second chain and across.
72 sc
Large Lower Band
Work three plain two-row pairs.
Row 2 — CC
Sc BLO.
Row 3 — MC
Sc BLO.
Row 4 — CC
Sc BLO.
Row 5 — MC
Sc BLO.
Row 6 — CC
Sc BLO.
Large Mosaic Section
Row 7 — MC
Sc BLO.
Row 8 — CC
Motif A.
Row 9 — MC
Sc BLO.
Row 10 — CC
Motif B.
Row 11 — MC
Sc BLO.
Row 12 — CC
Motif C.
Row 13 — MC
Sc BLO.
Row 14 — CC
Motif D.
Row 15 — MC
Sc BLO.
Row 16 — CC
Motif E.
Large Upper Band
Row 17 — MC
Sc BLO.
Row 18 — CC
Sc BLO.
Row 19 — MC
Sc BLO.
Row 20 — CC
Sc BLO.
Row 21 — MC
Sc BLO.
Row 22 — CC
Sc BLO.
Fasten off.
Check the Panels Before Assembly
Lay every panel flat.
The panel should be:
- rectangular
- dense
- slightly textured
- flexible
- not heavily curled
- filled with evenly repeated mosaic diamonds
Make sure every row still contains the original stitch count.
Small:
48
Medium:
60
Large:
72
Adding the Colorful Vertical Accent Stripes
The colorful narrow vertical bands help give the pumpkins the richly decorated appearance.
These are added after the mosaic panel is complete.
Use:
Accent Stripe Color 1
and:
Accent Stripe Color 2
Work two narrow parallel surface-crochet lines at selected boundaries between the 12-stitch motif repeats.
Surface Slip Stitch Method
Hold the yarn behind the fabric.
Insert the crochet hook from the front to the back at the lower edge.
Catch the yarn.
Pull a loop to the front.
Insert the hook one row higher.
Catch the yarn again.
Pull the new loop through the loop already on the hook.
Continue upward.
This creates a chain-like raised line on the front.
First Accent Line
Work one vertical surface-slip-stitch line from the bottom edge to the top.
Position it between two mosaic motifs.
Fasten off.
Second Accent Line
Using the second accent color, make another surface line immediately beside the first.
The two lines should look like a narrow colorful stripe.
Do not work them so tightly that the panel puckers.
Repeat the Accent Stripes
Add additional paired stripes at regular intervals around the panel.
Keep enough mosaic fabric visible between them.
For the small pumpkin, approximately:
3–4 accent stripe sections
works well.
For the medium:
4–5
For the large:
5–6
They do not need to sit at every motif boundary.
SEAM THE PANEL INTO A TUBE
Fold the panel so the short side edges meet.
The right side should face inward temporarily.
Thread a yarn needle with MC.
Using mattress stitch or whip stitch, sew the two short edges together.
Match:
row to row
all the way from bottom to top.
Do not pull the seam excessively tight.
Turn the tube right side out.
The mosaic design should wrap completely around the cylinder.
Close the Bottom
Cut a long strand of MC.
Thread it onto the yarn needle.
Weave the needle in and out around the entire lower edge.
Use approximately one gathering stitch per row.
Once you return to the starting point:
Pull the yarn gradually.
The lower opening will close.
Pull firmly until the hole is almost completely shut.
Pass the needle across the center opening several times.
Knot securely.
Do not cut the yarn yet if you plan to use it for additional reinforcement.
Flatten the Bottom Slightly
Push the gathered center slightly inward.
The pumpkin should sit on the gathered area rather than wobbling on a sharp point.
Take a few small stitches across the center if necessary.
Fasten securely.
Stuff the Pumpkin
Add polyester fiberfill gradually.
Begin around the outer edges.
Then fill the center.
Rotate the pumpkin as you work so stuffing remains even.
The pumpkin should feel:
firm but squeezable
Do not pack it rock hard.
Overstuffing makes it difficult to create deep pumpkin sections later.
Shape the Side Wall
Before closing the top, use your hands to form:
- a wide round body
- slightly flattened top
- slightly flattened bottom
The pumpkin should be wider than it is tall.
Add small amounts of stuffing wherever the shape looks uneven.
Close the Top
Cut another long strand of MC.
Weave it through the entire upper edge.
Pull slowly to gather.
Before completely closing the opening, add any final stuffing needed.
Pull the opening almost completely shut.
Leave only enough space for the stem.
Secure firmly.
CREATE THE PUMPKIN SEGMENTS
This step changes the stuffed ball into a recognizable pumpkin.
Cut a very long strand of strong MC.
Approximately:
5–6 feet / 1.5–1.8 meters
is useful for the large pumpkin.
Use less for the smaller versions.
Thread it onto a long yarn needle.
First Segment Line
Insert the needle through the center bottom.
Push it through the stuffing.
Bring it out through the center top.
Leave a long tail at the bottom.
Bring the working yarn down the outside of the pumpkin.
Keep it sitting in a natural groove between decorative sections.
Insert the needle through the bottom center again.
Bring it back through the top.
Pull gently.
The outside strand sinks into the stuffed pumpkin and creates the first groove.
Create Six Sections
Continue wrapping the yarn around the outside and passing through the center.
Divide the pumpkin approximately into:
6 sections
Space each groove evenly.
Pull each strand enough to create a visible indentation, but not so tightly that the pumpkin becomes distorted.
As the grooves deepen, the pumpkin will become shorter and wider.
Check the Mosaic Placement
While sculpting, rotate the pumpkin.
Try to position the grooves so the decorative mosaic motifs remain visible on the rounded sections.
The accent stripes can sit either:
- near the center of a section
- or inside one of the grooves
Both create an attractive result.
Keep the same choice consistent around the pumpkin.
Secure the Shaping Yarn
After the final segment:
Bring the needle back through the center.
Tie securely to the original tail.
Hide the knot inside the center opening.
Trim the excess.
Add the Stem
Use:
- cinnamon stick
- small natural twig
- wooden dowel wrapped with brown yarn
For the stacked version, a cinnamon stick gives a clean autumn look.
Insert the stem into the center top of the small pumpkin.
A stem approximately:
2–3 inches / 5–7.5 cm
long works well.
Push it deeply enough to remain stable.
If necessary, add a small amount of craft glue inside the center opening before inserting it.
Allow glue to dry completely before stacking.
Optional Crochet Stem
If you prefer an entirely crocheted decoration:
With brown yarn:
Ch:
7
Beginning in second chain:
sc across.
6 sc
Ch 1 and turn.
Work:
4–5 rows
of sc.
Fasten off.
Roll the rectangle tightly into a small tube.
Stitch closed.
Insert into the pumpkin center and sew securely.
STACKING THE THREE PUMPKINS
Arrange:
large pumpkin on bottom
medium pumpkin in the center
small pumpkin on top
Rotate each pumpkin before joining until the colors look balanced.
Do not place every accent stripe directly above the stripe below.
A slightly offset arrangement usually looks more natural.
Secure the Stack
For a display that will be moved frequently, stitch the pumpkins together.
Thread a long yarn needle with strong yarn matching the dominant colors.
Pass the needle:
through the center top of the large pumpkin
into the center bottom of the medium pumpkin.
Take several strong stitches between them.
Repeat between:
medium and small
Keep the stitches hidden inside the gathered centers.
Do not pull so tightly that the pumpkins become flattened.
Optional Removable Stack
If you want to use the pumpkins separately:
Do not sew them together.
Instead, flatten the top and bottom centers slightly so they balance securely.
A small nonslip felt circle between tiers can help when used only as indoor decor.
If the Mosaic Double Crochets Pull the Fabric
You are probably pulling the long loop too short.
When making an MDC:
pull the loop all the way to the height of the current row before completing the dc.
The stitch should lie smoothly across the row below.
If You Cannot Find the Correct Front Loop
Look directly down from the current stitch position.
Skip the immediately preceding row.
The correct FLO belongs to the stitch:
two rows below
Because all ordinary mosaic stitches are worked BLO, the front loop should still be clearly visible.
If the Mosaic Pattern Shifts Sideways
Count every 12-stitch section.
Place stitch markers after:
12, 24, 36, 48
and continue as required for the larger sizes.
Then work each diamond independently inside those markers.
This greatly reduces counting mistakes.
If the Panel Gets Wider
Remember that an MDC:
replaces
the current stitch.
Do not make an MDC and then sc into the stitch directly behind it.
Maintain:
48 / 60 / 72 stitches
throughout.
If the Panel Curls Slightly
A little curling is normal in BLO mosaic crochet.
Do not heavily block the panel.
Once the piece is seamed, stuffed, and shaped, minor curling disappears naturally.
If the Pumpkin Is Too Round
Pull the six shaping strands a little tighter.
The strands should compress the center vertically and create deeper lobes.
If the Pumpkin Is Too Flat
The shaping yarn is too tight.
Release and redo the segment strands with gentler tension.
You may also need slightly more stuffing.
If Stuffing Shows Through
The crochet fabric is too loose.
For the next pumpkin:
- use a smaller hook
- tighten ordinary sc slightly
- use a denser yarn
For the current pumpkin, placing a scrap of matching fabric behind the crochet before stuffing can hide white fiberfill.
Make the Pumpkins Taller or Shorter
Height is controlled primarily by the number of panel rows.
Add rows in two-row color pairs so the color rhythm remains consistent.
For a taller pumpkin:
add one or more plain MC/CC pairs above and below the mosaic motif.
For a shorter pumpkin:
remove plain pairs.
Do not remove rows from the central diamond unless you intentionally want to change the design.
Make the Pumpkins Wider
Width is controlled by the number of:
12-stitch repeats
Add:
12 stitches
for every additional mosaic repeat.
Examples:
48 → 60 → 72 → 84 stitches
Always make sure the finished panel wraps around naturally before seaming.
Using Leftover Yarn
These pumpkins are excellent for coordinated scraps.
Keep one main color dominant and use smaller amounts for:
- mosaic contrasts
- surface stripes
- stems
Because all row ends are hidden inside the stuffed pumpkin, you do not need to spend time weaving in every mosaic color tail individually.
Simply secure each tail enough that it will not pull loose before assembly.
Final Pattern at a Glance
Small
Ch 49
48 stitches
14 rows
1 plain color pair below motif.
5 mosaic color pairs.
1 plain color pair above.
Medium
Ch 61
60 stitches
18 rows
2 plain color pairs below.
5 mosaic color pairs.
2 plain color pairs above.
Large
Ch 73
72 stitches
22 rows
3 plain color pairs below.
5 mosaic color pairs.
3 plain color pairs above.
Mosaic Motif
Every:
12 stitches
work contrast-color MDC positions:
A
6, 7
B
4, 5, 8, 9
C
2, 3, 10, 11
D
4, 5, 8, 9
E
6, 7
Main-color rows between motif rows are:
sc BLO across
Assembly
For every pumpkin:
- Finish the flat mosaic panel.
- Add the colorful vertical surface stripes.
- Seam the short sides into a tube.
- Gather the bottom.
- Stuff evenly.
- Gather the top.
- Pass shaping yarn through the center.
- Create approximately 6 pumpkin sections.
- Secure the shaping yarn.
- Add the stem to the smallest pumpkin.
- Stack large, medium, and small.
- Stitch the tiers together if desired.
The completed set has three richly patterned mosaic crochet pumpkins with colorful raised accents, rounded segmented bodies, and a coordinated stacked silhouette, creating a striking handmade fall centerpiece without showing any person in the finished presentation.