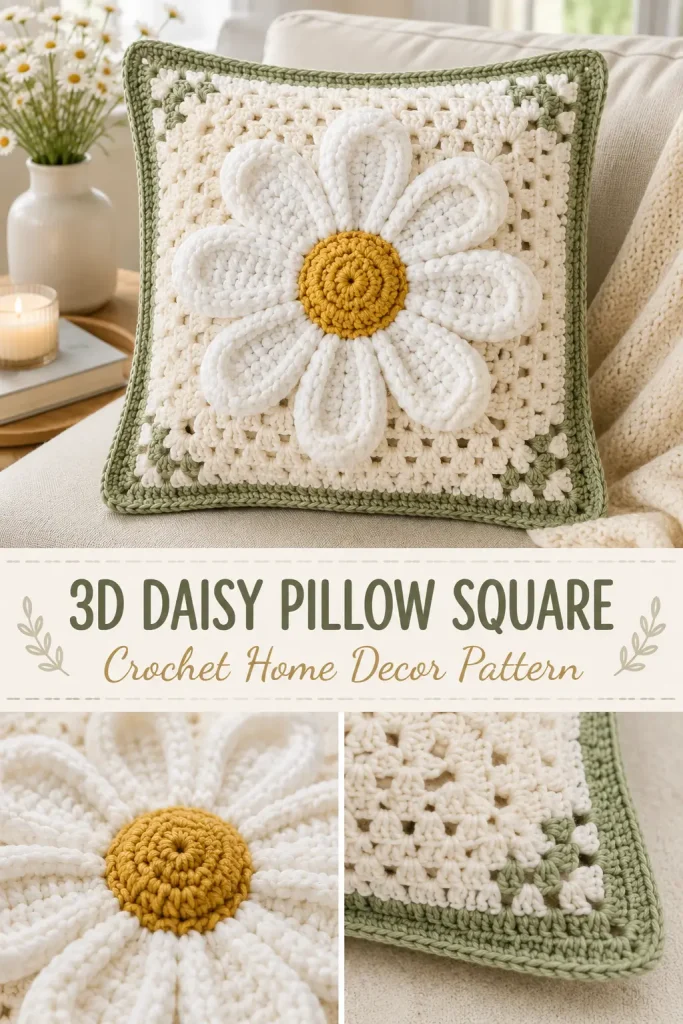
This 3D daisy pillow square is a cozy crochet home decor pattern with a soft cottage-style look. The pillow front is made as one oversized cream granny square, then finished with a big raised daisy in the center, chunky white petals, a golden yellow flower center, and a sage green border.
The finished pillow looks bright, handmade, and decorative without feeling too busy. It is perfect for a sofa, reading chair, nursery corner, bedroom, or handmade housewarming gift.
Description
This crochet pillow cover is made with a large cream granny square front panel, a simple cream back panel, and a clean sage green border around the outside. The daisy is made separately and sewn to the center of the pillow front so the petals stay raised and dimensional. The center of the flower is golden yellow, the petals are chunky white, and the border is sage green for a fresh cottage crochet finish.
Materials
- Worsted weight yarn in warm cream
- Worsted weight yarn in white
- Worsted weight yarn in golden yellow
- Worsted weight yarn in sage green
- 4.5 mm crochet hook
- 16 x 16 inch pillow insert
- Yarn needle
- Scissors
- Stitch markers
- Measuring tape
- Blocking pins, optional
Abbreviations
- MR = magic ring
- ch = chain
- sl st = slip stitch
- sc = single crochet
- hdc = half double crochet
- dc = double crochet
- tr = treble crochet
- st = stitch
- sts = stitches
- sp = space
- rep = repeat
Pattern Notes
- This pattern uses US crochet terms.
- The pillow front is one large cream granny square.
- The daisy is made separately and sewn onto the center of the front square.
- The back panel is simple and solid so the pillow cover is sturdy.
- The front and back panels are joined together around a pillow insert.
- The sage green border frames the pillow and matches the design shown.
- Keep the daisy petals raised by sewing only the base of each petal securely.
- The finished size is made to fit a 16 x 16 inch pillow insert.
Step-by-Step Instructions
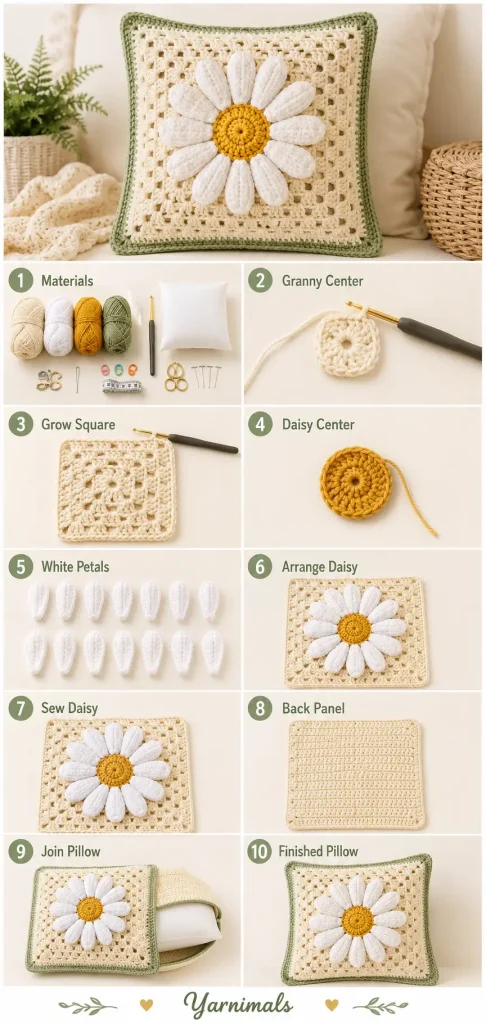
Pillow Front Granny Square
Use warm cream yarn and a 4.5 mm hook.
Round 1
Make a MR.
Ch 3. This counts as the first dc.
Work 2 dc into the ring.
Ch 2.
Work 3 dc into the ring, ch 2.
Repeat 2 more times.
Pull the ring closed.
Join with sl st to the top of the beginning ch 3.
You should have 4 granny clusters and 4 corner spaces.
Round 2
Sl st into the next corner ch-2 sp.
Ch 3.
Work 2 dc, ch 2, 3 dc in the same corner sp.
Ch 1.
In the next corner ch-2 sp, work 3 dc, ch 2, 3 dc.
Ch 1.
Repeat around.
Join with sl st to the top of the beginning ch 3.
Round 3
Sl st into the next corner ch-2 sp.
Ch 3.
Work 2 dc, ch 2, 3 dc in the same corner sp.
Ch 1.
Work 3 dc in the next ch-1 side sp.
Ch 1.
In the next corner, work 3 dc, ch 2, 3 dc.
Repeat around.
Join with sl st.
Continue the Granny Square
Continue working in the same way:
- In each corner ch-2 sp, work 3 dc, ch 2, 3 dc.
- Along each side, work 3 dc in each ch-1 sp.
- Ch 1 between each cluster.
- Join each round with sl st.
Work until the square measures about 15 inches across.
For most worsted yarn, this will be about 13 to 15 rounds.
Do not make the front panel larger than your pillow insert before the border, because the finished cover should fit snugly.
Fasten off and weave in ends.
Front Panel Edge Round
Join warm cream yarn in any corner.
Ch 1.
Sc evenly around the full square.
Work 3 sc in each corner.
Join with sl st to first sc.
Fasten off.
This gives the front panel a neat edge before assembly.
Golden Yellow Daisy Center
Use golden yellow yarn.
Round 1
Make a MR.
Ch 1.
Work 8 sc into the ring.
Pull the ring closed.
Join with sl st to first sc.
8 sc
Round 2
Ch 1.
Work 2 sc in each st around.
Join with sl st.
16 sc
Round 3
Ch 1.
Sc in next st, 2 sc in next st.
Repeat around.
Join with sl st.
24 sc
Round 4
Ch 1.
Sc in next 2 sts, 2 sc in next st.
Repeat around.
Join with sl st.
32 sc
Fasten off, leaving a long tail for sewing.
The center should be round, firm, and slightly raised.
Chunky White Daisy Petals
Make 12 petals in white.
Each petal is worked separately so the daisy looks full and dimensional.
Petal
Ch 14.
Sc in the 2nd ch from hook.
Hdc in next ch.
Dc in next 8 ch.
Hdc in next ch.
Sc in next ch.
Work 3 sc in the last ch.
Now work along the opposite side of the foundation chain.
Sc in next ch.
Hdc in next ch.
Dc in next 8 ch.
Hdc in next ch.
Sc in last ch.
Join with sl st to the first sc.
Petal Edge
Ch 1.
Sc evenly around the petal.
At the rounded tip, work 2 sc into each of the 3 tip stitches to keep the petal smooth and rounded.
Join with sl st.
Fasten off, leaving a long tail for sewing.
Repeat until you have 12 white petals.
Arrange the Daisy
Lay the cream granny square front panel flat with the right side facing up.
Place the golden yellow center in the middle of the square.
Arrange the 12 white petals evenly around the center.
The narrow base of each petal should sit slightly under the yellow center.
The rounded tips should point outward.
Pin everything in place before sewing.
Sew the Petals
Sew each white petal to the granny square at the base only.
Use the long white tail and small stitches.
Stitch across the lower 1 inch of each petal so the base is secure.
Leave the top and sides of the petal free so it lifts slightly from the pillow front.
Repeat for all 12 petals.
Sew the Yellow Center
Place the yellow center over the bases of the petals.
Sew around the edge of the yellow center with small neat stitches.
This hides the petal bases and creates the raised 3D daisy look.
Weave in all ends on the back of the front panel.
Back Pillow Panel
Use warm cream yarn.
The back panel is worked as a simple solid square.
Row 1
Ch 47.
Hdc in the 2nd ch from hook.
Hdc in each ch across.
Ch 1, turn.
46 hdc
Row 2
Hdc in each st across.
Ch 1, turn.
46 hdc
Continue Rows
Repeat Row 2 until the back panel measures the same size as the front panel.
Do not stretch the panel while measuring.
Back Panel Border
Ch 1.
Sc evenly around all 4 sides.
Work 3 sc in each corner.
Join with sl st to the first sc.
Fasten off and weave in ends.
Join the Pillow Cover
Place the back panel wrong side down.
Place the front granny square panel on top, right side up.
The daisy should face outward.
Line up all four edges.
Join warm cream yarn in one corner.
Sc through both layers around three sides of the pillow cover.
Insert the pillow form.
Continue single crocheting through both layers across the final side.
Join with sl st to the first sc.
Fasten off and weave in the end.
Make sure the pillow insert sits smoothly inside the cover.
Sage Green Outer Border
Join sage green yarn in any corner of the pillow edge.
Border Round 1
Ch 1.
Sc evenly around the entire pillow.
Work 3 sc in each corner.
Join with sl st to the first sc.
Border Round 2
Ch 1.
Sc in each st around.
Work 3 sc in each corner.
Join with sl st.
Fasten off and weave in ends.
This creates the clean sage green frame around the pillow.
Optional Soft Corner Shape
If the pillow corners look too pointed, gently shape them with your fingers after the border is complete.
Do not overstuff the pillow.
A slightly snug insert gives the cover a neat decorative shape.
Finishing
Weave in every yarn tail securely.
Check that all 12 petals are firmly attached at the base.
Check that the yellow center is sewn down evenly.
Gently lift and shape the white petals so the daisy looks dimensional.
Smooth the sage green border around the pillow.
Block the panels before assembly if needed, but do not press the 3D flower flat.
Tips & Variations
Use warm cream for the granny square background to keep the pillow soft and neutral.
Use bright white petals for a clean daisy look.
Use golden yellow for the center so the flower stands out.
Use sage green only for the outer border to match the cottage-style design.
For a smaller pillow, stop the granny square earlier and use a smaller insert.
For a larger pillow, add more granny square rounds and make a matching larger back panel.
Use cotton yarn for crisp stitch definition.
Use acrylic or acrylic-blend yarn for a softer pillow.
Sew the petal bases firmly, but leave the petal tips loose for the raised 3D effect.
FAQ
Is this pillow pattern beginner-friendly?
It is best for confident beginners. The granny square and back panel are simple, but the 3D daisy and pillow assembly need careful sewing.
Can I make the daisy directly into the square?
You can, but making the petals separately gives the pillow a stronger raised 3D look and keeps the daisy shape clear.
What pillow insert should I use?
A 16 x 16 inch pillow insert works well for this pattern. Adjust your square size if using a different insert.
Can I make this as a flat square instead of a pillow?
Yes. You can make only the front panel and use it as a large crochet square for a blanket, wall hanging, or bag panel.




Hello. I am trying to DL the free crochet patter for the 3D Daisy pillow square. When I try to print, there’s nothing there.. Can you help me with this matter> I So love daisies. want to make this for a chair in the living room. If you could send me a link or something to try. Thank you