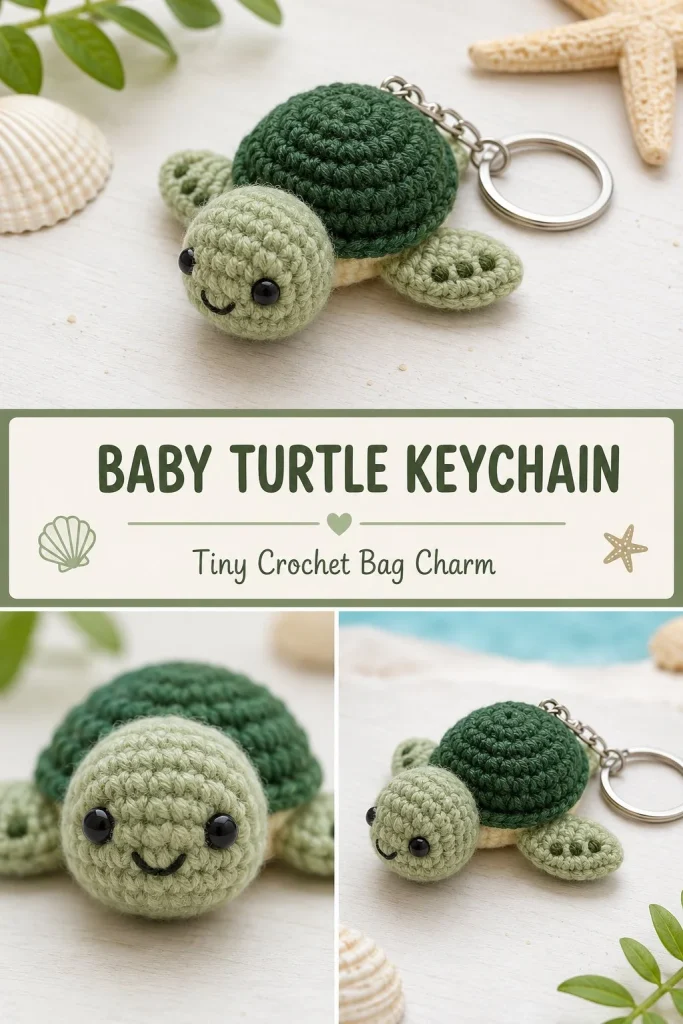
Creating a Baby Turtle Keychain is a delightful crochet project that’s both practical and charming. This tiny amigurumi turtle, sized at just under 3 inches long, makes an adorable accessory to brighten up keys, bags, or backpacks. Whether you’re gifting it or making one for yourself, its compact size and sweet shape are sure to bring a smile. The pattern uses sport or DK cotton yarn and works in continuous rounds, so it’s a great project for those who want to practice neat tension and shaping in amigurumi. If you’ve enjoyed crafting small keychains before, you might appreciate how the tight stitches keep the stuffing neatly inside, ensuring your turtle holds its cute dome shell shape well. For those interested in coastal themed projects, this baby turtle fits right in—similar to other small aquatic amigurumi like the popular sea turtle crochet keychain pattern, it’s a lovely way to carry a little piece of the beach wherever you go.
Why You’ll Love This Crochet Pattern
- Clear, beginner-friendly instructions with familiar US crochet terms
- Small size perfect for quick projects and gifting to friends
- Uses continuous rounds for smoother shaping and easier assembly
- Tight stitches ensure a neat finish and well-shaped amigurumi
- Practical accessory that’s easy to customize with different yarn colors
- A chance to practice several stitches, including invisible decrease, to improve your skills
Finished Size
The finished baby turtle measures approximately 7 cm (2.75 inches) long, excluding the key ring. Keep in mind that your actual size may vary slightly depending on your choice of yarn weight, hook size, and personal tension.
Skill Level
This pattern is suitable for advanced beginner crocheters. It requires working in continuous rounds, using an invisible decrease, and assembling multiple small pieces, making it a perfect next step for someone comfortable with basic stitches but new to amigurumi assembly.
Materials Needed
- Sport or DK weight cotton yarn (approximate amounts):
- Dark green – 20 g
- Sage green – 15 g
- Cream – 10 g
- Small scrap of black yarn or safety eyes for facial details
- 2.75 mm crochet hook
- Two 5 mm safety eyes (or black embroidery yarn if preferred)
- Small amount of polyester stuffing
- 20-25 mm metal key ring
- Yarn needle for sewing pieces together
- Stitch marker to track rounds
- Scissors
Stitches and Abbreviations
- MR = Magic Ring
- ch = Chain
- sl st = Slip Stitch
- sc = Single Crochet
- hdc = Half Double Crochet
- dc = Double Crochet
- inc = Increase (2 sc in the same stitch)
- dec = Invisible Decrease (crochet two stitches together invisibly)
- BLO = Back Loop Only
Gauge and Tension Notes
Gauge isn’t critical for size accuracy on this project, but maintaining tight tension is essential. Tight single crochet stitches help prevent stuffing from showing through the fabric, especially since this is a small amigurumi piece. Using a smaller hook than usual for your yarn can help achieve this firmness.
Pattern Notes Before You Start
This amigurumi baby turtle is worked in continuous rounds with no joining at the end of rounds, so use a stitch marker to mark your round beginnings. The shell and belly are made separately and joined by crocheting them together along with the turtle’s appendages sandwiched inside. Color changes occur only with different yarn required for each piece. Pay special attention to the invisible decrease used on the shell and head for neat shaping.
Step-by-Step Crochet Instructions
Domed Shell Top (Dark Green)
R1: MR, 6 sc (6)
R2: inc around (12)
R3: (sc, inc) around (18)
R4: (2 sc, inc) around (24)
R5: (3 sc, inc) around (30)
R6: BLO sc around (30)
R7: sc around (30)
R8: (3 sc, dec) around (24)
Fasten off, leaving a short tail.
Flat Belly (Cream)
R1: MR, 6 sc (6)
R2: inc around (12)
R3: (sc, inc) around (18)
R4: (2 sc, inc) around (24)
Fasten off.
Head (Sage Green)
R1: MR, 6 sc (6)
R2: inc around (12)
R3-R5: sc around (12)
Insert safety eyes between rounds 3 and 4, about 5 stitches apart, or embroider eyes after assembly.
R6: (sc, dec) around (8)
Lightly stuff, flatten the opening, and leave a long sewing tail.
Flippers (Make 4, Sage Green)
Ch 5
Starting in second chain from hook: sl st, sc, hdc, 5 dc in last chain
Working along the opposite side of the foundation chain: hdc, sc, sl st
Join and fasten off, leaving a sewing tail.
Tail (Sage Green)
Ch 4
Starting in second chain from hook, sl st in each of the next 3 chains
Fasten off.
Key Loop (Dark Green)
Ch 12
sl st in first chain to form a loop
Fasten off, leaving a tail for assembly.
Assembly and Finishing
Start by placing the cream belly wrong side up. Position the head at the 12 o’clock position so its flattened opening extends about 5 mm between the belly and shell. Attach the front flippers at about 2 and 10 o’clock, back flippers at 4 and 8 o’clock, and the tail at 6 o’clock. The key loop goes at 12 o’clock behind the head.
Place the dark green shell over the belly, right side up, carefully matching the 24 shell stitches to the 24 belly stitches. Using sage or dark green yarn, sc through both layers together, catching all appendages inside the seam for a secure finish. Before closing the last 5 stitches, add a small amount of stuffing to dome the shell properly. Finish the seam and sew the head opening firmly to the shell if needed. Embroider a small curved mouth to add expression. Weave in all ends neatly and attach the metal key ring through the crochet loop.
Helpful Tips
- Use a stitch marker religiously to avoid losing track of rounds, especially during increases and decreases.
- When stuffing, don’t overfill—light stuffing helps keep the dome shape without distorting stitches.
- For a smoother shell top, crocheting the sixth round in BLO creates a subtle edge that helps the dome look nicely rounded.
- When sewing appendages in, position and pin them first with contrasting thread to ensure symmetry before permanent sewing.
- Embroidering the mouth last helps balance facial expression; avoid pulling too hard to keep the round head shape.
Common Mistakes to Avoid
- Losing round count during continuous rounds—always mark your round start and count stitches at the end to avoid extra or missed stitches.
- Stuffing too tightly, which can stretch yarn and create gaps allowing stuffing to peek through. Use moderate stuffing.
- Attaching the safety eyes too close or too far apart; eye placement affects expression, so measure carefully before securing eyes.
- Crocheting loosely, particularly on the shell, can prevent the piece from holding its shape—keep tension consistent.
- Forgetting to leave a long sewing tail on pieces for easier assembly and neater finishes.
Customization Ideas
- Swap the color palette for pastel tones for a nursery-themed keychain gift.
- Use textured yarn like boucle or cotton blends for a subtly different shell texture.
- Replace the key ring with a small carabiner clip for hanging on travel bags.
- Add a tiny bell or charm to the key loop for a playful sound or personal touch.
How to Use or Display This Crochet Project
This baby turtle keychain is perfect for carrying a tiny amigurumi companion wherever you go. Attach it to your keys, backpack zipper, purse, or use it as a decorative charm on a baby’s stroller. Its cute size also makes it a sweet gift to accompany a larger handmade set or as a small party favor. Because it’s durable and easy to handle, children can enjoy it as a tactile toy under supervision.
Care Instructions
To keep your crochet turtle looking fresh, hand wash it gently in cool water with mild soap. Avoid soaking too long to keep stuffing secure. Reshape while damp and air dry flat away from direct sunlight to prevent fading. Storage in dry, cool places will prevent fiber damage and preserve color vibrancy.
Frequently Asked Questions
Q: Can I substitute acrylic yarn for cotton?
A: Yes, but cotton helps reduce stretch and looks neater for amigurumi. If using acrylic, consider going down a hook size for tighter stitches.
Q: How do I embroider the mouth without puckering the fabric?
A: Use a single strand of embroidery yarn and gentle tension. Anchor stitches lightly and avoid pulling too tightly.
Q: Can I skip the safety eyes and embroider them instead?
A: Absolutely, embroidering eyes makes this kid-friendly and customizable for different expressions.
Q: What is an invisible decrease?
A: An invisible decrease crocheted by inserting the hook into the front loop of two stitches, pulling up a loop from each, and completing a sc – it creates a subtle, less noticeable decrease.
Q: How do I keep my stitches tight enough?
A: Use a smaller hook than usual for your yarn to maintain firm fabric, and consciously hold your yarn taut when crocheting.
Final Thoughts
This baby turtle keychain is a rewarding project that combines simple shaping and clever assembly to create a charming, sturdy accessory. Whether you’re gifting, decorating, or practicing amigurumi technique, it’s a compact design that fits every maker’s collection. Take your time with the assembly—it’s the part that really brings this little turtle to life. Happy crocheting!



