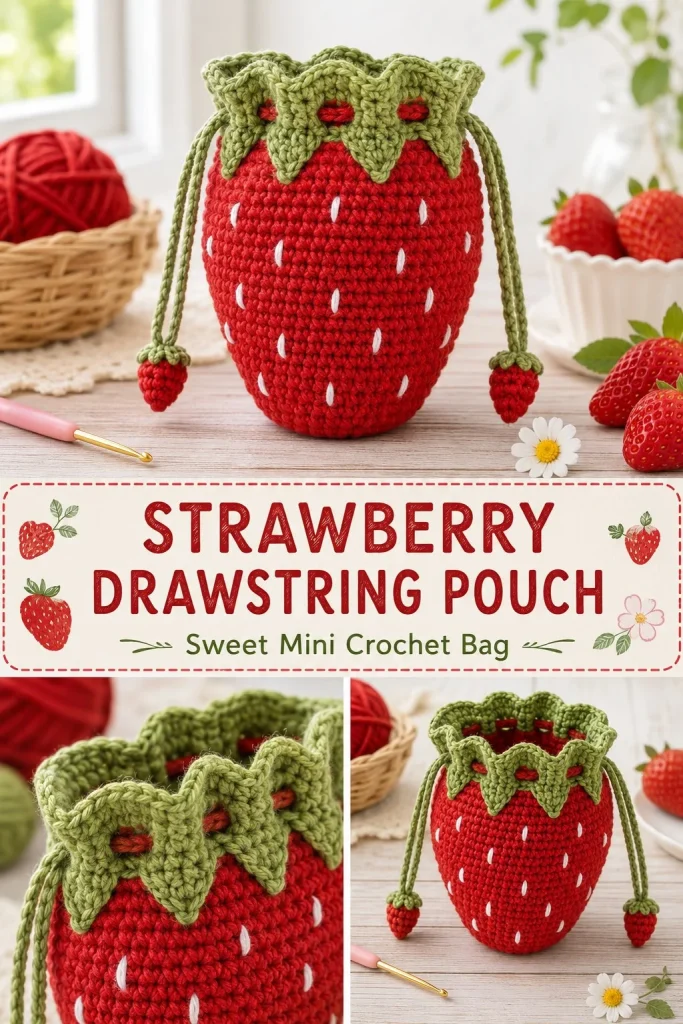
This charming Strawberry Drawstring Pouch is a fun and practical crochet project that’s perfect for beginners and intermediate makers alike. Its bright red body mimics the look of a strawberry, complete with a lively green leaf edge and delicate white embroidered seeds, making it a delightful little accessory. The pouch can hold small items like jewelry, coins, or crafting supplies, keeping them safe and organized with a secure drawstring closure. Working in a continuous spiral and using firm tension ensures the piece is tight enough so nothing slips through, which is a helpful tip for anyone new to crocheting objects with small openings. If you’re looking to dive into a project that combines a bit of shaping with embellishment, this pouch offers just the right balance—and if you like working on small cozy projects, the technique is similar to other beginner-friendly styles like this easy crochet drawstring pouch pattern that emphasizes neat finishing and practical details.
Why You’ll Love This Crochet Pattern
- The playful strawberry design adds a cute and cozy touch to your crochet collection.
- Working in a continuous spiral stitch keeps the fabric seamless and sturdy.
- The firm tension technique prevents small items from slipping through the pouch.
- A green leafy edging introduces simple shaping and color changes to add interest.
- The drawstring closure is both functional and decorative, perfect for various uses.
- Ideal for gifting, this project finishes quickly and makes a thoughtful handmade treasure.
Finished Size
The finished pouch measures approximately 4.5 inches (11.5 cm) in height and about 4 inches (10 cm) in diameter at the base. Keep in mind that your actual size may vary slightly depending on your yarn choice, hook size, and personal tension.
Skill Level
This pattern is suitable for easy to advanced beginners. It involves working in continuous rounds, simple stitch increases to shape the pouch, basic color changes, and a decorative edge that introduces some shaping. It’s a great next step for beginners comfortable with basic stitches but wanting a touch of creative detail.
Materials Needed
- DK cotton yarn: 35 grams red, 15 grams green, and a small scrap of white for embroidery
- 3.5 mm crochet hook (E/4 US)
- Yarn needle for weaving in ends and embroidery
- Stitch marker to mark the first stitch of rounds
- Scissors
Stitches and Abbreviations
- sc: single crochet – insert hook, yarn over, pull through, yarn over, pull through both loops
- ch: chain – yarn over, pull through loop on hook
- sl st: slip stitch – insert hook, yarn over, pull through loop and stitch
- inc: increase – 2 single crochets in the same stitch
Gauge and Tension Notes
Gauge isn’t critical for this pouch, but maintaining firm tension is important. This keeps the fabric tight, so small items don’t fall through. Too loose tension can cause gaps, so if you find your stitches are too open, try holding your yarn a little tauter or switch to a slightly smaller hook.
Pattern Notes Before You Start
This pouch is worked in a continuous spiral from the base upward to the opening. Use a stitch marker to mark the first stitch of each round—this is essential to keep track of rounds without joining. The pattern transitions from red (body) to green (leaf edging) at the top. White yarn is used later for simple embroidered seeds to mimic real strawberries. The drawstring cords are crocheted separately and woven through eyelets near the opening.
Step-by-Step Crochet Instructions
-
Base and Body (R1–R18):
- Begin with a magic ring or ch 2 and 6 sc in 2nd ch (6 sts).
- Increase evenly each round to form a flat circle until you reach approximately 40 stitches.
- Continue working evenly in sc without increases to build height, finishing round 18 with a firm tension. Use a stitch marker to track rounds.
-
Leaf Edging (R19):
- Switch to green yarn.
- Create 12 pointed leaves around the pouch opening as follows:
For each leaf: ch 6, sc in 2nd ch from hook, hdc in next ch, dc in next 2 ch, sl st in last ch; attach this leaf in the next stitch around. Repeat until you have 12 leaves spaced evenly.
-
Embroidery:
- Using white yarn and a yarn needle, embroider small seed shapes randomly on the red body area. Simple straight stitches or small “V” shapes work beautifully.
-
Drawstring Cords:
- Chain 70 in red yarn twice to create two cords.
- Weave both cords through the eyelets formed just below the leaf edging.
- Knot the ends to prevent unraveling.
Assembly and Finishing
Weave in all ends carefully with a yarn needle, trimming excess yarn close to the fabric for a clean finish. Pull the drawstrings to close the pouch neatly. Shaping the leaves gently outward after blocking helps them to flare attractively without curling inward. The embroidered seeds can be lightly steam blocked if needed to even out the fabric texture.
Helpful Tips
- Marking the first stitch of each round helps avoid counting errors in continuous work.
- Keep tension firm but not tight to ensure a flexible yet stable pouch fabric.
- Use a yarn needle with a blunt tip for embroidered seeds to avoid splitting the yarn.
- For a neater leaf edge, work slowly and space the leaves evenly, ensuring consistent stitch height.
- When weaving the cords, leave enough slack so the pouch closes easily without puckering.
Common Mistakes to Avoid
- Loose tension causing gaps: Make sure to hold stitches firmly to prevent contents from slipping through.
- Miscounting rounds: Use a stitch marker to track your progress precisely.
- Uneven leaves: Ensure consistent stitch height when making the leaves for a balanced rim.
- Drawstring too short: Chain extra length on the cords if you prefer a longer drawstring for easier tying.
- Skipping embroidery: Don’t skip the seeds; they add an essential strawberry detail that completes the look.
Customization Ideas
- Try variegated or textured yarns to add a unique twist to the basic strawberry shape.
- Create larger or smaller pouches by adjusting stitch counts and rounds.
- Replace the drawstring cords with colorful ribbons or leather cords for variety.
- Add beads or small buttons for extra “seed” texture or sparkle.
How to Use or Display This Crochet Project
This pouch is perfect for storing small treasures like jewelry, earphones, or craft supplies. It makes a charming gift bag for little surprises or can be used as a playful decorative piece in your craft room. The sturdy structure and cute design also mean it travels well in your handbag or knitting bag to keep essentials secure and accessible.
Care Instructions
Since this pouch uses cotton DK yarn, hand wash gently in cool water with mild detergent. Lay flat to dry to maintain shape and protect the leaf edging. Store in a dry place away from direct sunlight to preserve color vibrancy.
Frequently Asked Questions
Q: Can I use a different yarn weight?
A: Using a thicker yarn will change the pouch size and texture. For best shape, use DK cotton or similar yarn with the recommended hook.
Q: Is a magic ring necessary?
A: No, you can start with a chain ring if preferred. Magic ring helps avoid holes in the base.
Q: How do I make the leaf edging stand out?
A: Blocking the finished leaf row gently helps it shape nicely outward.
Q: Can I skip the embroidery?
A: You can, but the white seeds add an authentic strawberry look that’s charming and visually appealing.
Q: How long should the drawstrings be?
A: The pattern suggests chaining 70 stitches, but you can adjust length based on how tightly you want to close the pouch.
Final Thoughts
Making this strawberry drawstring pouch is a rewarding way to practice shaping, color changes, and embroidery within a neat, practical project. Whether for yourself or as a sweet handmade gift, it combines functionality with playful style. I hope this pattern brings you as much joy to crochet as it did for me to design and share!



