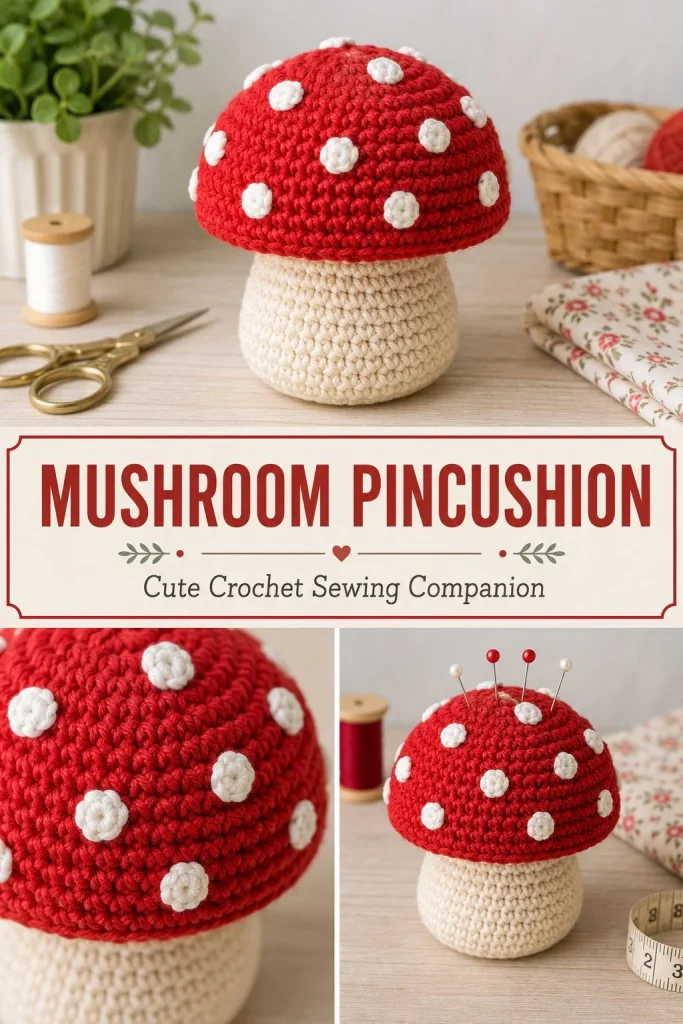
This charming mushroom pincushion is a delightful addition to any crafter’s workspace. Measuring about 9 cm (3.5 inches) tall and wide, it’s the perfect size to hold your pins securely while also adding a whimsical, cozy touch to your sewing area. Worked in continuous rounds with simple single crochet stitches and easy shaping techniques, this project is beginner-friendly yet satisfying to make. The stuffed red cap is carefully designed to hold pins firmly without them poking through other parts. Using DK cotton or acrylic yarn gives the pincushion a smooth, sturdy texture that’s comfortable to use. One thing I found helpful in shaping the mushroom is the option to use a firm felt or plastic canvas circle at the base to keep it standing straight—this makes a noticeable difference if you want a neat display piece. If you’re just diving into amigurumi or decorative crochet projects, this mushroom pincushion is a fun, practical way to improve your skills while making something truly useful and cute. For those looking to expand on mushroom-inspired patterns, the range of similar projects like the aesthetic crochet mushroom plush pattern offers excellent next steps.
Why You’ll Love This Crochet Pattern
- Perfectly sized for practical pin storage without clutter
- Uses straightforward stitches ideal for beginners
- Worked in continuous rounds, teaching seamless shaping
- Stuffed cap ensures pins stay secure without damaging the crochet
- Optional strong base support helps the mushroom stand upright
- Quick-to-make, great for last-minute gifts or craft space decor
Finished Size
The finished mushroom pincushion is approximately 9 cm (3.5 inches) tall and about 9 cm across the cap. Keep in mind that your gauge, yarn choice, hook size, and tension may slightly affect the final size.
Skill Level
Advanced beginner. This pattern uses familiar single crochet stitches and simple increases and decreases, but the shaping and assembly steps introduce essential amigurumi skills. It’s a great project to build confidence in working continuous rounds and joining pieces.
Materials Needed
- DK weight cotton or acrylic yarn: approximately 30 g red, 25 g cream, and 10 g white
- 3.5 mm crochet hook
- Polyester stuffing
- Optional 5 cm plastic canvas or firm felt circle for the base
- Yarn needle for sewing pieces together and weaving in ends
- Scissors
- Stitch marker (helpful to mark beginning of rounds)
Stitches and Abbreviations
- MR (magic ring): a technique for starting rounds with an adjustable loop
- sc (single crochet): insert hook, yarn over, pull through both loops on hook
- inc (increase): 2 sc in same stitch
- dec (decrease): single crochet two stitches together
- BLO (back loop only): work single crochet into back loop of the stitch only
- RED CAP: refers to the main red mushroom cap portion
Gauge and Tension Notes
Gauge is not critical for this pincushion since its purpose is decorative and functional rather than fitting. However, maintaining consistent tension helps keep the fabric tight so the stuffing and pins don’t show through. Avoid loose stitches for a smoother finish and firmer shape.
Pattern Notes Before You Start
This mushroom pincushion is worked entirely in continuous rounds starting with the cap, followed by the underside, then the stem and base. You’ll crochet the red cap and cream underside separately and join them by crocheting through both layers. White spots are small crocheted circles sewn on last. Stuffing is important to keep the pincushion firm enough for pins without bulging or sagging. Optionally, inserting a small plastic canvas or firm felt circle inside the base adds stability and helps the mushroom stand neatly.
Step-by-Step Crochet Instructions
Red Cap
- MR, 6 sc (6)
- Inc around (12)
- (Sc, inc) around (18)
- (2 sc, inc) around (24)
- (3 sc, inc) around (30)
- (4 sc, inc) around (36)
7-8. Sc around (36) - (4 sc, dec) around (30)
- (3 sc, dec) around (24) — Fasten off
Cream Cap Underside
- MR, 6 sc (6)
- Inc around (12)
- (Sc, inc) around (18)
- (2 sc, inc) around (24) — Do not fasten off
Position the cream underside against the cap opening, wrong sides together. Crochet through both pieces around, matching 24 stitches. Before completing the last 5 stitches, stuff the cap firmly, then finish and fasten off.
Cream Stem and Base
- MR, 6 sc (6)
- Inc around (12)
- (Sc, inc) around (18)
- BLO sc around (18)
(Optional: insert plastic canvas or felt circle inside the base now) - (Sc, dec) around (12)
6-9. Sc around (12) — Fasten off, leaving long sewing tail
Stuff the stem firmly, focusing especially on the base. Sew the 12-stitch opening to the center of the cream cap underside. Add extra stitches through both the cap and the stem to stabilize the mushroom so it stands straight.
White Spots
Make 5 small spots: MR, 6 sc, join, fasten off
Make 2 medium spots: MR, 6 sc; R2 inc around (12), join, fasten off
Sew all 7 spots evenly over the red cap, spacing them away from the edge.
Weave in all ends carefully. Pins should be inserted only into the stuffed red cap portion, not the stem.
Assembly and Finishing
Securely sew the stem to the underside using a long yarn tail and needle, making multiple passes for sturdiness. Ensure the base is stable—adding the plastic canvas or firm felt circle inside before final stitching makes your pincushion stand upright better. Sew white spots neatly, avoiding folds or puckering. Weave all ends tidily on the inside to prevent any snagging. Firm stuffing is key so the pincushion holds shape under the pressure of pins.
Helpful Tips
- Use a stitch marker to keep track of your rounds and avoid accidental stitches or skipped rounds.
- Keep your tension relatively tight to prevent stuffing from showing through but not so tight it’s hard to insert the hook.
- If the cap looks floppy, add more stuffing gradually and adjust your final stitches to close gaps.
- Blocking is usually unnecessary, but slightly shaping the cap with your hands after stuffing can smooth out uneven areas.
- Leaving a longer yarn tail at the base helps with a sturdier join and an easier finish.
Common Mistakes to Avoid
- Skipping stitches when joining the underside and cap, which causes the pieces not to fit correctly. Crochet carefully through both layers.
- Overstuffing or understuffing the cap: too much stuffing can distort stitches; too little means pins can poke through the fabric.
- Crocheting too loosely in the base can cause the stem to wobble. Use the optional firm insert to help stability.
- Miscounting increases or decreases, throwing off stitch counts and shape—use stitch markers or count often.
Customization Ideas
- Try different color combinations for an artistic twist on the classic red and cream mushroom.
- Use a softer yarn like bamboo or cotton blends for a more textile-friendly pincushion.
- Make the mushroom larger or smaller by adjusting hook size and yarn weight, keeping stitch ratios consistent.
- Add embroidery or small beads to enhance the white spots for a whimsical effect.
How to Use or Display This Crochet Project
This mushroom pincushion is perfect to use on your sewing desk or craft table, keeping pins safely stored in one place. It also makes a charming gift for fellow crafters or a fun desk companion for anyone who enjoys handmade details. Display it alongside other crochet decor pieces or amigurumi collections for a cozy, woodland vibe.
Care Instructions
Hand wash the pincushion gently in cool water with mild detergent if needed. Avoid heavy agitation to keep the stuffing intact. Air dry flat away from direct sunlight to maintain yarn color and shape. Store in a dry place to prevent mildew. If pins rust from moisture, remove them promptly.
Frequently Asked Questions
Q: Can I use any weight yarn for this pattern?
A: DK weight is recommended for the right size and firmness, but you can substitute lighter or heavier yarn by adjusting hook size and stitch counts accordingly.
Q: What’s the best stuffing to use?
A: Polyester stuffing works best as it holds shape well and is easy to adjust while stuffing.
Q: How do I keep the mushroom standing upright?
A: Using a small plastic canvas or firm felt circle inside the base and sewing securely helps the stem stay straight.
Q: Can I embroider the spots instead of crocheting them?
A: Yes, simple embroidery spots or even small fabric appliques can work as an alternative to the crocheted spots.
Q: Is this pattern suitable for absolute beginners?
A: It’s ideal for those comfortable with single crochet and basic shaping. Beginners learning continuous rounds will find it a helpful practice piece.
Final Thoughts
This mushroom pincushion brings together practical use and charming design in one easy-to-make project. The detailed shaping and assembly create a sturdy, attractive piece that brightens your craft space and keeps your pins handy. Whether you make it for yourself or as a thoughtful gift, it’s sure to add a little handmade joy to any sewing nook. Happy crocheting!



