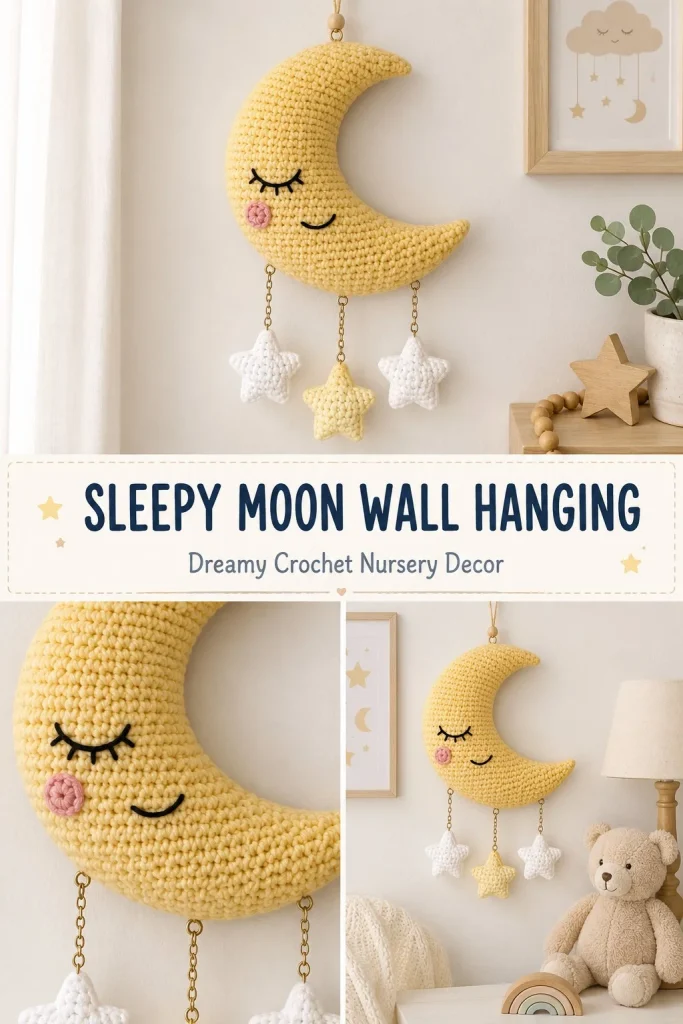
This delightful sleepy moon wall hanging is a cozy and whimsical addition to any nursery, child’s room, or peaceful nook in your home. Crocheted in the round as a soft crescent moon, it’s lightly stuffed to keep its gentle curve without being stiff, making it great for a tactile decorative piece. The sleepy face embroidered on the outer curve adds a sweet personality, while three tiny dangling star motifs bring a charming mobile-like effect. This project is perfect for crocheters looking to enhance their skills with shaping and simple embroidery but who still want an approachable and satisfying pattern. I found that working in continuous rounds with a stitch marker really helps keep track of your progress, especially as you start shaping the crescent curve. If you’ve enjoyed crafting delicate crochet decorations like a floral wall hanging, you might appreciate this as a next project—much like the techniques shared in the crochet bouquet wall hanging pattern for summer decor.
Why You’ll Love This Crochet Pattern
- Creates a charming, soft crescent moon with a unique tapered tube design.
- Light stuffing keeps the piece bendable for smooth shaping without wrinkles.
- Combines simple continuous round crochet with basic embroidery skills for personality.
- Perfect size for wall décor, baby shower gifts, or bedroom accents.
- Great project to practice shaping using short rows and controlled increases/decreases.
- Uses lightweight DK yarn and 3.25 mm hook for a neat, defined stitch texture.
Finished Size
The finished moon measures about 16 cm (6.25 inches) tip to tip, excluding the stars and hanging loop. Keep in mind, your size may vary slightly depending on your chosen yarn, hook size, and individual tension, so gauge is flexible for this decorative piece.
Skill Level
Advanced beginner to intermediate. The pattern uses basic stitches like single crochet but involves continuous rounds with shaping through increases and decreases. Assembly steps including threading to curve the crescent and simple embroidery for the face add a touch of technique, making this a great pattern to build confidence beyond basic amigurumi.
Materials Needed
- DK weight cotton or soft acrylic yarn:
- Soft yellow (~45 g) for the moon body and cords
- White (~15 g) for small star motifs
- Black scrap for facial embroidery
- Pink scrap for a cheek accent
- 3.25 mm crochet hook (US D/3)
- Polyester fiberfill stuffing (light to moderate amount)
- Yarn needle for assembly and embroidery
- Stitch marker to mark first stitch in rounds
- Scissors
- Optional: 20-25 mm wooden ring for hanging support
Stitches and Abbreviations
- MR = Magic Ring: a method to start rounds with an adjustable loop.
- ch = Chain: yarn over, pull through loop.
- sl st = Slip Stitch: insert hook, yarn over, pull through loops.
- sc = Single Crochet: insert hook, yarn over, pull through both loops.
- inc = Increase: 2 single crochet in the same stitch.
- dec = Invisible Decrease: single crochet two stitches together invisibly for neater shaping.
Gauge and Tension Notes
Gauge isn’t critical for this decorative wall hanging, but consistent tension helps the shaping and stuffing behave as expected. Work with a firm but not tight tension to keep stitches neat and fabric sturdy but flexible enough to bend when curved. Avoid overly loose stitches that can cause stuffing to show through.
Pattern Notes Before You Start
The moon is worked in continuous rounds as a tapered tube to create a crescent shape when curved. Ensure you use a stitch marker to track the first stitch of each round. Begin stuffing lightly after round 12 to help the tube hold shape but remain bendable. The crescent shaping is done by threading a yarn through alternating rounds along one side to gently pull the tube inward. Embroidery for the sleepy face and small pink cheek should be done carefully with knots hidden inside the stuffing for a clean finish. Tiny white stars are crocheted separately and attached by three varying length chains that dangle along the bottom curve of the moon.
Step-by-Step Crochet Instructions
-
Moon Body:
- R1: MR, 6 sc (6)
- R2: sc around (6)
- R3: (sc, inc) around (9)
- R4: sc around (9)
- R5: (2 sc, inc) around (12)
- R6: sc around (12)
- R7: (3 sc, inc) around (15)
- R8-R10: sc around (15)
- R11: (4 sc, inc) around (18)
- R12-R18: sc around (18)
- Begin adding small amounts of stuffing from round 12, keep stuffing light at tips, firmer in middle.
- R19: (4 sc, dec) around (15)
- R20-R22: sc around (15)
- R23: (3 sc, dec) around (12)
- R24: sc around (12)
- R25: (2 sc, dec) around (9)
- R26: sc around (9)
- R27: (sc, dec) around (6)
- Finish stuffing to maintain shape but keep flexible.
- Fasten off leaving a long tail, thread tail through front loops of final 6 stitches, pull closed and secure.
-
Curve the Crescent:
- Lay the stuffed tube flat, choose one long side as inner curve.
- Thread a 70 cm length of yellow yarn, anchor at one tip.
- Take a small horizontal bite through one stitch every second round along inner curve to the opposite tip.
- Gradually pull yarn to shorten inner edge causing the moon to curve smoothly into a crescent.
- Secure at opposite tip and reinforce shape with additional passes through inner curve stitches.
-
Face Embroidery:
- On outer convex side about one-third down from upper tip, embroider a gently curved closed eye using black yarn.
- Add 3 short eyelash stitches at outer end of eye.
- Embroider a small curved smile just below the eye.
- Stitch a small pink cheek stitch beneath the eye.
- Pass needle through stuffing to bury knots internally for a tidy look.
-
Tiny White Stars (make 3):
- MR, repeat 5 times: ch 3, sl st in second chain from hook, sc in next chain, sl st into MR.
- Pull ring closed, fasten off leaving a long tail for attachment.
-
Dangling Cords:
- Crochet 3 chains in yellow or white of lengths 14, 19, and 24 stitches.
- Fasten off leaving tails at both ends.
- Sew one star to the lower end of each chain.
- Attach upper ends spaced about 3 cm apart along the lower half of the moon.
- Position shortest cord nearest upper side and longest nearer the moon tip so stars hang at varying heights.
-
Hanging Loop:
- Join yellow yarn at top midpoint of outer curve.
- Ch 24 and sl st back into same attachment point to form loop.
- Reinforce the base with several stitches.
- If using a wooden ring, pass the chain through it before closing the loop.
- Weave in all ends securely.
Assembly and Finishing
Secure all yarn tails neatly inside the crescent moon by threading them through the stuffing with a yarn needle. Shape the crescent carefully after stitching the curved inner edge so there are no puckers or sharp folds. Attach stars firmly to dangling cords and space cords evenly along the moon’s lower curve for balanced hanging. Reinforce the hanging loop base well to support the wall hanging’s weight. Lastly, trim any stray fibers for a polished finish.
Helpful Tips
- Use a stitch marker on the first stitch of every round to avoid counting mistakes during shaping.
- Stuff lightly at the tips of the moon to keep flexibility while adding more stuffing in the middle for stability.
- When shaping the crescent, pull the shaping yarn gradually to avoid puckers—building tension slowly gives a smooth curve.
- Embroider the face before final stuffing or use a separate embroidery thread so knots can be hidden inside effectively.
- Make the tiny stars tight and neat to keep their five points defined.
- For hanging, a small wooden ring can help keep the loop sturdy and easier to hang.
Common Mistakes to Avoid
- Pulling the shaping yarn too tightly, causing puckers and uneven curves.
- Overstuffing the moon body, which makes it stiff and harder to bend.
- Forgetting to keep track of rounds without a stitch marker, leading to counting errors.
- Being too loose with tension causing visible stuffing through the stitches.
- Neglecting to bury embroidery knots inside, resulting in lumps or visible knots on the surface.
Customization Ideas
- Use glow-in-the-dark yarn or metallic thread for stars and embroidery to add a magical nighttime effect.
- Substitute soft pastel colors to match nursery or seasonal themes.
- Add extra dangling cords with different lengths and beads for more movement.
- Experiment with different fiber textures like bamboo or linen blends for unique drape and feel.
How to Use or Display This Crochet Project
This sleepy moon wall hanging is perfect for decorating a baby or toddler’s room, adding a serene vibe to a cozy reading corner, or gifting at baby showers and birthdays. Hang it on a nursery wall, above a crib, or even as part of a larger celestial décor display. The soft, bendable structure means it’s light enough to be securely pinned without heavy hardware.
Care Instructions
Depending on your yarn choice, gentle hand washing in cool water with mild detergent is best to preserve the shape and color. Avoid wringing—gently squeeze out excess water and reshape while damp. Lay flat to dry. Store in a dry place out of direct sunlight to prevent fading.
Frequently Asked Questions
Q: Can I use thicker yarn or a larger hook?
A: You can, but the finished moon will be larger and thicker. Adjust stuffing accordingly to keep it flexible. You may also need to modify stitch counts slightly for smooth shaping.
Q: How do I hide embroidery knots inside the piece?
A: Pass the needle through the stuffing body to a distant point before trimming the yarn tail to keep knots hidden and prevent lumps on the surface.
Q: What if my moon doesn’t curve evenly?
A: Slow down when pulling the shaping yarn and make sure you take small, even bites of stitches along the inner edge. Adjust tension gradually until the curve is smooth.
Q: Can I skip the dangling stars?
A: Yes, but the stars add charm and a playful detail—consider adding other small details like beads or tassels if you prefer.
Q: Is this pattern suitable for beginners?
A: It’s advanced beginner level because it uses continuous rounds, increases, decreases, and shaping techniques. Beginners with basic skills can complete it with patience.
Final Thoughts
This sleepy moon wall hanging brings soft nighttime magic into any space, blending manageable crochet techniques with shaping and embroidery for a rewarding project. Its sweet sleepy face and dangling stars make it both a lovely décor piece and a thoughtful gift. With careful stuffing and shaping, you’ll enjoy seeing this moon glow softly on your wall for years to come.



