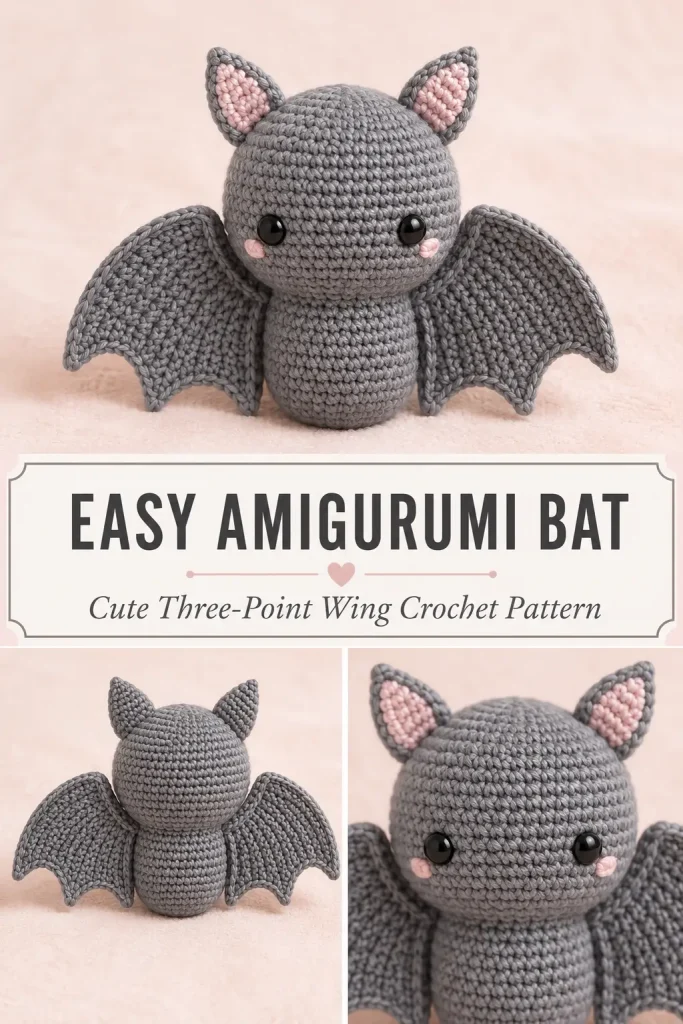
This tiny crochet bat has a round head, softly shaped body, pointed ears, rosy cheeks, and oversized fan-like wings with three small tips along each outer edge. The simple one-piece head-and-body construction keeps sewing to a minimum while giving the finished amigurumi a compact, cuddly shape.
Worked in gray yarn, this little bat makes a sweet Halloween decoration, pocket-sized plush crochet toy, nursery ornament, or handmade gift. You can also make it in black for a classic bat or in white for a soft ghost-bat variation.
This is an original, image-inspired construction created to produce the same visible style without copying another designer’s written pattern.
Description
The finished amigurumi bat has a large spherical head that flows directly into a smaller rounded body. Two small triangular ears sit high on the head, with optional pink inner-ear pieces matching the embroidered cheeks. Two oversized semicircular wings are sewn behind the sides of the bat, creating the wide folded silhouette visible from the front. Each wing has three subtle pointed sections along its outer edge.
Materials
- DK or light worsted-weight yarn in medium gray
- Small amount of pale pink yarn
- Small amount of black embroidery floss
- 2.75–3 mm crochet hook
- Two 6 mm black safety eyes
- Polyester fiberfill
- Yarn needle
- Scissors
- Stitch marker
- Sewing pins
- Blocking mat and rustproof pins, optional
Abbreviations
- ch: chain
- dc: double crochet
- dec: invisible single crochet decrease
- hdc: half double crochet
- inc: work 2 sc in the same stitch
- MR: magic ring
- Rnd: round
- sc: single crochet
- sl st: slip stitch
- st: stitch
- sts: stitches
Finished Size
Using DK yarn and a 2.75 mm hook:
- Bat height: approximately 4–4½ inches
- Body width: approximately 2½ inches
- Wingspan: approximately 6–7 inches
The finished size will vary with yarn thickness, hook size, and tension.
Pattern Notes
- This pattern uses US crochet terminology.
- The head and body are worked continuously from the top down.
- Work the head and body in continuous spiral rounds.
- Mark the first stitch of every round.
- Stuff firmly enough to hold the rounded shape without stretching the stitches.
- The wings and ears are made separately and sewn on.
- The wings are worked flat in turning rows.
- Make both wings with the same stitch tension so they match.
- Safety eyes are not recommended for toys intended for children under three. Embroider the eyes instead.
- Difficulty level: confident beginner.
Special Stitch
Invisible Decrease
Insert the hook through the front loop of the next stitch.
Insert the hook through the front loop of the following stitch.
Yarn over and pull through both front loops.
Yarn over and pull through both loops on the hook.
Step-by-Step Instructions
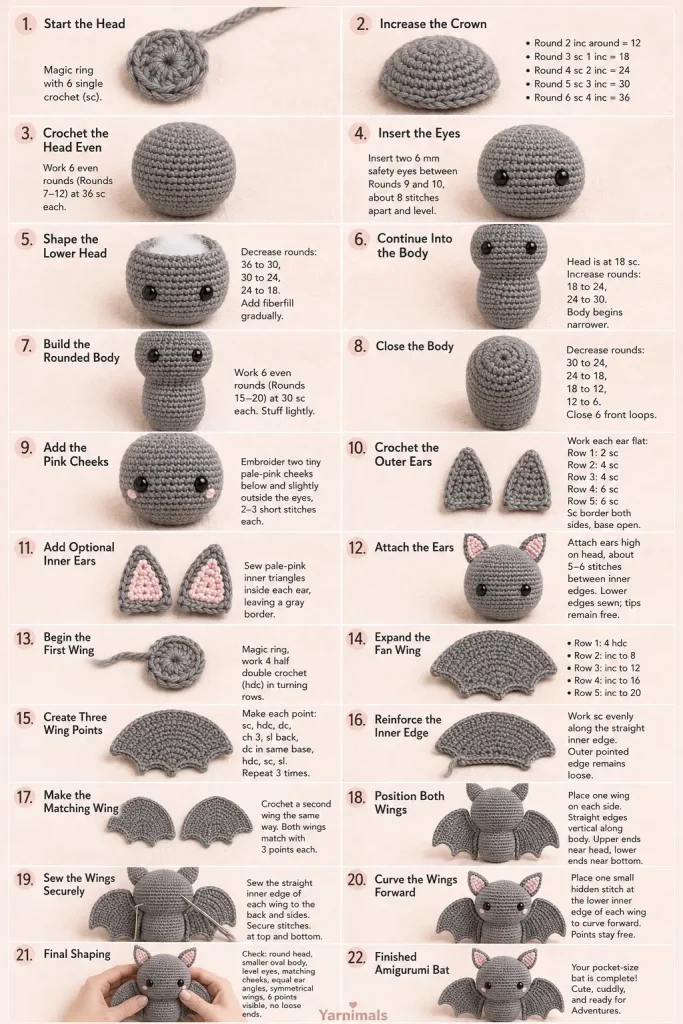
Head and Body
Using gray yarn:
Head
Rnd 1: Make 6 sc in a MR. (6)
Rnd 2: Inc in each st around. (12)
Rnd 3: Repeat 1 sc, inc around. (18)
Rnd 4: Repeat 2 sc, inc around. (24)
Rnd 5: Repeat 3 sc, inc around. (30)
Rnd 6: Repeat 4 sc, inc around. (36)
Rnds 7–12: Sc in each st around. (36)
Add the Eyes
Insert the safety eyes between Rnds 9 and 10.
Place them approximately 8 stitches apart.
Check the face from the front before attaching the washers. The eyes should sit slightly toward the lower half of the head rather than high near the crown.
For embroidered eyes, wait until the head is stuffed and closed.
Shape the Lower Head
Rnd 13: Repeat 4 sc, dec around. (30)
Rnd 14: Repeat 3 sc, dec around. (24)
Begin stuffing the head.
Shape the face and sides evenly as you add fiberfill.
Rnd 15: Repeat 2 sc, dec around. (18)
Add more stuffing, keeping the head rounded.
Body
Continue with gray yarn.
Rnd 16: Repeat 2 sc, inc around. (24)
Rnd 17: Repeat 3 sc, inc around. (30)
Rnds 18–23: Sc in each st around. (30)
Continue stuffing the body gradually.
Keep the upper body firm enough to support the head.
Rnd 24: Repeat 3 sc, dec around. (24)
Rnd 25: Repeat 2 sc, dec around. (18)
Add the remaining stuffing.
The body should be smaller than the head and shaped into a short rounded oval.
Rnd 26: Repeat 1 sc, dec around. (12)
Rnd 27: Dec around. (6)
Fasten off, leaving a tail.
Thread the tail through the front loops of the remaining stitches.
Pull firmly to close.
Secure the yarn and hide the tail inside the body.
Pink Cheeks
Using pale pink yarn, embroider one small cheek below the outer edge of each eye.
Make two or three short horizontal stitches for each cheek.
Keep the cheeks level and approximately one round below the eyes.
Secure the yarn ends inside the head.
Optional Embroidered Eyes
For a child-safe version, use black embroidery floss instead of safety eyes.
Make several small vertical satin stitches for each eye between Rnds 9 and 10.
Keep the eyes approximately 8 stitches apart.
Add one tiny white highlight stitch near the upper side of each black eye if desired.
Outer Ears
Make two using gray yarn.
Row 1
Ch 2.
Work 2 sc in the second ch from the hook.
Turn.
2 sts
Row 2
Ch 1.
Inc in each st.
Turn.
4 sts
Row 3
Ch 1.
Sc in each st across.
Turn.
4 sts
Row 4
Ch 1.
Inc in the first st.
Sc in each of the next 2 sts.
Inc in the final st.
Turn.
6 sts
Row 5
Ch 1.
Sc in each st across.
6 sts
Do not turn.
Ch 1 and work sc evenly down the first side of the ear.
Work 2 sc around the tip.
Continue sc evenly up the opposite side.
Leave the straight lower edge unworked.
Fasten off, leaving a long sewing tail.
Optional Pink Inner Ears
Make two using pale pink yarn.
Row 1
Ch 2.
Work 2 sc in the second ch from the hook.
Turn.
2 sts
Row 2
Ch 1.
Inc in each st.
Turn.
4 sts
Row 3
Ch 1.
Sc in each st across.
Fasten off, leaving a sewing tail.
Position one pink piece in the center of each gray ear.
Leave a narrow gray border visible around the sides and tip.
Sew the inner ear in place using small stitches.
Attach the Ears
Pin the ears high on the head between approximately Rnds 3 and 8.
Position the straight lower edges against the head.
Leave approximately 5–6 visible stitches between the inner edges of the ears.
Angle both ears slightly outward.
Sew across the bottom edge first.
Add one or two small stitches along the lower sides so the ears remain upright.
Do not sew the entire ear flat against the head.
Repeat for the second ear.
Check that both ears are equal in height and angle.
Wings
Make two using gray yarn.
Each wing is worked as a flat semicircular fan. The final edging creates three small bat-wing points.
Wing Row 1
Make a MR.
Ch 1.
Work 4 hdc into the ring.
Pull the ring closed.
Turn.
4 sts
Wing Row 2
Ch 1.
Work 2 hdc in each st across.
Turn.
8 sts
Wing Row 3
Ch 1.
Repeat across:
- 1 hdc in the next st
- 2 hdc in the next st
Turn.
12 sts
Wing Row 4
Ch 1.
Repeat across:
- 1 hdc in each of the next 2 sts
- 2 hdc in the next st
Turn.
16 sts
Wing Row 5
Ch 1.
Repeat across:
- 1 hdc in each of the next 3 sts
- 2 hdc in the next st
Do not turn.
20 sts
The wing should now resemble a flat semicircle.
Pointed Wing Edging
Work across the curved 20-stitch edge.
Sl st in the first st.
Repeat the following sequence three times:
- Sc in the next st.
- Hdc in the next st.
- In the next st, work:
- 1 dc
- Ch 3
- Sl st in the second ch from the hook
- Sl st in the next ch
- 1 dc in the same base st
- Hdc in the next st.
- Sc in the next st.
- Sl st in the next st.
Sl st in the final stitch.
The wing should now have three subtle points along the curved edge.
Reinforce the Straight Wing Edge
Ch 1.
Work sc evenly along the first row-end side toward the magic-ring center.
Work 1 sc through the center ring.
Continue sc evenly up the opposite row-end side.
Fasten off, leaving a long sewing tail.
This straight reinforced edge will be sewn to the bat.
Shape the Wings
Lightly dampen each wing if necessary.
Lay the wings flat on a blocking mat.
Arrange the three points evenly.
Keep the straight attachment edge smooth.
Allow the wings to dry completely before sewing.
Attach the Wings
Place the bat with its back facing you.
Position one wing on each side.
Rotate each semicircle so the reinforced straight edge runs vertically along the side of the bat.
The upper end should sit near the lower side of the head, around Rnds 11–13.
The lower end should finish near Body Rnds 22–24.
The pointed outer edges should extend sideways and remain visible from the front.
Pin both wings before sewing.
Check from the front that:
- Both wings extend the same distance.
- All six wing points are visible.
- The head remains centered.
- The body is not hidden completely.
Using the long yarn tail, sew the straight edge of the first wing securely to the back and side of the bat.
Pass the needle through:
- The reinforced wing edge
- A small section of the body stitches
Add several extra stitches at the upper and lower attachment points.
Do not sew the outer curved edge to the body.
Repeat for the second wing.
Optional Folded-Wing Position
For the cuddled wing position shown in the design, bring the lower outer portion of each wing slightly forward beside the body.
Add one small hidden stitch between:
- The lower inner wing
- The side of the body
This holds the wing in a gentle forward curve while keeping the three outer points loose.
Do not pull the stitch tightly.
Final Shaping
Gently roll the head between your hands to smooth the stuffing.
Shape the body into a short oval.
Adjust the ears so they sit evenly.
Pull the wings outward and then curve them slightly forward.
Check that:
- Both eyes are level.
- The cheeks match.
- The ears have the same angle.
- The body is centered beneath the head.
- Both wings are the same size.
- The wing points face outward.
- No yarn ends are visible.
Color Variations
Classic Gray Bat
Use:
- Medium gray for the body, ears, and wings
- Pale pink for the inner ears and cheeks
- Black eyes
Midnight Black Bat
Use:
- Black or charcoal yarn throughout
- White or pale gray cheek stitches
- Black or dark safety eyes with white embroidered highlights
Snow Bat
Use:
- White or cream yarn throughout
- Pale pink inner ears and cheeks
- Black safety eyes
Keep the same construction and stitch counts for every color version.
Tips & Variations
Use a smaller hook when the stuffing shows between the stitches.
Cotton yarn creates crisp wings and ears, while acrylic yarn makes the bat softer and slightly fluffier.
Do not overstuff the body. A firm head and slightly softer body create the rounded proportions shown in the design.
Pin both wings at the same time before sewing either one permanently.
For firmer wings, make two identical pieces for each side and crochet them together around the outer edge. This will create a thicker result than the single-layer design.
For a hanging decoration, sew a short yarn loop to the top of the head between the ears.
For a keychain-sized bat, use sport-weight yarn and a 2 mm hook.
For a larger plush crochet toy, use worsted-weight yarn with a 3.5–4 mm hook.
FAQ
Why are my wings curling?
The stitches may be too tight, or the wing may need blocking. Lightly dampen the piece, shape it flat, and allow it to dry before attaching it to the body.
Can I make the wings smaller?
Yes. Stop after Wing Row 4, then adapt the pointed edging across the 16 stitches. Keep three points but space them closer together.
Can I make this bat without safety eyes?
Yes. Embroidered eyes are a good alternative and are recommended when the finished toy may be handled by a young child.
Conclusion
This easy amigurumi bat crochet pattern creates a compact little character with a round head, pink cheeks, pointed ears, a softly shaped body, and wide three-point wings. Make the bat in classic gray, deep black, snowy white, or any color that suits your collection.
The finished plush makes a charming Halloween decoration, pocket companion, nursery accent, or handmade crochet gift.



