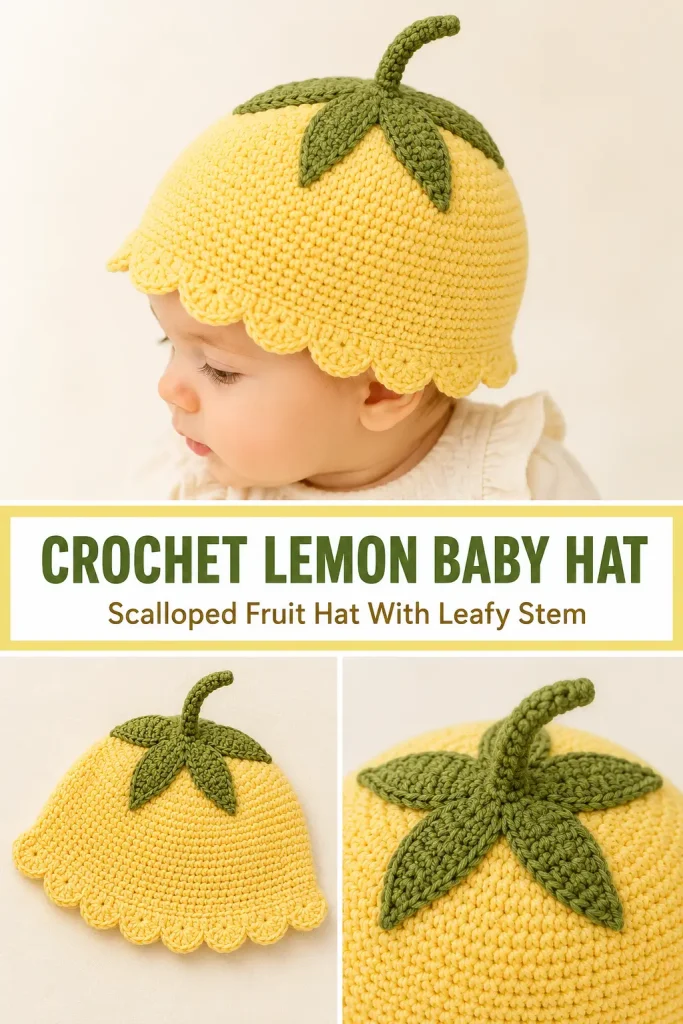
This sweet crochet lemon baby hat turns a simple yellow beanie into a cheerful fruit-inspired accessory. The rounded crown creates the lemon shape, while the softly ruffled brim frames the baby’s face like a wavy citrus edge.
A dark green calyx and curved crochet stem complete the design without using wire, buttons, beads, or other hard embellishments. It makes a charming handmade baby gift, spring photo prop, or playful addition to a fruit-themed outfit.
Description
The finished hat has a dense, softly rounded lemon-yellow crown worked from the top down in single crochet. Sixteen small scallops form the decorative brim around the face and back of the neck. A five-point green leafy cap sits securely at the crown, with a narrow curved stem rising from its center. The sample instructions make a 0–3 month baby hat, with adjustments included for newborn through 12-month sizes.
Materials
- DK or light worsted-weight yarn in lemon yellow
- Small amount of dark olive or leaf green yarn
- 3.5 mm crochet hook
- 3 mm crochet hook for the stem, optional
- Yarn needle
- Scissors
- Stitch marker
- Measuring tape
- Sewing pins
Approximate yarn amounts:
- Yellow: 100–130 yards
- Green: 20–30 yards
Abbreviations
- ch: chain
- dc: double crochet
- hdc: half double crochet
- inc: work 2 single crochet stitches in the same stitch
- MR: magic ring
- Rnd: round
- sc: single crochet
- sl st: slip stitch
- st: stitch
- sts: stitches
Finished Size
The main instructions make a 0–3 month size.
- Finished circumference: approximately 14–15 inches
- Finished height including scallops: approximately 5½ inches
- Scallop depth: approximately ¾ inch
- Stem height: approximately 2–2½ inches
Size Guide
| Size | Stop Increasing After | Crown Stitch Count | Hat Height Before Scallops |
|---|---|---|---|
| Newborn | Round 7 | 56 sts | 4¼ inches |
| 0–3 months | Round 8 | 64 sts | 4¾ inches |
| 3–6 months | Round 9 | 72 sts | 5¼ inches |
| 6–12 months | Round 10 | 80 sts | 5¾ inches |
The scalloped edging adds approximately ¾ inch to the finished height.
Gauge
Approximately:
- 18 sc = 4 inches
- 20 rounds = 4 inches
Measure the baby’s head whenever possible. For a comfortable fit, make the finished hat approximately 1–1½ inches smaller than the actual head circumference.
Pattern Notes
- This pattern uses US crochet terminology.
- The yellow hat is worked in continuous spiral rounds.
- Do not join at the end of each crown round.
- Mark the first stitch of every round.
- The scalloped edging is worked after the main hat reaches the correct height.
- The green calyx is made separately and sewn securely to the crown.
- The stem is a narrow crochet tube with no wire inside.
- Keep the stitches firm but flexible.
- The stitch count remains divisible by four in every size so the scallops fit evenly.
- Check every sewn attachment carefully before the hat is worn.
- This hat is intended for supervised wear and should be removed before sleep.
Step-by-Step Instructions
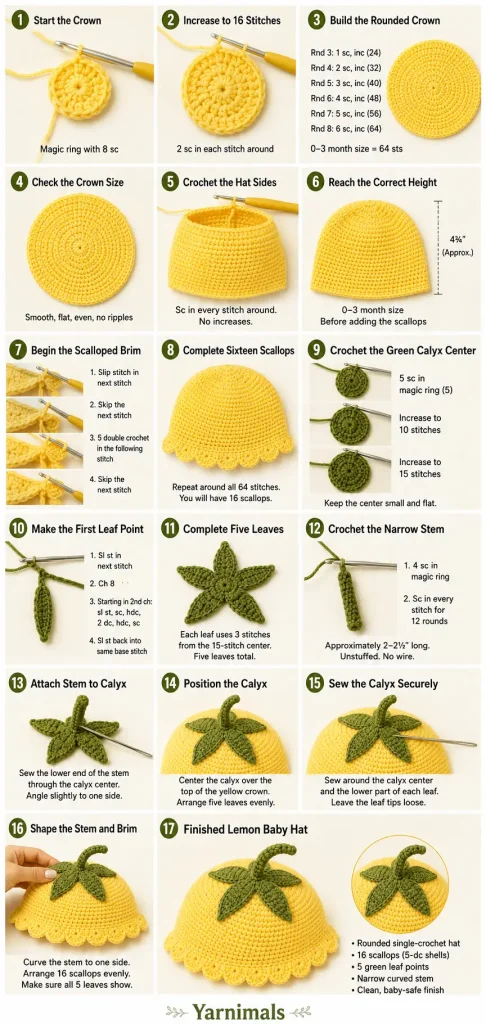
Yellow Lemon Hat
Using lemon-yellow yarn and the 3.5 mm hook:
Round 1
Make 8 sc in a MR.
Pull the ring firmly closed.
8 sts
Round 2
Inc in every st around.
16 sts
Round 3
Repeat around:
- Sc in the next st
- Inc in the next st
24 sts
Round 4
Repeat around:
- Sc in each of the next 2 sts
- Inc in the next st
32 sts
Round 5
Repeat around:
- Sc in each of the next 3 sts
- Inc in the next st
40 sts
Round 6
Repeat around:
- Sc in each of the next 4 sts
- Inc in the next st
48 sts
Round 7
Repeat around:
- Sc in each of the next 5 sts
- Inc in the next st
56 sts
Stop increasing here for the newborn size.
Round 8
Repeat around:
- Sc in each of the next 6 sts
- Inc in the next st
64 sts
Stop increasing here for the 0–3 month size.
Round 9
Repeat around:
- Sc in each of the next 7 sts
- Inc in the next st
72 sts
Stop increasing here for the 3–6 month size.
Round 10
Repeat around:
- Sc in each of the next 8 sts
- Inc in the next st
80 sts
Stop increasing here for the 6–12 month size.
Work the Hat Even
After completing the final increase round for the chosen size, work 1 sc in every stitch around.
Continue without increasing until the hat reaches the listed measurement from the center of the crown to the lower edge.
For the 0–3 month size, this will usually require approximately 13–15 even rounds after Round 8.
Try the hat on when possible. The lower edge should sit just above the eyebrows at the front and cover the lower back of the head.
Do not fasten off.
Lemon Scalloped Brim
After reaching the correct height, sl st into the next stitch to finish the spiral smoothly.
The edging uses four stitches for each scallop.
Repeat around:
- Sl st in the next st.
- Skip the next st.
- Work 5 dc in the following st.
- Skip the next st.
Repeat until all stitches have been used.
The size counts create:
- 14 scallops over 56 sts
- 16 scallops over 64 sts
- 18 scallops over 72 sts
- 20 scallops over 80 sts
Join with a sl st to the first edging stitch.
Fasten off and weave the yarn tail securely into the inside of the hat.
Shape the Brim
Lay the hat flat.
Use your fingers to open each five-double-crochet shell.
Gently pull the center of each scallop downward so the rounded points sit evenly around the hat.
Do not stretch the main crown.
Green Leafy Calyx
Using green yarn and the 3.5 mm hook:
Round 1
Make 5 sc in a MR.
Pull the ring closed.
5 sts
Round 2
Inc in each st around.
10 sts
Round 3
Repeat around:
- Sc in the next st
- Inc in the next st
15 sts
Do not fasten off.
Crochet the Five Leaf Points
Each leaf uses three stitches from Round 3.
Repeat the following sequence five times:
- Sl st in the next st.
- Ch 8.
- Beginning in the second ch from the hook, work:
- Sl st in the next ch
- Sc in the next ch
- Hdc in the next ch
- Dc in each of the next 2 ch
- Hdc in the next ch
- Sc in the final ch
- Sl st back into the same base stitch where the chain began.
- Sl st in each of the next 2 stitches of Round 3.
After the fifth leaf, join neatly and fasten off, leaving a long sewing tail.
The calyx should have five long tapered points radiating from a small circular center.
Shape the Calyx
Lightly dampen the green piece if necessary.
Stretch the five leaves outward so they are evenly spaced.
Allow the piece to dry flat before attaching it to the hat.
Crochet the Stem
Using green yarn and the 3 mm hook:
Stem Round 1
Make 4 sc in a MR.
Pull the ring closed.
4 sts
Stem Rounds 2–12
Sc in each st around.
4 sts
Because the stem is narrow, work slowly and use the stitch marker to locate the beginning of each round.
Do not stuff the stem with fiberfill.
For a slightly firmer stem, thread the beginning yarn tail upward through the center of the tube before closing it.
Fasten off, leaving a long sewing tail.
The stem should measure approximately 2–2½ inches.
Attach the Stem to the Calyx
Insert the lower end of the stem through the center opening of the green calyx.
Use the stem’s sewing tail to attach it securely to the center circle.
Sew through the base of the stem and several stitches of the calyx at least three or four times.
Angle the stem slightly instead of keeping it completely straight.
Secure the yarn firmly on the underside.
Do not add wire, pipe cleaners, or other rigid materials.
Attach the Calyx to the Hat
Place the completed green piece over the center of the yellow crown.
The five leaves should spread evenly across the upper hat.
Pin the center circle in place.
Using the long green sewing tail, sew around the outer edge of the small circular center.
Add several hidden stitches through the lower sections of the five leaves.
Leave the pointed ends free so they lift slightly away from the hat.
Do not sew through the inside of the stem.
Knot the yarn securely inside the hat and weave in the remaining tail.
Final Shaping
Place the hat on a rounded bowl, ball, or other form close to the baby’s head size.
Check that:
- The crown remains smooth and rounded.
- The scallops are evenly spaced.
- The green calyx is centered.
- All five leaf points are visible.
- The stem is secure.
- No yarn ends remain loose.
- No stitches feel hard or bulky against the inside.
Gently curve the stem to one side with your fingers.
Tips & Variations
Cotton yarn gives the leaves and scallops crisp definition. A soft acrylic or cotton-acrylic blend creates a warmer, more flexible baby hat.
Use a smaller hook if the stitches look loose or have visible gaps.
For a softer scallop, replace the five double crochets with five half double crochets.
For a fuller ruffled brim, work seven double crochets in each scallop. Check that the edge does not ripple excessively.
Use warm golden yellow for a ripe lemon look or pale pastel yellow for a softer newborn version.
The same construction can become an orange hat by using orange yarn with a green calyx.
For a lime version, make the hat light green and use a darker green for the leaves and stem.
Do not attach buttons, beads, bells, or loose decorative pieces to a baby hat.
FAQ
Can I make the lemon hat in another baby size?
Yes. Continue the crown increases until reaching the stitch count listed for the chosen size. Then work evenly until the hat reaches the recommended height before adding the scallops.
Why is my hat becoming wavy during the increase rounds?
The stitches may be too loose or there may be too many increases. Confirm that every increase round adds exactly eight stitches. Moving to a smaller hook can also help.
How do I keep the stem standing up?
Use firm tension, a slightly smaller hook, and a narrow four-stitch tube. Passing the beginning yarn tail through its center adds gentle support without using wire.
Conclusion
This crochet lemon baby hat combines a simple top-down beanie with a playful scalloped edge, five green leaf points, and a curved crochet stem. The bright fruit shape makes it a lovely spring accessory, photo prop, or handmade baby gift.
Make it in classic lemon yellow or adapt the same pattern into an orange, lime, or other cheerful fruit-inspired hat using your favorite soft yarn colors.



