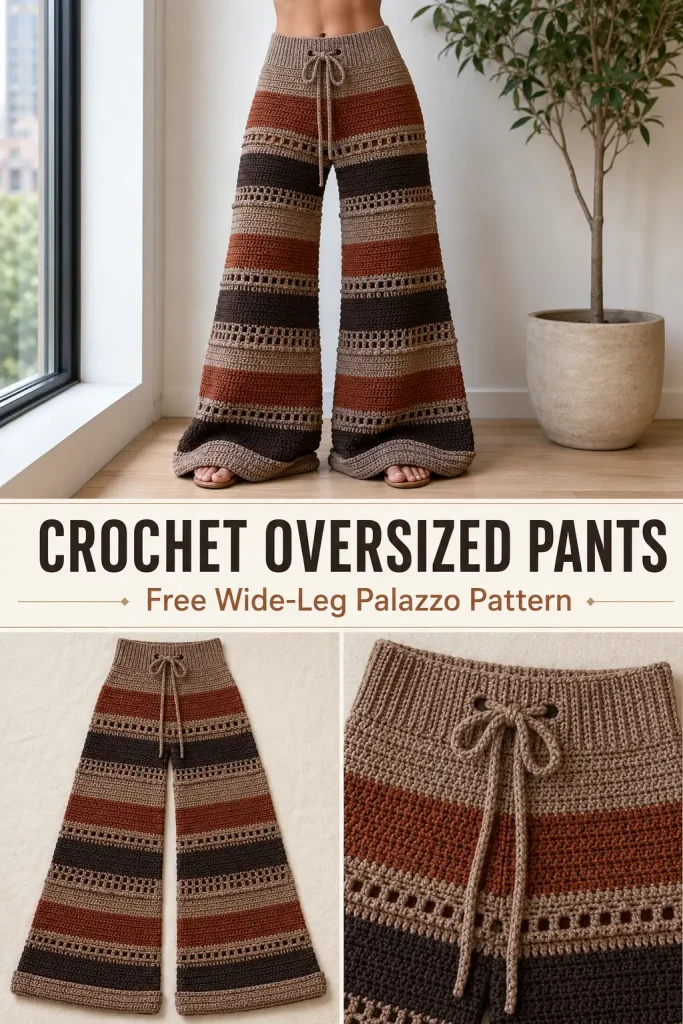
These oversized crochet pants combine a fitted drawstring waistband with dramatic, extra-wide legs and a relaxed patchwork-inspired stripe pattern. Alternating taupe, rust brown, and deep espresso yarn creates the warm earthy look, while open mesh rows add movement and keep the large silhouette from feeling too heavy.
The pants are worked seamlessly from the top down. Gradual increases shape the hips, a short crotch bridge separates the legs, and evenly placed increases create the exaggerated palazzo flare. A double-thickness hem gives each leg the soft pooled finish visible in the design.
This is an original, image-inspired crochet construction rather than a reproduction of another designer’s written pattern.
Description
The finished crochet pants have a high, textured waistband with two centered eyelets and a long matching drawstring. The hip and upper-leg area is relaxed but controlled, while the legs widen gradually into an oversized floor-length silhouette. Solid half double crochet and double crochet bands alternate with narrow openwork rows. Warm taupe is the dominant color, with rust and dark espresso stripes creating the patchwork effect. Thick folded cuffs stabilize the wide hems and help the legs hang with a soft, dramatic drape.
Materials
- Category 3 DK or light worsted-weight cotton, bamboo, or cotton-acrylic yarn
- Color A: warm mushroom taupe
- Color B: medium rust brown
- Color C: deep espresso brown
- 4.5 mm crochet hook
- 4 mm crochet hook for the drawstring, optional
- Stitch markers
- Yarn needle
- Scissors
- Measuring tape
- Soft waistband elastic, optional
- Blocking mats and rustproof pins, optional
Approximate Total Yardage
- XS–S: 1,800–2,200 yards
- M–L: 2,300–2,900 yards
- XL–2XL: 3,000–3,600 yards
- 3XL–5XL: 3,700–4,800 yards
Use approximately:
- 55% Color A
- 30% Color B
- 15% Color C
Buy extra yarn when adding length or making an especially wide hem.
Abbreviations
- BLO: back loop only
- ch: chain
- dc: double crochet
- hdc: half double crochet
- hdc2tog: half double crochet two together
- inc: work 2 stitches in the same stitch
- rep: repeat
- Rnd: round
- sc: single crochet
- sl st: slip stitch
- sp: space
- st: stitch
- sts: stitches
Gauge
After washing and blocking:
- 15 dc = 4 inches
- 8 dc rounds = 4 inches
- 16 hdc = 4 inches
- 10 hdc rounds = 4 inches
Make and block a large swatch before beginning. The weight of long crochet pants can stretch the finished fabric.
Sizing
Choose the size according to the full hip measurement. The finished hip includes approximately 5–9 inches of positive ease.
| Size | Suggested Hip | Waistband Count | Body Count | Crotch Chain | Starting Leg Count |
|---|---|---|---|---|---|
| XS | 32–34 in | 112 | 144 | 8 | 80 |
| S | 35–37 in | 120 | 160 | 8 | 88 |
| M | 38–40 in | 128 | 176 | 12 | 100 |
| L | 41–44 in | 136 | 192 | 12 | 108 |
| XL | 45–48 in | 144 | 208 | 12 | 116 |
| 2XL | 49–52 in | 152 | 224 | 16 | 128 |
| 3XL | 53–56 in | 160 | 240 | 16 | 136 |
| 4XL | 57–60 in | 168 | 256 | 16 | 144 |
| 5XL | 61–64 in | 176 | 272 | 20 | 156 |
The drawstring allows the waistband to be cinched several inches smaller than its unstretched circumference.
Finished Measurements
The pattern is designed for a very oversized fit.
- Waistband depth: approximately 3–3½ inches
- Rise from top edge to crotch:
- XS: 10½ inches
- S: 11 inches
- M: 11½ inches
- L: 12 inches
- XL: 12½ inches
- 2XL: 13 inches
- 3XL: 13½ inches
- 4XL: 14 inches
- 5XL: 14½ inches
- Regular inseam before cuff: approximately 28 inches
- Folded cuff depth: approximately 2 inches
- Final leg circumference increases by approximately 14–17 inches during the regular-length leg section
Measure the rise and inseam on the wearer whenever possible.
Pattern Notes
- This pattern uses US crochet terminology.
- The pants are worked from the waistband downward in joined rounds.
- Ch 1 does not count as a stitch.
- Ch 2 does not count as a stitch.
- Join each round with a sl st unless instructed otherwise.
- Keep the joining seam at the center back.
- The waistband is fitted with a drawstring.
- Eight evenly spaced increases shape the hip section.
- The legs are separated with one crotch chain.
- Both legs are worked separately after the division.
- Each leg has four shaping markers.
- Increase only during the designated solid rounds.
- Work the second leg with the same color and round sequence as the first.
- The folded cuff is optional but creates the weighted pooled hem shown in the design.
- Try the pants on frequently and allow the unfinished garment to hang overnight before deciding the final length.
- Difficulty level: intermediate.
Texture and Stripe Pattern
The pants use an eight-round repeat.
Texture Repeat
Round 1: Solid Hdc
Using the stated color, ch 1.
Hdc in each st around.
Join.
Round 2: Raised Ridge
Ch 1.
Working in BLO, hdc in each st around.
Join.
Round 3: Solid Dc
Ch 2.
Dc in each st around.
Join.
Round 4: Openwork
Ch 2.
Repeat around:
- Dc in the next st
- Ch 1
- Skip the next st
Join.
The stitch count must be even.
Round 5: Close the Openwork
Ch 2.
Work:
- 1 dc in every dc
- 1 dc in every ch-1 sp
Join.
The original stitch count is restored.
Round 6: Solid Hdc
Ch 1.
Hdc in each st around.
Join.
Round 7: Second Openwork Row
Repeat Texture Round 4.
Round 8: Close the Openwork
Repeat Texture Round 5.
Color Sequence
Alternate these two eight-round stripe sequences.
Stripe Repeat A
- Rounds 1–2: Color A
- Rounds 3–5: Color B
- Round 6: Color A
- Rounds 7–8: Color C
Stripe Repeat B
- Rounds 1–2: Color A
- Rounds 3–5: Color C
- Round 6: Color A
- Rounds 7–8: Color B
Alternate Stripe Repeat A and Stripe Repeat B throughout the yoke and legs.
Change colors when completing the final yarn-over of the previous round.
Step-by-Step Instructions
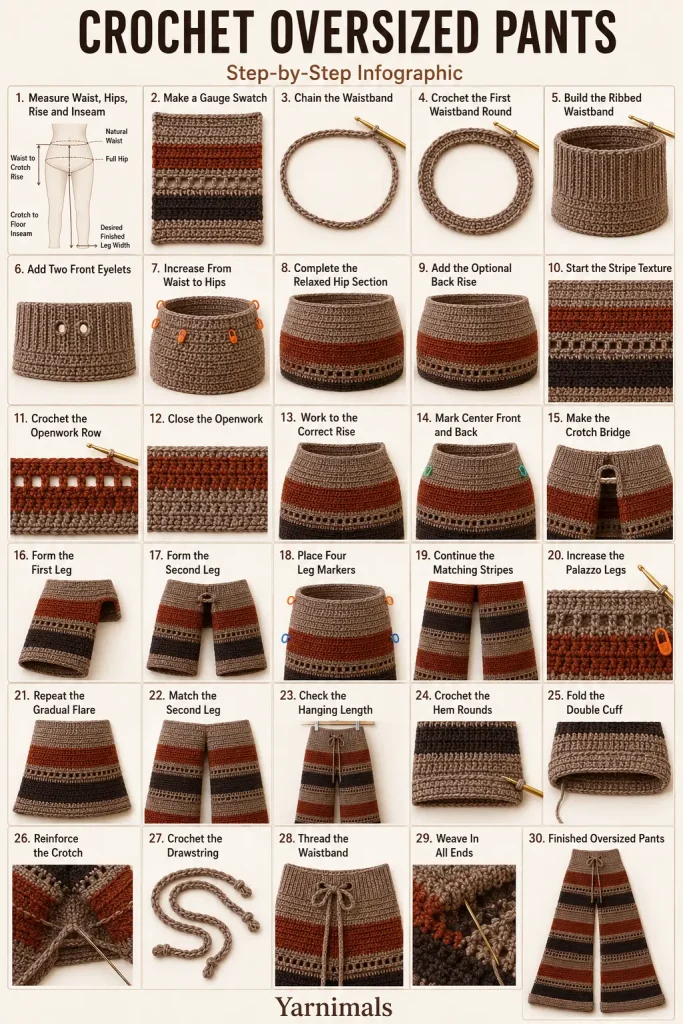
Waistband
Using Color A and the 4.5 mm hook, ch the Waistband Count for your size.
Join with a sl st to the first chain, making sure the chain is not twisted.
Waistband Round 1
Ch 1.
Hdc in each ch around.
Join.
Waistband Rounds 2–4
Ch 1.
Working in BLO, hdc in each st around.
Join.
Waistband Round 5: Drawstring Eyelets
Place a marker at the center front, directly opposite the center-back join.
Work in BLO until 3 sts remain before the center-front marker.
Work:
- Hdc in the next st
- Ch 1 and skip the next st
- Hdc in each of the next 2 sts
- Ch 1 and skip the next st
- Continue in BLO around
Join.
This creates two centered drawstring openings.
Waistband Round 6
Ch 1.
Working in BLO:
- Hdc in each regular st
- Hdc in each ch-1 eyelet sp
Join.
Waistband Rounds 7–8
Ch 1.
Working in BLO, hdc in each st around.
Join.
The waistband should measure approximately 3–3½ inches deep.
Increase From Waist to Hips
The body needs eight evenly spaced increase points.
Divide the Waistband Count by eight.
Beginning at center back, place one marker after each equal section.
For example:
- XS: marker every 14 sts
- S: marker every 15 sts
- M: marker every 16 sts
- L: marker every 17 sts
- XL: marker every 18 sts
- 2XL: marker every 19 sts
- 3XL: marker every 20 sts
- 4XL: marker every 21 sts
- 5XL: marker every 22 sts
Hip Increase Round
Ch 1.
Hdc in each st around, working 2 hdc in every marked stitch.
Move each marker to the second stitch of its increase.
Join.
Each Hip Increase Round adds 8 sts.
Repeat the Hip Increase Round until reaching the Body Count for your size.
Number of increase rounds:
- XS: 4
- S: 5
- M: 6
- L: 7
- XL: 8
- 2XL: 9
- 3XL: 10
- 4XL: 11
- 5XL: 12
Remove the eight increase markers after reaching the correct count.
Optional Back-Rise Shaping
This section adds extra height over the seat and helps the waistband remain level.
Mark the right and left side seams by dividing the Body Count into four equal sections.
Join Color A at the right-side marker.
Back-Rise Row 1
Ch 1.
Hdc across the back half to the left-side marker.
Turn.
Back-Rise Row 2
Ch 1.
Hdc across, stopping 8 sts before the right-side marker.
Turn.
Back-Rise Row 3
Ch 1.
Hdc across, stopping 8 sts before the previous turning point.
Turn.
Back-Rise Row 4
Ch 1.
Hdc across, stopping 8 sts before the previous turning point.
Fasten off.
Join Color A at center back.
Work one complete hdc round around the body, working evenly across the short-row ends.
Skip this section for a flatter front-and-back rise.
Crochet the Hip and Rise
Begin with Stripe Repeat A.
Work the eight-round Texture Repeat around the full Body Count.
Alternate Stripe Repeat A and Stripe Repeat B until the total measurement from the upper waistband edge to the lower working edge equals the Rise measurement for your size.
Finish after Texture Round 8 whenever possible.
The working edge should sit at or slightly below the natural crotch level without pulling upward.
Mark the Front and Back
Place one marker at center back, which is the beginning of the round.
Count half the Body Count and place a second marker at center front.
The body is now divided into two equal leg sections.
Divide for the First Leg
Join the scheduled yarn color at the center-front marker.
Work in the established texture across:
- Half of the front
- The outer side
- Half of the back
Stop at the center-back marker.
Ch the Crotch Chain number listed for your size.
Without twisting the chain, join with a sl st to the first stitch at center front.
The first leg now contains the Starting Leg Count listed in the size table.
First Leg Setup Round
Work around the first leg using the appropriate solid stitch from the stripe sequence.
Work one stitch in every body stitch and one stitch in every crotch chain.
Join at the inner leg.
Count carefully.
Mark the First Leg
Divide the Starting Leg Count into four equal sections.
Place markers at:
- Inner-leg join
- Center front
- Outer side
- Center back
These are the four leg increase points.
Form the Second Leg
Join the scheduled yarn at the center-back marker.
Work across the remaining unworked half of the body to the center-front marker.
Continue across the unused loops on the opposite side of the crotch chain.
Join to the first stitch.
The second leg should contain the same Starting Leg Count as the first.
Place four shaping markers in the same positions.
Crochet the Oversized Legs
Work each leg separately.
Begin both legs with Stripe Repeat A so the horizontal stripes align.
Regular-Length Leg Plan
Work seven complete eight-round stripe repeats.
This creates approximately 28 inches before the cuff.
For petite pants, work six repeats.
For tall pants, work eight repeats.
Leg Increase Rounds
During each eight-round repeat, increase during Texture Rounds 1 and 5 only.
At each of the four leg markers:
- Work 2 stitches in the marked stitch
- Move the marker to the second stitch of the increase
Each increase round adds 4 sts.
Each full eight-round repeat adds 8 sts.
Final increase totals:
- Petite, 6 repeats: add 48 sts
- Regular, 7 repeats: add 56 sts
- Tall, 8 repeats: add 64 sts
Do not increase during the openwork rounds.
Maintaining the Openwork
After an increase round, the stitch count remains even because four stitches were added.
Continue the openwork repeat normally:
- Dc in the next st
- Ch 1
- Skip the next st
If one stitch remains before the join, work it as a dc and begin the next repeat from the opposite side of the seam. Keep the eyelets visually balanced rather than stacking an error at the inner leg.
Shaping the Flare
Keep all four increase lines straight:
- One along the inner leg
- One along the center front
- One along the outer side
- One along the center back
This spreads the flare evenly instead of placing all the fullness at the side seam.
Adjust the Length
After completing the planned stripe repeats, hang the pants from the waistband for at least 12 hours.
Measure the inseam again.
Continue without increasing if extra length is needed.
Stop approximately 4 inches before the desired final floor length to allow for the folded cuff.
Repeat the same number of rounds on the second leg.
Double-Thickness Hem
Use Color A for the hem.
Remove the four leg markers.
Hem Round 1
Ch 1.
Hdc in each st around.
Join.
Hem Rounds 2–6
Ch 1.
Working in BLO, hdc in each st around.
Join.
Fasten off after Round 6, leaving a long sewing tail.
Fold the final three rounds toward the inside of the leg.
Align the last round with the back loops left by Hem Round 3.
Using the long yarn tail and a yarn needle, whip stitch the folded cuff in place.
Keep the seam flexible.
Repeat for the second leg.
For a lighter hem, leave the six rounds unfolded and fasten off normally.
Reinforce the Crotch
Turn the pants inside out.
Thread a length of Color A onto a yarn needle.
Reinforce:
- Both ends of the crotch chain
- The center-front join
- The center-back join
- Any small gaps where the two legs meet
Use small hidden stitches.
Do not pull tightly enough to gather the crotch.
Crochet the Drawstring
Using Color A and the 4 mm hook:
Ch until the cord measures approximately:
- Waist measurement plus 24 inches
Beginning in the second ch from the hook, sl st loosely in every chain across.
Fasten off.
Tie a secure knot near each end.
Thread the cord through the waistband from one center-front eyelet, around the inside of the waistband, and out through the second eyelet.
Tie it into a loose bow.
Optional Elastic Support
Cut soft elastic approximately 1–2 inches shorter than the wearer’s waist measurement.
Thread it through the inner waistband stitches with a safety pin or yarn needle.
Overlap the elastic ends and sew them securely.
Keep the crochet drawstring as the visible adjustable closure.
Optional Patchwork Side Blocks
To create stronger dark vertical blocks like the inspiration image, mark 16 stitches centered over the outer-side marker of each leg.
During selected stripe repeats, work these 16 stitches in Color C while working the remainder of the round in the scheduled color.
Use separate yarn bobbins and twist the two yarns together on the wrong side at every color change.
Good placements include:
- Stripe Repeat 3
- Stripe Repeat 5
- Stripe Repeat 7
Keep the blocks identical on both legs.
Final Finishing
Weave in every yarn end securely.
Turn the pants right side out.
Check that:
- The waistband lies flat.
- Both eyelets are centered.
- The drawstring moves easily.
- The crotch is secure.
- Both legs contain the same number of rounds.
- The stripes align.
- The increases are distributed evenly.
- Both cuffs have the same depth.
- The pants hang symmetrically.
Wash or wet-block according to the yarn label.
Lay the pants flat with the legs spread evenly.
Shape the waistband, crotch, legs, and cuffs.
Allow the garment to dry completely.
Tips & Variations
Cotton-bamboo yarn creates the softest drape for very wide crochet pants. A cotton-acrylic blend is lighter and may recover better after stretching.
Avoid heavy category 4 yarn unless making cropped pants. Full-length oversized legs contain a large amount of fabric.
Use a slightly larger hook if the pants feel stiff.
For less transparent pants, replace Texture Rounds 4 and 7 with solid dc rounds.
For more openwork, repeat the mesh row twice before closing it.
Use only Color A for a modern solid pair.
Use leftover neutral yarn for a more random striped look, but keep both legs symmetrical.
For a less dramatic leg, work only one increase round in each eight-round repeat.
For an even wider leg, continue the two increase rounds through one additional stripe repeat.
The legs should skim the floor when worn with shoes. Shorten them when the wearer plans to go barefoot.
FAQ
Can beginners make these oversized crochet pants?
The individual stitches are simple, but the project requires accurate gauge, garment measurements, joined rounds, crotch division, color changes, and symmetrical leg shaping. It is best for a confident beginner or intermediate crocheter.
How do I stop the pants from becoming too heavy?
Use lightweight yarn, include the openwork rows, avoid overworking the hems, and let the pants hang before deciding the final length. Cotton-bamboo and lightweight cotton blends usually drape better than dense acrylic.
Can I make the legs narrower?
Yes. Work only one increase round per eight-round repeat or stop increasing after three to four repeats. Continue the remaining leg rounds without shaping.
Conclusion
This crochet oversized pants free pattern creates a high-waisted pair of dramatic palazzo pants with warm neutral stripes, open mesh details, a drawstring waist, and extra-wide flowing legs. The top-down construction makes it easy to adjust the rise, inseam, and flare while the pants are in progress.
Choose earthy taupe and brown shades for the patchwork-inspired look shown here, or use a solid color for a simpler modern version. The finished pants make a bold handmade wearable with plenty of comfort, movement, and personality.




I would love to have the Pattern, can you please sen It to me ? Thanks a Lot.
Belíssima Calça,tem aula e qual valor?