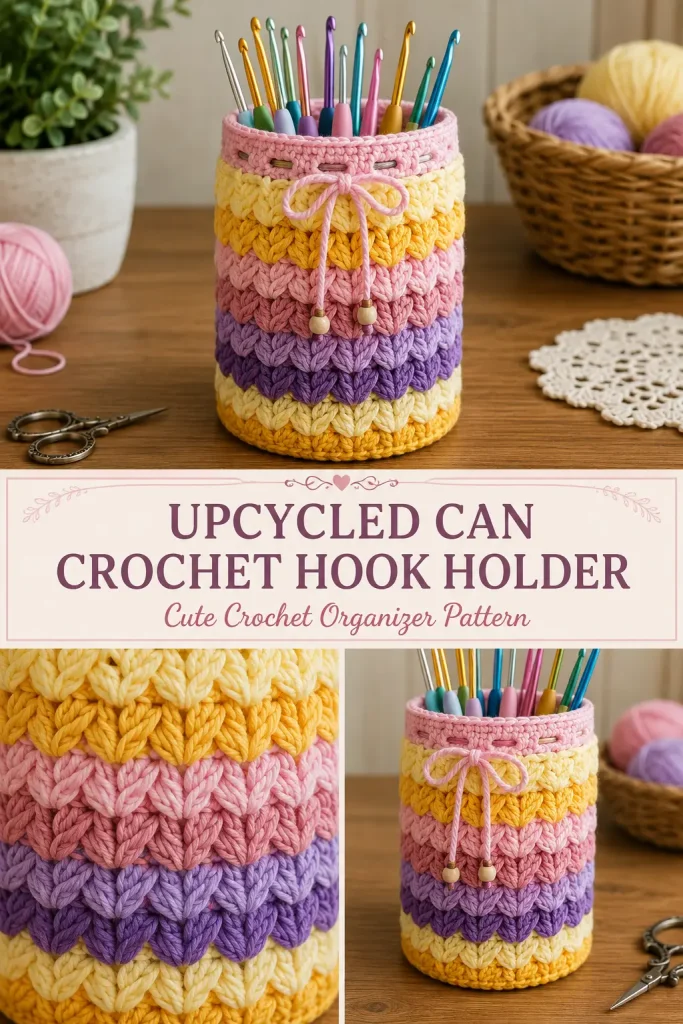
Turn a clean, smooth-sided can into a colorful crochet hook holder with this cheerful upcycling project. The fitted crochet sleeve has a sturdy yellow base, eight overlapping bands of elongated loop clusters, a neat pink top edge, and an adjustable drawstring tied into a bow.
The layered stitch creates the braided, feathery texture visible in the design while keeping the container soft to hold. Use the finished organizer for crochet hooks, pens, markers, knitting needles, paintbrushes, or small craft tools.
This is an original, image-inspired construction created to produce the same visible holder style without reproducing another designer’s instructions.
Description
The finished crochet organizer fits closely around a standard metal food can measuring approximately 3 inches across and 4¼ inches high. A closed pale-yellow crochet base covers the bottom, while eight staggered rows of four-loop clusters form the thick multicolored body.
The color sequence moves through pale yellow, golden yellow, light pink, dusty rose, lavender, deep purple, pale yellow, and golden yellow. A smooth light-pink rim hides the top edge of the container. Six eyelets hold a narrow pink crochet cord finished with two optional wooden beads and tied into a decorative bow.
Materials
- DK or light worsted-weight yarn in:
- Pale yellow
- Golden yellow
- Light pink
- Dusty rose
- Lavender
- Deep purple
- 3.5 mm crochet hook
- 3 mm crochet hook for the cord, optional
- One clean cylindrical can approximately 3 inches wide and 4¼ inches tall
- Yarn needle
- Scissors
- Stitch marker
- Measuring tape
- Strong fabric tape
- Narrow felt strip, optional
- Two wooden beads with holes large enough for the cord, optional
- Craft glue suitable for metal and fabric, optional
Abbreviations
- BLO: back loop only
- ch: chain
- inc: two single crochet stitches in the same stitch
- MR: magic ring
- sc: single crochet
- sl st: slip stitch
- sp: space
- st: stitch
- sts: stitches
- yo: yarn over
Finished Size
Designed for a can measuring approximately:
- Diameter: 3 inches
- Circumference: 9¼–9½ inches
- Height: 4¼ inches
Finished crochet holder:
- Diameter: approximately 3¼ inches
- Height: approximately 4½ inches
Gauge
Approximately 18 sc and 20 rounds measure 4 inches using the 3.5 mm hook.
The sleeve should fit snugly without stretching the stitches excessively. Check the base against the actual container before beginning the textured body.
Special Stitch
Four-Loop Woven Cluster
This stitch creates the four long raised strands visible in every textured section.
With one loop already on the hook:
- Insert the hook into the indicated ch-3 sp.
- Yo and pull up one loop approximately ¾–1 inch tall.
- Repeat this three more times in the same space.
You should have five loops on the hook:
- The original working loop
- Four long drawn-up loops
Yo and pull through all five loops.
Ch 1 tightly to close the cluster.
Use your fingers to spread the four elongated strands evenly. Push the completed cluster slightly toward the right so the strands lie together in a smooth fan.
Keep every drawn-up loop the same height.
Pattern Notes
- This pattern uses US crochet terminology.
- The circular base and lower walls are worked in continuous spiral rounds.
- Mark the first stitch of each spiral round.
- The textured body is worked in joined rounds.
- Each color band contains one mesh round and one Four-Loop Woven Cluster round.
- The project contains 14 clusters in every textured band.
- New cluster rows sit between the clusters below, creating the overlapping woven appearance.
- Try the sleeve over the can regularly while working.
- The crochet should fit closely enough to remain upright without slipping.
- Do not place crochet directly over a sharp metal rim.
- Use only a can with a completely smooth safety-opened edge. Cover the rim with strong fabric tape and, when needed, a narrow felt strip.
- A clean plastic container may be used instead of a metal can.
Prepare the Container
Wash the can thoroughly and remove the label and adhesive.
Dry it completely inside and outside.
Inspect the upper rim carefully.
Use the container only when:
- The lid was removed with a safety can opener.
- The rim is smooth.
- No sharp or raised metal remains.
- The can is not dented or rusty.
Wrap the upper rim with strong fabric tape.
For additional protection, glue or tape a narrow felt strip around the inside edge.
Never rely on the yarn sleeve alone to cover sharp metal.
Set the prepared container aside while crocheting.
Step-by-Step Instructions
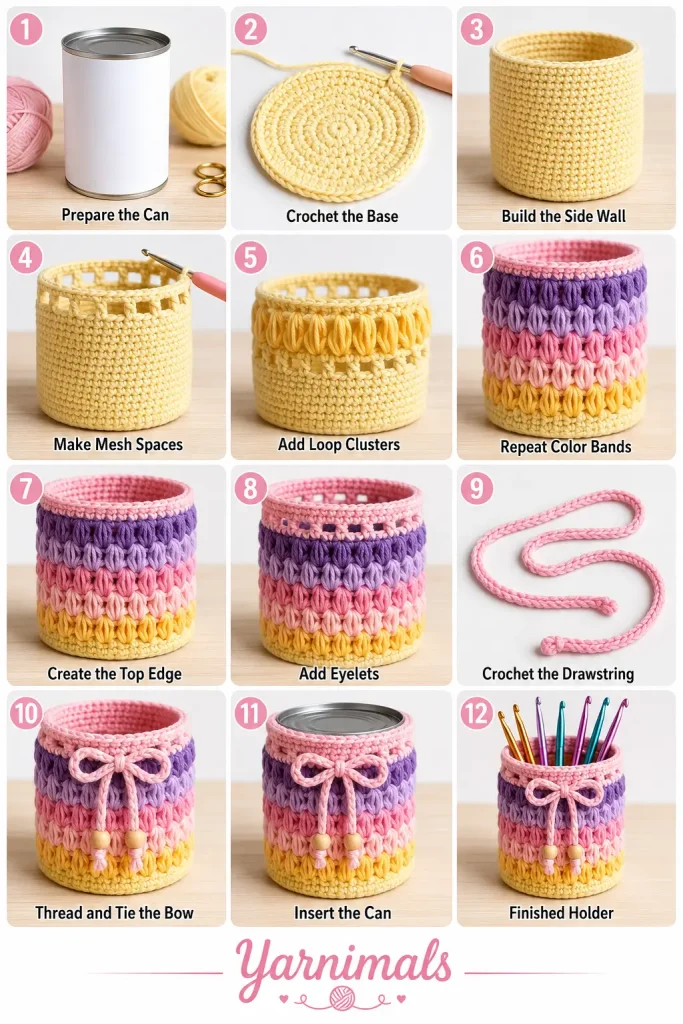
Crochet the Circular Base
Using pale-yellow yarn and the 3.5 mm hook:
Round 1
Make 6 sc in a MR.
Pull the ring firmly closed.
6 sts
Round 2
Inc in every st around.
12 sts
Round 3
Repeat around:
- Sc in the next st
- Inc in the next st
18 sts
Round 4
Repeat around:
- Sc in each of the next 2 sts
- Inc in the next st
24 sts
Round 5
Repeat around:
- Sc in each of the next 3 sts
- Inc in the next st
30 sts
Round 6
Repeat around:
- Sc in each of the next 4 sts
- Inc in the next st
36 sts
Round 7
Repeat around:
- Sc in each of the next 5 sts
- Inc in the next st
42 sts
Lay the disk flat.
It should measure approximately the same diameter as the bottom of the can.
Place the can on the disk to check the size.
The disk should reach the outer edge without extending far beyond it.
Adjusting the Base
When the disk is too small, add one more increase round:
- Sc in each of the next 6 sts
- Inc in the next st
48 sts
When the disk is too large, stop after Round 6 with 36 stitches.
The body stitch count must remain divisible by three. Both 36, 42, and 48 stitches will work with the texture pattern.
The remaining instructions use 42 stitches.
Turn the Base Upward
Round 8
Working in BLO, sc in each st around.
42 sts
The unused front loops create a ridge around the bottom edge.
Round 9
Sc in each st around.
42 sts
Sl st in the next st to finish the spiral neatly.
The base should now resemble a shallow cup.
Place it over the bottom of the can and confirm that it fits closely.
Textured Body
Every textured band has:
- One mesh round
- One Four-Loop Woven Cluster round
The first mesh round is worked into the 42 body stitches. Later mesh rounds are worked between the cluster tops.
Band 1: Pale Yellow
Continue with pale-yellow yarn.
Mesh Round 1
Ch 1.
Repeat 14 times:
- Sc in the next st
- Ch 3
- Skip the next 2 sts
Join with a sl st to the first sc.
You should have:
- 14 sc
- 14 ch-3 spaces
Cluster Round 1
Sl st into the first ch-3 sp.
Work one Four-Loop Woven Cluster in the same space.
Work one Four-Loop Woven Cluster in each remaining ch-3 sp around.
Join with a sl st to the top of the first cluster.
14 clusters
Fasten off pale yellow.
Spread the four strands of every cluster evenly.
Band 2: Golden Yellow
Join golden-yellow yarn to the top of any cluster.
Mesh Round 2
Ch 1 and sc in the same cluster top.
Repeat around:
- Ch 3
- Sc in the top of the next cluster
After the final cluster, ch 3 and join with a sl st to the first sc.
14 ch-3 spaces
Cluster Round 2
Sl st into the first ch-3 sp.
Work one Four-Loop Woven Cluster in every ch-3 sp around.
Join to the first cluster.
14 clusters
Fasten off.
The new golden clusters should sit between the pale-yellow clusters below.
Band 3: Light Pink
Join light-pink yarn to any cluster top.
Repeat Mesh Round 2 and Cluster Round 2.
Fasten off.
14 light-pink clusters
Band 4: Dusty Rose
Join dusty-rose yarn.
Repeat Mesh Round 2 and Cluster Round 2.
Fasten off.
14 dusty-rose clusters
Band 5: Lavender
Join lavender yarn.
Repeat Mesh Round 2 and Cluster Round 2.
Fasten off.
14 lavender clusters
Band 6: Deep Purple
Join deep-purple yarn.
Repeat Mesh Round 2 and Cluster Round 2.
Fasten off.
14 deep-purple clusters
Band 7: Pale Yellow
Rejoin pale-yellow yarn.
Repeat Mesh Round 2 and Cluster Round 2.
Fasten off.
14 pale-yellow clusters
Band 8: Golden Yellow
Rejoin golden-yellow yarn.
Repeat Mesh Round 2 and Cluster Round 2.
Fasten off.
14 golden-yellow clusters
Check the Height
Slide the crochet sleeve over the prepared can.
The upper edge of Band 8 should finish approximately ½ inch below the can’s rim.
When the sleeve is too short, add one additional band in light pink.
When it is too tall, remove the final golden-yellow band.
Keep the color order identical around the entire holder.
Restore the Full Stitch Count
Join light-pink yarn to the top of any golden-yellow cluster.
Top Round 1
Ch 1.
Repeat around:
- Sc in the top of the next cluster
- Work 2 sc around the small mesh-round sc located between that cluster and the next cluster
Repeat 14 times.
Join with a sl st to the first sc.
42 sts
This round gathers the textured bands into a stable upper edge without narrowing the holder.
Top Round 2
Ch 1.
Sc in each st around.
Join.
42 sts
Try the sleeve over the can again.
The upper pink edge should sit closely around the taped metal rim.
Drawstring Eyelets
Top Round 3
Ch 1.
Repeat 6 times:
- Sc in each of the next 6 sts
- Ch 1
- Skip the next st
Join with a sl st to the first sc.
You should have six evenly spaced eyelets.
42 stitch positions
Top Round 4
Ch 1.
Work:
- Sc in every sc
- Sc in every ch-1 sp
Join.
42 sts
Top Round 5
Sl st loosely in every st around.
Join and fasten off.
The light-pink rim should completely cover the can’s upper edge when the sleeve is installed.
Make the Pink Drawstring
Using light-pink yarn and the 3 mm or 3.5 mm hook:
Ch 95, or continue until the chain measures approximately 20–22 inches.
Beginning in the second ch from the hook, sl st loosely in each ch across.
Fasten off.
The finished cord should be narrow, flexible, and long enough to circle the holder and form a bow.
Add the Optional Wooden Beads
Thread one wooden bead onto each end of the cord.
Tie a secure knot below each bead.
Trim the yarn ends neatly.
When the bead holes are too small, use a yarn needle or a loop of sewing thread to pull the cord through.
Omit the beads when the organizer will be used by a young child.
Thread the Drawstring
Insert the cord through the six eyelets, moving in and out around the holder.
Bring both ends to the front.
Pull only enough to make the upper edge sit neatly around the can.
Do not tighten so much that the metal container bends or the crochet puckers.
Tie the cord into a soft bow.
Insert the Can
Slide the prepared can into the finished sleeve.
Push it downward until its bottom rests flat against the crochet base.
Adjust the textured bands with your fingers.
The clusters should overlap evenly and cover the entire can.
Position the pink rim so it sits slightly above or directly level with the taped metal edge.
Optional Inner Felt Lining
Cut a felt rectangle equal to:
- The can’s inside circumference
- The can’s inside height
Cut a matching felt circle for the bottom.
Place the felt circle inside the can.
Roll the rectangle and place it against the inner wall.
Secure it with small amounts of suitable craft glue.
Allow the glue to dry completely before adding tools.
The felt helps protect crochet hooks and covers the inside of the metal container.
Final Finishing
Weave in every yarn end securely behind the textured bands.
Check that:
- The circular base lies flat.
- The sleeve fits the can closely.
- All eight textured bands are present.
- Every band contains 14 clusters.
- The clusters are staggered.
- All four strands in each cluster are visible.
- The pink rim covers the upper edge.
- The drawstring passes through all six eyelets.
- The bow sits at the front.
- The can has no exposed sharp edges.
- The organizer stands upright without wobbling.
Fill it with crochet hooks, pens, markers, or craft tools.
Tips & Variations
Use smooth acrylic or cotton-acrylic yarn. Very fuzzy yarn can hide the elongated loop texture.
Pull every long loop to the same height. Uneven loops make the bands look irregular.
When a cluster looks twisted, use the yarn needle or hook tip to separate its four strands.
A slightly smaller hook creates a firmer sleeve that grips the container securely.
For a wider can, continue the base increases until the disk matches the container. Keep the final stitch count divisible by three.
For a taller container, add more textured bands before working the top edge.
Create a pastel version with cream, blush, peach, mint, lavender, and pale blue.
For a stronger rainbow effect, use red, orange, yellow, green, blue, purple, and pink.
The same crochet construction can cover:
- A plastic jar
- A cardboard mailing tube
- A clean plant pot
- A glass jar with a protected rim
- A purchased pencil-holder insert
FAQ
Can I use a different-sized can?
Yes. Crochet the base until it matches the can’s diameter. The final base stitch count must be divisible by three so the mesh round can repeat evenly.
Why are my loop clusters too loose?
The long loops may be taller than 1 inch, or the closing chain may be too loose. Keep all loops equal and close each cluster with one firm chain.
Can the crochet holder be used without a can inside?
The textured sleeve is soft and may collapse without support. Use a can, plastic jar, cardboard insert, or another smooth rigid container to keep the finished holder upright.
Conclusion
This upcycled can crochet hook holder turns an ordinary container into a colorful handmade organizer with a sturdy yellow base, eight overlapping loop-stitch bands, a smooth pink rim, and a decorative drawstring bow.
Save the pattern and make matching holders for crochet hooks, pens, markers, paintbrushes, and other small supplies using your favorite yarn colors.




It’s very simple to find out any matter on net as compared to textbooks, as I found this piece of writing at this site.