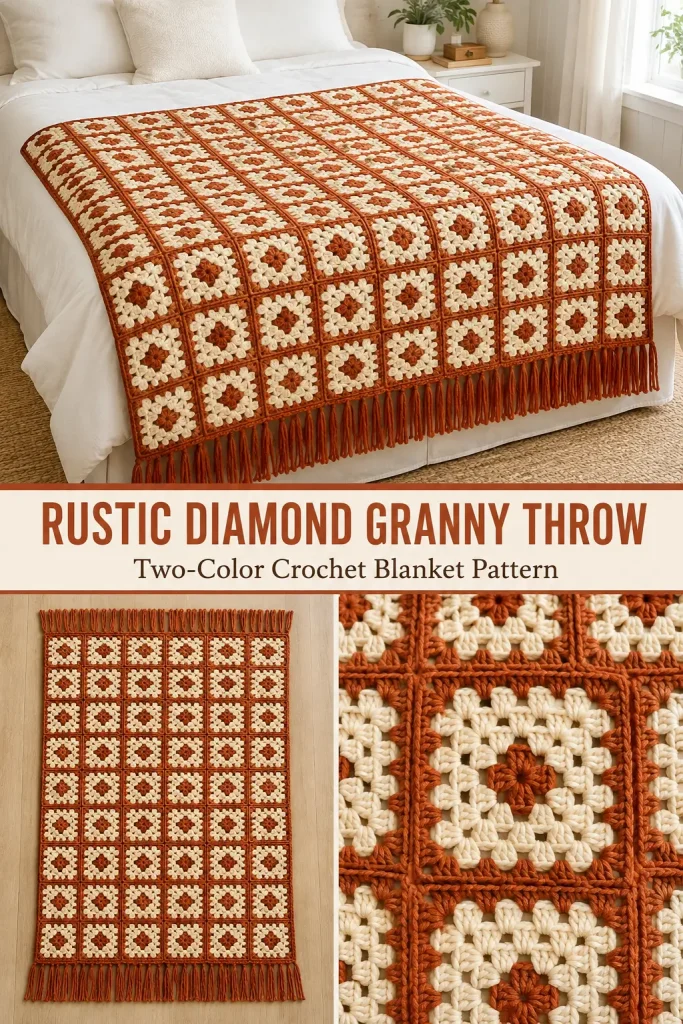
There is something so cozy about a two-color granny blanket, especially when the squares are turned on point and finished with a soft fringe. This design has that warm handmade look that feels perfect for a bedroom, reading chair, or guest room.
Inspired by the blanket in your image, this original crochet throw uses classic granny-style squares in cream and warm rust, joined in a diamond layout for the same eye-catching look. The finished blanket has a soft vintage feel, a tidy border, and long fringe along the short ends.
Description
This crochet throw is made from two-color granny squares with a rust center detail and creamy outer rounds. Each square is edged in rust, then joined corner-to-corner so the blanket sits in a diamond grid rather than straight rows. The finished look is bold but simple, with a warm rust lattice effect between the white floral granny motifs. A rust border frames the blanket, and matching rust fringe adds the finishing touch along both short edges.
Materials
- Worsted weight yarn in 2 colors:
- Color A: cream or off-white
- Color B: rust, terracotta, or burnt orange
- Crochet hook size 5 mm (H/8) or size needed to match your tension
- Scissors
- Yarn needle
- Measuring tape
- Cardboard or fringe tool for cutting fringe
- Blocking supplies if desired
Abbreviations
- ch = chain
- sl st = slip stitch
- sc = single crochet
- dc = double crochet
- sp = space
- st = stitch
- rep = repeat
- rnd = round
Pattern Notes
- This is an original pattern inspired by the blanket shown in the image.
- The blanket is made from individual granny squares.
- Each square uses a classic granny-square construction with 4 rounds.
- Squares are joined on point, meaning they are rotated like diamonds.
- The blanket shown looks like a medium throw size. The sample below uses 42 squares arranged in 6 squares across and 7 squares down when turned on point.
- You can easily make the blanket larger or smaller by adding or removing squares.
- Ch-3 at the beginning of a round counts as 1 dc.
- Join each round with a sl st to the top of the starting ch-3 unless noted.
Step-by-Step Instructions
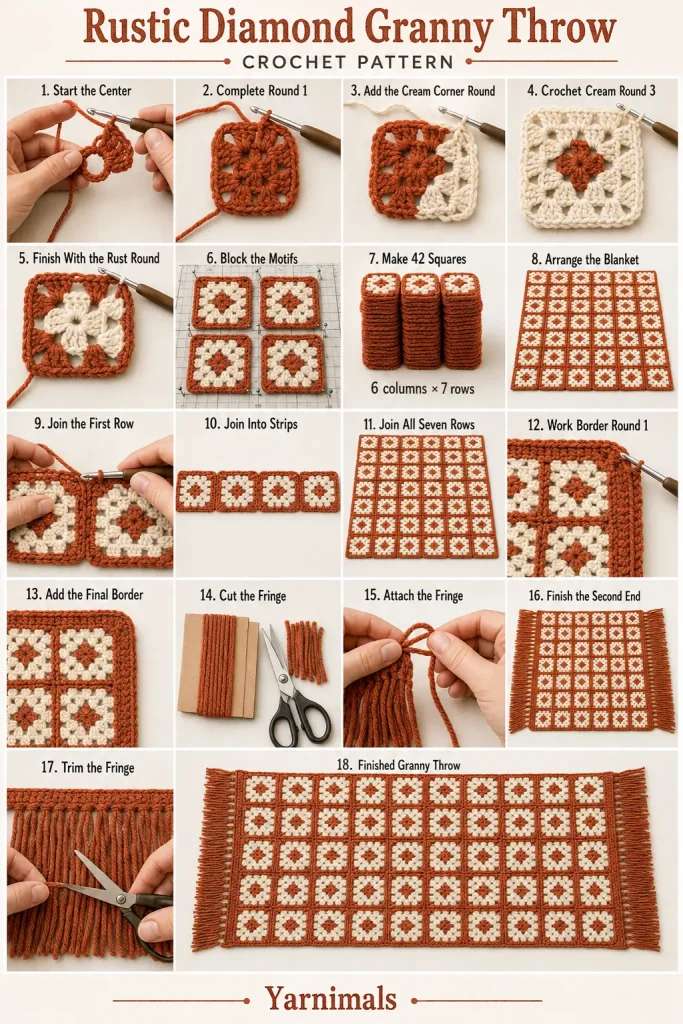
Make the Granny Squares
Make 42 squares, or any number needed for your preferred size.
Round 1
With Color B, make a magic ring.
Ch 3, work 2 dc into ring, ch 2, 3 dc into ring, ch 2, 3 dc into ring, ch 2, 3 dc into ring, ch 2.
Pull ring closed and join with sl st to top of beginning ch-3.
You now have 4 granny clusters and 4 corner spaces.
Round 2
Join Color A in any corner sp.
Ch 3, 2 dc, ch 2, 3 dc in same corner sp.
In next corner sp work: 3 dc, ch 2, 3 dc.
Repeat in each remaining corner sp.
Join with sl st to top of beginning ch-3.
Round 3
Sl st into next corner sp if needed. Still using Color A:
In first corner sp work: ch 3, 2 dc, ch 2, 3 dc.
In next side sp work: 3 dc.
In next corner sp work: 3 dc, ch 2, 3 dc.
Repeat around, placing 3 dc in each side sp and 3 dc, ch 2, 3 dc in each corner sp.
Join with sl st.
Round 4
Join Color B in any corner sp.
In first corner sp work: ch 3, 2 dc, ch 2, 3 dc.
Work 3 dc in each side sp across.
In each corner sp work: 3 dc, ch 2, 3 dc.
Continue all the way around and join with sl st.
Fasten off.
Square Size
Each square should measure about 5.5 to 6 inches after light blocking, depending on yarn and tension.
Arrange the Blanket
Lay out the 42 squares in diagonal rows so each square sits like a diamond.
A good layout for a throw is:
- 6 squares across
- 7 squares down
When rotated on point, this gives the same diamond-grid look as the blanket in the image.
Before joining, make sure all squares are facing the same way so the color pattern looks consistent.
Join the Squares
Use Color B for joining so the blanket keeps the strong rust diamond lines seen in the reference image.
You can use your preferred joining method, but a flat slip-stitch join or whipstitch join works very well here.
Flat Slip Stitch Join
Place 2 squares with wrong sides together or right sides together, depending on the seam look you want. For a visible join ridge like the image, work through the outer loops only from the front side.
Join yarn in one corner and sl st through matching stitches across one side of the squares.
Continue joining squares into diagonal strips first.
Then join the strips together to complete the full blanket.
Take your time lining up:
- corner spaces
- cluster groups
- side stitches
This helps the blanket lie flat and keeps the diamond pattern neat.
Border
Once all squares are joined, work a simple border around the entire blanket with Color B.
Border Round 1
Join Color B in any edge space.
Work sc evenly around the whole blanket.
Guidelines:
- place 1 sc in each dc or seam stitch as needed
- place 3 sc in each outer point/corner to help the blanket turn neatly
- work evenly along the stepped edges created by the diamond layout
Join with sl st to first sc.
Border Round 2
Ch 1, sc in each st around, again placing 3 sc in each outer point/corner.
Join and fasten off.
If you want a slightly wider edge like the image, add one more round of sc in Color B.
Fringe
The blanket in the image has rust fringe on the short ends.
Cut Fringe
Using Color B, cut multiple strands about 10 inches long.
For each fringe piece:
- hold 2 strands together
- fold in half
Attach Fringe
Turn the blanket so one short edge is facing you.
Attach fringe evenly along that edge by pulling the folded loop through the border stitches, then pulling the yarn ends through the loop and tightening.
Repeat across the entire short edge.
Do the same on the opposite short edge.
Trim fringe evenly to your desired length. A finished fringe length of about 4 to 4.5 inches works nicely.
Finished Size
Approximate size with 42 squares:
- about 40 to 45 inches wide
- about 55 to 65 inches long
Size will vary depending on your yarn, hook, and blocking.
Tips & Variations
- For a closer match to the image, choose a soft cream and a warm burnt orange or rust shade.
- If you want a larger bed throw, make 56 squares instead of 42.
- Block the squares before joining for cleaner lines and easier assembly.
- If your blanket ripples, you may be adding too many border stitches.
- If the blanket pulls inward, add a few extra stitches around the outer angled edges.
- You can skip the fringe for a simpler finish, but the fringe really helps match the look in the image.
- A cotton-acrylic or soft acrylic yarn will give good stitch definition and a cozy drape.
FAQ
Is this a beginner crochet project?
Yes, if you already know how to make a basic granny square and join motifs. The construction is repetitive and very beginner-friendly.
How many squares do I need for a bigger blanket?
You can add more squares in either direction. Keep the same square design and join them in the same diamond orientation.
Can I use different colors?
Absolutely. The pattern works beautifully in any two-color combination, but cream and rust give it that warm vintage look shown in the image.
Conclusion
This rustic diamond granny throw is a beautiful and practical crochet blanket with a timeless handmade look. The two-color squares, diagonal layout, and fringe edging come together to create a cozy throw that looks lovely draped over a bed or sofa. If you enjoy granny square projects, this is a wonderful one to make in your favorite colors and keep for years to come.



