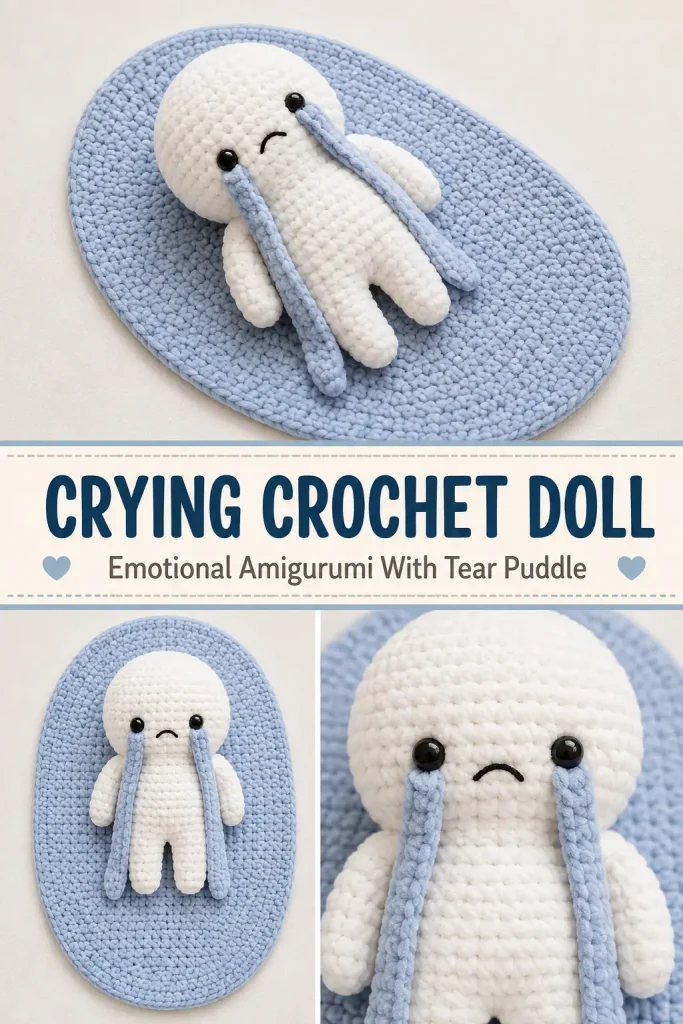
This little crying crochet doll turns a simple plush character into a sweet, expressive amigurumi. Its soft white body rests on a pale blue puddle while two oversized crochet tears fall from the glossy black eyes.
The design is simple enough to feel modern, but the tiny embroidered frown and long tear streams give it plenty of personality. Use the finished plush as a comforting handmade gift, desk companion, nursery decoration, or playful emotional-support toy.
Description
The finished project features a soft white chenille doll with a large round head, compact body, short arms, and two small rounded legs. Two black eyes and a curved embroidered frown create the sad facial expression. Long pale blue crochet tear streams begin beneath the eyes and rest across a matching oval tear puddle. The doll is lightly sewn to the puddle so the entire project stays together while the arms and lower portions of the tears remain softly movable.
This is an original, image-inspired construction designed to create the same visible crying-plush concept without reproducing another designer’s pattern.
Materials
- Super bulky chenille yarn in soft white
- Super bulky chenille yarn in pale periwinkle blue
- Small amount of smooth black yarn or embroidery floss
- 5 mm crochet hook
- 5.5 mm crochet hook for the puddle, optional
- Two 10–12 mm black safety eyes
- Polyester fiberfill
- Yarn needle suitable for chenille yarn
- Smaller embroidery needle
- Scissors
- Stitch markers
- Sewing pins
Approximate yarn amounts:
- White: 100–130 yards
- Pale blue: 60–80 yards
- Black: less than 2 yards
Abbreviations
- BLO: back loop only
- ch: chain
- dec: invisible single crochet decrease
- hdc: half double crochet
- inc: work 2 single crochet stitches in the same stitch
- MR: magic ring
- Rnd: round
- sc: single crochet
- sl st: slip stitch
- st: stitch
- sts: stitches
Finished Size
Using super bulky chenille yarn and a 5 mm hook:
- Doll height: approximately 8–9 inches
- Head width: approximately 4 inches
- Puddle length: approximately 10–11 inches
- Puddle width: approximately 5½–6 inches
- Each tear stream: approximately 4–5 inches long
The finished size will vary with yarn, hook size, and tension.
Pattern Notes
- This pattern uses US crochet terminology.
- The legs, body, neck, and head are worked as one continuous piece.
- The arms are made separately and crocheted directly into the body.
- Work the doll in continuous spiral rounds.
- Mark the first stitch of every round.
- The puddle is crocheted as a flat oval.
- The two tear streams are made as long, narrow oval pieces.
- Stuff the head firmly, but keep the torso and limbs slightly softer.
- Chenille stitches can be difficult to count. Use a stitch marker and count every round.
- When using chenille yarn, make the magic ring with smooth matching yarn if the center keeps breaking.
- Embroidered eyes are recommended instead of safety eyes when making the toy for a young child.
- Difficulty level: confident beginner.
Special Stitch
Invisible Decrease
Insert the hook through the front loop of the next stitch.
Insert the hook through the front loop of the following stitch.
Yarn over and pull through both front loops.
Yarn over and pull through the remaining two loops.
Step-by-Step Instructions
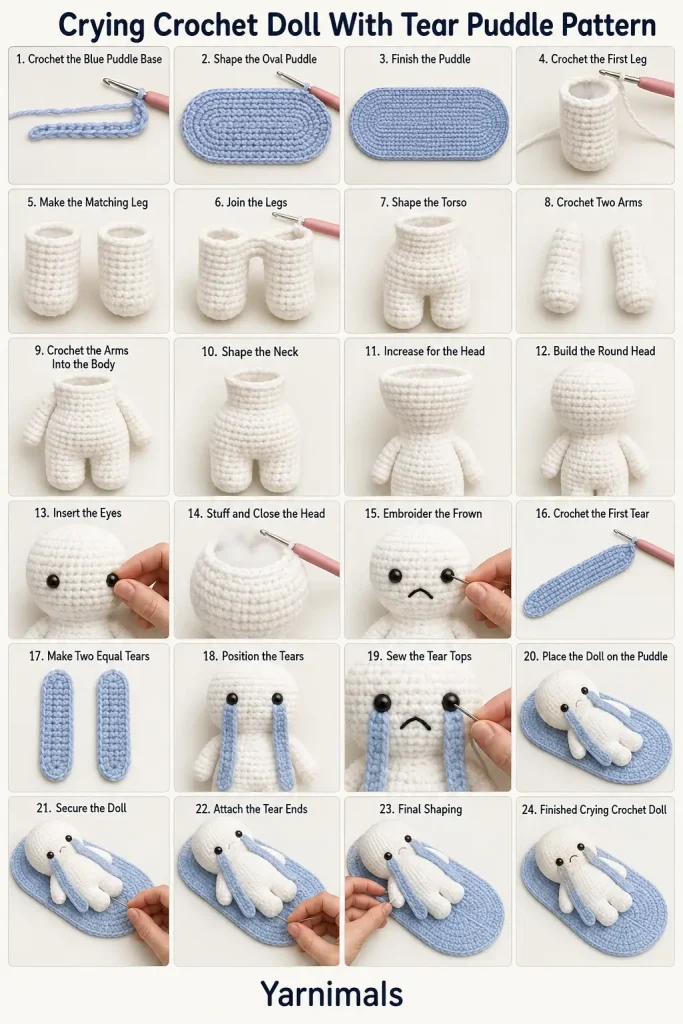
Pale Blue Tear Puddle
Use pale blue yarn and the 5.5 mm hook.
Foundation
Ch 18.
Round 1
Beginning in the second ch from the hook:
- Work 2 sc in the first ch.
- Sc in each of the next 15 ch.
- Work 4 sc in the final ch.
Rotate the foundation chain and work along the unused loops on the opposite side:
- Sc in each of the next 15 loops.
- Work 2 sc in the final loop.
38 sts
Place the stitch marker in the first stitch.
Round 2
Work:
- Inc in each of the next 2 sts
- Sc in each of the next 15 sts
- Inc in each of the next 4 sts
- Sc in each of the next 15 sts
- Inc in each of the final 2 sts
46 sts
Round 3
Work:
- Repeat twice: sc in the next st, inc in the next st
- Sc in each of the next 15 sts
- Repeat four times: sc in the next st, inc in the next st
- Sc in each of the next 15 sts
- Repeat twice: sc in the next st, inc in the next st
54 sts
Round 4
Work:
- Repeat twice: sc in each of the next 2 sts, inc in the next st
- Sc in each of the next 15 sts
- Repeat four times: sc in each of the next 2 sts, inc in the next st
- Sc in each of the next 15 sts
- Repeat twice: sc in each of the next 2 sts, inc in the next st
62 sts
Round 5
Sc in each st around.
62 sts
Sl st into the next st.
Fasten off, leaving a long tail for attaching the doll.
Flatten and shape the puddle into a smooth oval.
First Leg
Use white yarn and the 5 mm hook.
Round 1
Make 6 sc in a MR.
6 sts
Round 2
Inc in every st around.
12 sts
Round 3
Working in BLO, sc in each st around.
12 sts
Rounds 4–7
Sc in each st around.
12 sts
Stuff the lower leg lightly.
Fasten off the first leg.
Second Leg
Repeat Leg Rounds 1–7.
Do not fasten off.
Stuff lightly.
Join the Legs
Position both legs beside each other with the beginning-round seams facing the back.
From the second leg, ch 2.
Join to the first leg with 1 sc.
Body Round 1
Sc in the remaining 11 sts of the first leg.
Sc in each of the 2 chains.
Sc in all 12 sts of the second leg.
Sc in the unused loops on the opposite side of the 2 chains.
28 sts
Place the beginning marker at the center back.
Body Round 2
Repeat four times:
- Sc in each of the next 6 sts
- Inc in the next st
32 sts
Body Rounds 3–7
Sc in each st around.
32 sts
Stuff the legs fully and begin stuffing the lower body.
Body Round 8
Repeat four times:
- Sc in each of the next 6 sts
- Dec
28 sts
Body Rounds 9–10
Sc in each st around.
28 sts
Body Round 11
Repeat four times:
- Sc in each of the next 5 sts
- Dec
24 sts
Body Round 12
Sc in each st around.
24 sts
Pause here and make both arms.
Arms
Make two using white yarn.
Round 1
Make 5 sc in a MR.
5 sts
Round 2
Inc in every st around.
10 sts
Rounds 3–8
Sc in each st around.
10 sts
Stuff only the lower half of the arm.
Flatten the upper opening.
Work 5 sc through both layers to close the arm.
Fasten off and weave in the end.
Make the second arm in the same way.
Crochet the Arms Into the Body
Position one arm on each side of the torso.
The arms should point downward with the flattened edges aligned against the body stitches.
Body Round 13
Work:
- Sc in each of the next 4 body sts
- Sc through the next body st and the first closed arm st
- Continue attaching the first arm across the next 4 body sts
- Sc in each of the next 6 body sts
- Attach the second arm across the next 5 body sts in the same way
- Sc in each of the final 4 body sts
24 sts
Make sure both arms sit at the same height.
Body Round 14
Sc in each st around.
24 sts
Body Round 15
Repeat six times:
- Sc in each of the next 2 sts
- Dec
18 sts
Body Round 16
Sc in each st around.
18 sts
Finish stuffing the torso.
Keep the upper torso firm enough to support the oversized head.
Head
Continue with white yarn.
Head Round 1
Inc in every st around.
36 sts
Head Round 2
Repeat six times:
- Sc in each of the next 5 sts
- Inc in the next st
42 sts
Head Rounds 3–8
Sc in each st around.
42 sts
Add the Eyes
Insert the safety eyes between Head Rounds 5 and 6.
Place them approximately 8 stitches apart.
The eyes should sit toward the lower half of the face rather than close to the crown.
Do not attach the washers until both eyes look level from the front.
For embroidered eyes, wait until the head has been stuffed.
Head Round 9
Repeat six times:
- Sc in each of the next 5 sts
- Dec
36 sts
Head Round 10
Repeat six times:
- Sc in each of the next 4 sts
- Dec
30 sts
Begin stuffing the head.
Shape the cheeks and sides evenly as you add fiberfill.
Head Round 11
Repeat six times:
- Sc in each of the next 3 sts
- Dec
24 sts
Head Round 12
Repeat six times:
- Sc in each of the next 2 sts
- Dec
18 sts
Add the remaining stuffing.
The head should be round, firm, and noticeably larger than the torso.
Head Round 13
Repeat six times:
- Sc in the next st
- Dec
12 sts
Head Round 14
Dec around.
6 sts
Fasten off, leaving a tail.
Thread the tail through the front loops of the remaining stitches.
Pull firmly to close.
Secure and hide the yarn end inside the head.
Embroider the Sad Mouth
Thread a small embroidery needle with black yarn or embroidery floss.
Position the mouth approximately two rounds below the eyes.
Create a small downward-curving frown:
- Insert the needle at one upper mouth corner.
- Bring it out at the lowest center point.
- Insert it again at the opposite upper corner.
- Use one tiny holding stitch at the center to keep the curve in place.
The finished mouth should be small and centered.
Do not add a nose.
Secure the black yarn inside the head.
Crochet the Tear Streams
Make two using pale blue yarn and the 5 mm hook.
Each tear is worked as one long, narrow oval.
Foundation
Ch 18.
Tear Round 1
Beginning in the second ch from the hook:
- Work 2 sc in the first ch.
- Sc in each of the next 15 ch.
- Work 3 sc in the final ch.
Rotate the chain and work along the unused loops on the opposite side:
- Sc in each of the next 15 loops.
- Work 1 sc in the same first chain that already contains 2 sc.
Join with a sl st to the first sc.
36 sts
Fasten off, leaving a long sewing tail.
The finished tear should be a long, softly rounded strip.
Make a second identical tear.
Position the Tears
Lay the doll on the finished blue puddle.
Place one tear beneath each eye.
The upper end of each tear should begin just below and slightly outside the eye.
Allow each strip to curve naturally along the side of the face and body.
The rounded lower end should rest on the puddle beside the hips.
Pin both tears before sewing.
Check that:
- Both begin at the same height.
- The two strips are equal in length.
- The eyes remain visible.
- The tears do not cover the embroidered mouth.
- The lower ends lie naturally on the puddle.
Sew the Tears to the Face
Using the long blue tail, sew the upper ¾ inch of the first tear to the head.
Use small hidden stitches along both edges of the strip.
Do not sew across the entire tear.
Repeat with the second tear.
The middle portions should remain loose enough to drape naturally.
Attach the Doll to the Puddle
Place the doll in the center of the blue oval.
The head should sit near one end of the puddle, with the legs extending toward the opposite end.
Using the long puddle tail or a separate strand of pale blue yarn, sew the doll discreetly to the mat.
Add hidden attachment stitches beneath:
- The upper back
- The lower torso
- Each leg
- The back of the head, if additional support is needed
Do not sew the arms flat.
Keep the hands free so they rest naturally beside the body.
Do not pull the sewing yarn tightly enough to distort the puddle.
Attach the Lower Tear Ends
Arrange the lower end of each tear on the puddle.
Curve the tear slightly rather than pulling it into a perfectly straight line.
Sew only the final 1–1½ inches of each tear to the puddle.
Leave the middle sections free.
This creates the appearance of the tears flowing from the face and collecting in the puddle.
Final Shaping
Gently shape the head into a smooth round form.
Adjust the torso so it lies centered.
Position the arms slightly away from the sides.
Straighten the legs while keeping a small natural gap between the feet.
Arrange the tears so they drape symmetrically.
Smooth the puddle into an even oval.
Check that:
- Both eyes are level.
- The frown is centered.
- Both tears begin beneath the eyes.
- The tear lengths match.
- The body is attached securely.
- The arms remain movable.
- No loose yarn ends are visible.
Tips & Variations
Use soft chenille yarn for the plush appearance shown in the design. Smooth worsted-weight yarn can also be used for a smaller, more defined amigurumi.
Keep the hook size small enough that the stuffing does not show between the stitches.
Chenille magic rings can snap when tightened. Make the ring with smooth matching yarn and crochet over it with chenille when necessary.
For more expressive tears, embroider a tiny pale blue stitch directly beneath each eye before attaching the long streams.
Make the puddle wider by adding another increase round before the final even round.
Use pale lavender, mint, or soft pink for a different emotional-support character.
For a sleepy version, embroider closed eyes instead of using safety eyes.
For a child-safe version:
- Embroider the eyes.
- Reinforce every attachment.
- Avoid buttons, beads, or hard embellishments.
- Check the toy regularly for loose seams.
Frequently Asked Questions
Are the blue strips ears or tears?
In this design, they are long stylized tear streams. They begin directly beneath the eyes, drape beside the face and body, and finish on the matching blue tear puddle.
Can I leave the doll removable from the puddle?
Yes, but sewing it to the puddle creates the exact finished composition and prevents the pieces from becoming separated. For a removable version, attach the tear strips only to the face and leave the puddle separate.
How can I make the head stay round?
Stuff the neck first, then add small amounts of fiberfill around the lower face, sides, and crown. Avoid placing one large clump of stuffing directly in the center.
Conclusion
This crying crochet doll pattern combines a soft white amigurumi character with an embroidered frown, two long blue tear streams, and a matching plush puddle. The simple colors and oversized emotional details make it a memorable handmade project that feels both playful and comforting.
Make the doll in classic white and pale blue or choose a favorite color combination for a personalized plush crochet gift.



