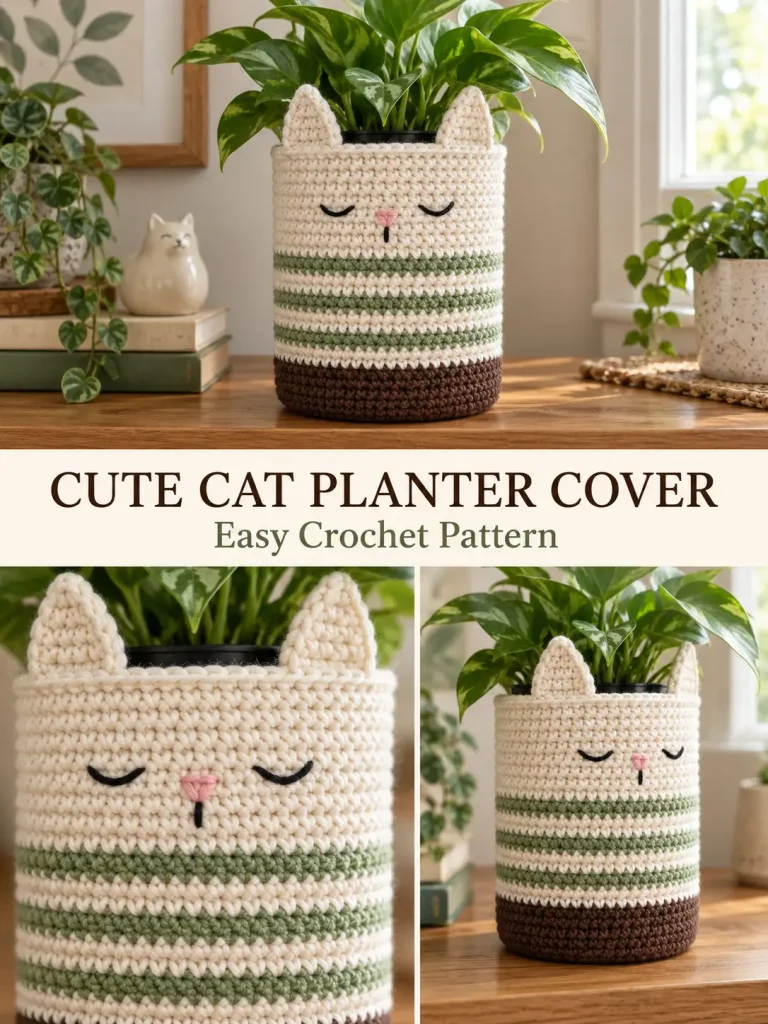
This little crochet cat planter turns an ordinary plant pot into a playful piece of home decor. The design uses a sturdy cylindrical crochet body with a dark brown base, three narrow sage-green stripes, a soft cream cat face, and two pointed ears at the top.
The construction is straightforward: crochet a flat circular base, continue upward without increasing to form the planter cover, add two separately crocheted ears, then embroider the sleepy cat face.
It also works beautifully as a crochet hook holder, pencil cup, small storage basket, or handmade gift for a cat lover.
Skill Level
Confident Beginner
You should be comfortable with:
- magic ring
- single crochet
- increasing
- decreasing
- working in continuous rounds
- changing colors
- simple sewing
- basic embroidery
Finished Size
Approximately:
- 4 inches across the base
- 5 inches tall without ears
- 6½ inches tall including ears
- approximately 12 inches around
Designed to fit around a small plant pot approximately 3½–4 inches in diameter.
Always measure your actual pot before finishing the sides.
Materials
- Medium weight #4 cotton or cotton-blend yarn
- Cream or soft white yarn
- Dark brown yarn
- Sage or muted olive-green yarn
- Small amount of pale pink yarn
- Small amount of black yarn or embroidery floss
- 4 mm crochet hook
- Yarn needle
- Scissors
- Stitch marker
- Measuring tape
Optional:
- removable plastic plant pot
- waterproof plant saucer
Abbreviations — US Terms
ch – chain
sl st – slip stitch
sc – single crochet
sc2tog – single crochet 2 stitches together
sc3tog – single crochet 3 stitches together
BLO – back loop only
st(s) – stitch(es)
Gauge
Approximately:
16 sc × 17 rounds = 4 inches
A firm gauge is important because the planter should hold its cylindrical shape.
If your fabric feels floppy or very open, move down to a smaller hook.
Pattern Notes
The planter body is worked from the bottom upward.
The base is crocheted as a flat circle.
After the base reaches 48 stitches, the increases stop. One round is worked in the back loops to create a defined fold between the bottom and the sides.
The body is then worked straight upward with 48 stitches in every round.
Use a stitch marker to mark the first stitch because the body is worked in continuous rounds.
Do not join unless specifically instructed.
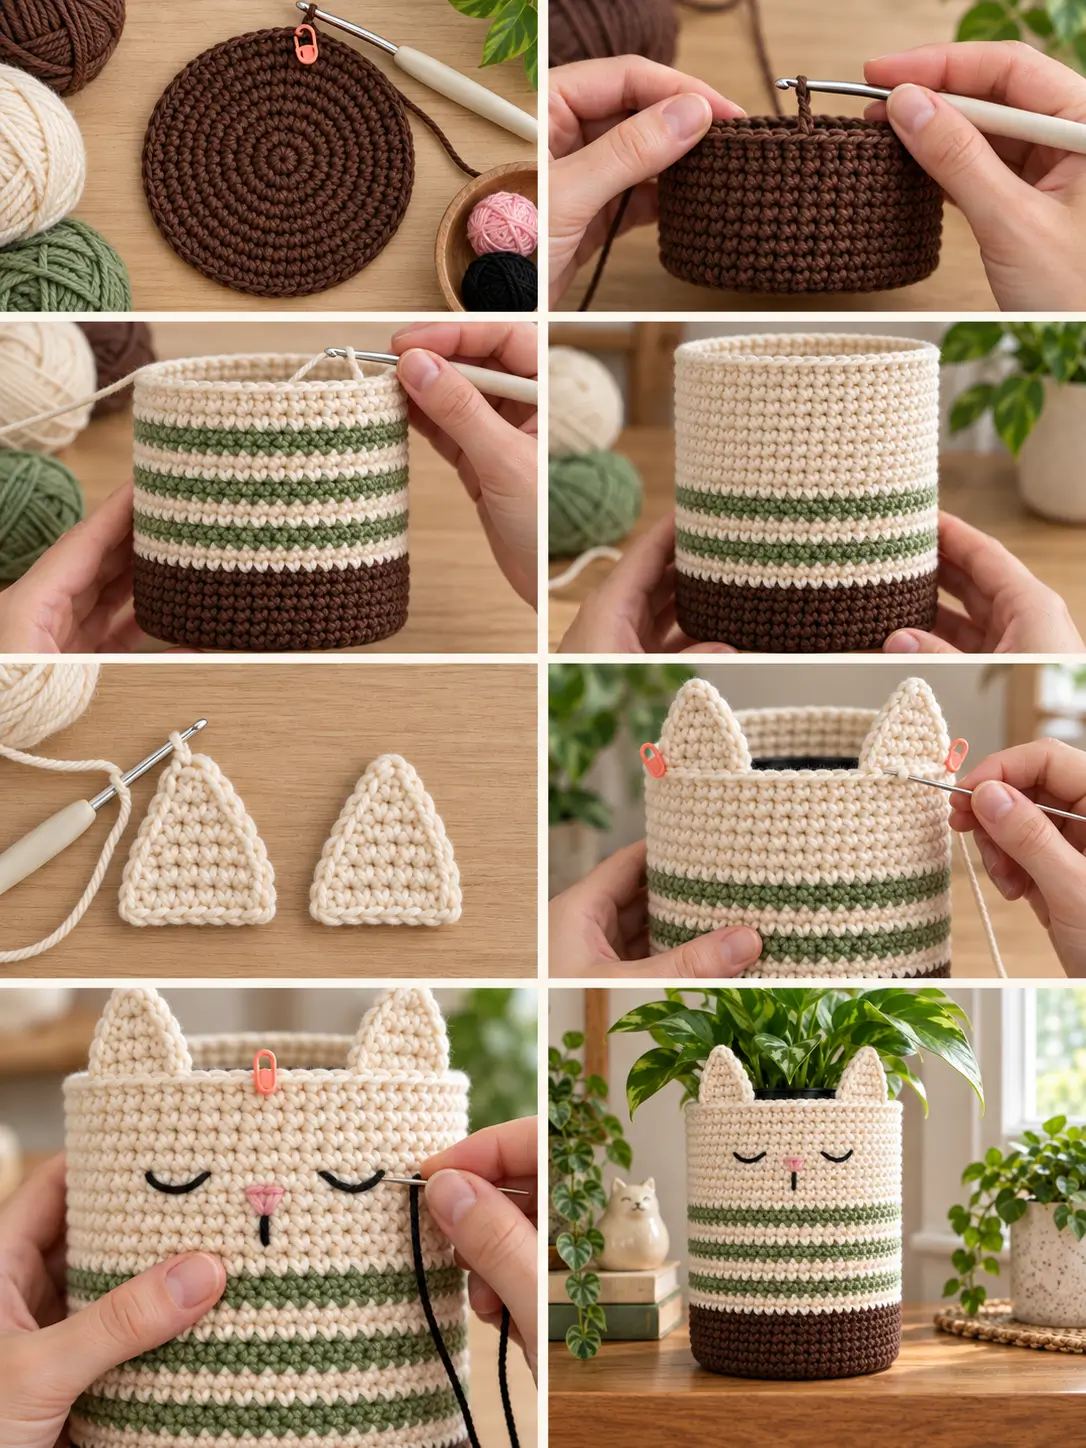
PART 1 — Crochet the Brown Base
Use dark brown yarn.
Round 1
Make a magic ring.
Work 6 sc into the ring.
Pull the ring closed.
6 sts
Place a stitch marker in the first stitch.
Round 2
Work 2 sc in every stitch around.
12 sts
Round 3
Repeat around:
sc in next st, 2 sc in next st
18 sts
Round 4
Repeat around:
sc in next 2 sts, 2 sc in next st
24 sts
Round 5
Repeat around:
sc in next 3 sts, 2 sc in next st
30 sts
Round 6
Repeat around:
sc in next 4 sts, 2 sc in next st
36 sts
Round 7
Repeat around:
sc in next 5 sts, 2 sc in next st
42 sts
Round 8
Repeat around:
sc in next 6 sts, 2 sc in next st
48 sts
The circle should now measure approximately 3¾–4 inches across.
Lay it flat before continuing.
If the circle forms a bowl already, your tension may be too tight.
If it ripples significantly, your tension may be too loose.
PART 2 — Turn the Base Into the Planter Sides
Continue with brown.
Round 9
Work 1 sc BLO in every stitch around.
48 sts
Working through the back loops creates a subtle ridge and encourages the sides to turn upward.
Rounds 10–12
Sc in every stitch around.
48 sts each round
You should now have a dark brown lower section with a flat base and approximately four rounds of vertical brown crochet.
PART 3 — Crochet the Striped Body
Change to cream.
Carry unused colors only if you are comfortable doing so. Otherwise, fasten off at each color change and weave the tails inside later.
Rounds 13–14 — Cream
Sc around.
48 sts
Round 15 — Sage Green
Change to sage.
Sc around.
48 sts
Rounds 16–17 — Cream
Change to cream.
Sc around.
48 sts each round
Round 18 — Sage Green
Change to sage.
Sc around.
48 sts
Rounds 19–20 — Cream
Change to cream.
Sc around.
48 sts each round
Round 21 — Sage Green
Change to sage.
Sc around.
48 sts
You should now have three narrow sage stripes, each separated by two cream rounds.
PART 4 — Crochet the Upper Cat Section
Change back to cream.
Rounds 22–29
Sc in every stitch around.
48 sts each round
This creates the larger cream section where the cat’s face will be embroidered.
After Round 29, check the planter against the pot you intend to use.
The crochet should reach approximately to the top of the plant pot without covering too much of the plant itself.
Final Rim
Work 1 loose sl st in each stitch around.
Do not pull these stitches tightly or the opening may become smaller.
Fasten off.
Weave the tail securely inside.
PART 5 — Crochet the Cat Ears
Make 2 identical ears using cream yarn.
The ears are worked flat and sewn onto the top rim.
Ear Foundation
Ch 8.
Row 1
Sc in the second chain from the hook and across.
7 sc
Ch 1 and turn.
Row 2
Sc2tog.
Sc in next 3 stitches.
Sc2tog.
5 sts
Ch 1 and turn.
Row 3
Sc in all 5 stitches.
5 sts
Ch 1 and turn.
Row 4
Sc2tog.
Sc in next stitch.
Sc2tog.
3 sts
Ch 1 and turn.
Row 5
Sc in all 3 stitches.
3 sts
Ch 1 and turn.
Row 6
Sc3tog.
1 st
Fasten off, leaving a long tail for sewing.
Edge the Ear
Attach cream yarn at one lower corner.
Work sc evenly up the first diagonal edge.
At the pointed tip, work:
sc, ch 1, sc
Continue working sc evenly down the opposite side.
Fasten off.
This gives the triangle a cleaner, slightly firmer outline.
Repeat for the second ear.
PART 6 — Position the Ears
Place the planter upright.
Choose the side with the cleanest color changes as the back.
The opposite side becomes the front.
Flatten the top slightly to help find the center front.
Position the ears symmetrically on either side of the center.
Leave approximately 1–1½ inches between the inner edges of the ears.
The bottom edge of each ear should sit directly against the top cream rim.
Use stitch markers or pins to hold both ears temporarily.
Before sewing, check the planter from the front.
The ears should:
- be the same height
- point upward
- lean slightly outward if desired
- sit evenly on either side of the face
PART 7 — Sew the Ears in Place
Thread the long cream tail onto a yarn needle.
Sew the entire bottom edge of the first ear securely to the top rim.
Pass through both the ear stitches and the planter stitches.
Sew back across the base a second time for reinforcement.
Do not pull so tightly that the rim puckers.
Repeat for the second ear.
Weave the yarn tails inside the planter.
PART 8 — Embroider the Cat Face
It is easier to embroider the face before putting the plant pot inside.
The face sits in the cream section above the highest sage stripe.
Mark the Face
Find the center front.
The pink nose should sit approximately:
3–4 rounds above the upper sage stripe
Place a removable stitch marker where you want the center of the nose.
The eyes sit slightly higher and to either side.
Pink Nose
Use pale pink yarn.
Create a tiny upside-down triangle approximately 2 stitches wide.
Make several short horizontal stitches, gradually making them slightly shorter toward the bottom.
The result should form a small soft triangular nose.
Do not make the nose too large.
The expression works best when the features remain delicate.
Mouth
Thread black yarn or embroidery floss onto the needle.
From the center bottom of the pink nose, make one short vertical stitch downward.
Then add two tiny diagonal stitches from the bottom of that line if you want a subtle cat-mouth shape.
Keep the mouth small.
Closed Sleepy Eyes
Position the eyes evenly on either side of the nose.
Leave approximately 5–6 stitches between the inner ends of the eyes.
For each eye, embroider a small curved line resembling:
⌒
A simple way to create the curve is to use two or three short black stitches.
Angle the outer end slightly upward to create the sleepy, smiling expression.
Make the second eye a mirror image of the first.
Check the Face
Before securing the embroidery tails, step back and check:
- both eyes are the same height
- the nose is centered
- the ears frame the face evenly
- the mouth is directly under the nose
Small adjustments make a big difference on such a simple face.
Secure all embroidery ends inside.
Optional Whiskers
The simple version does not need whiskers, but you can add them if desired.
On each side of the face, embroider two short black lines angled slightly outward.
Keep them thin so they do not overwhelm the sleepy expression.
Using It as a Planter Cover
This crochet piece is a decorative plant-pot cover, not a waterproof flower pot.
Place the actual plant inside:
- a plastic nursery pot
- a ceramic pot
- or another waterproof container
A saucer under the inner pot is also useful.
Do not plant directly into the crochet.
For easiest care, remove the plant pot before watering and return it after excess water has drained.
How to Resize the Planter
The easiest way to resize this project is to change the number of increase rounds in the base.
Smaller Version
Stop increasing at:
42 stitches
Then begin the BLO side round.
This works well for a smaller container.
Standard Version
Stop at:
48 stitches
This is the size used in this pattern.
Larger Version
Add one more increase round:
Repeat around:
sc in next 7 sts, 2 sc in next st
You will have:
54 stitches
For an even larger version, continue the normal flat-circle increase pattern.
The important rule is:
Add 6 stitches per increase round.
Once the base is approximately the same diameter as the bottom of your pot, stop increasing and begin the BLO round.
How to Adjust the Height
The height is even easier to customize.
After completing the stripes, simply add or remove cream rounds before the final rim.
For a taller planter:
Add more cream rounds.
For a shorter planter:
Work fewer upper cream rounds.
Keep enough cream fabric above the stripes to fit the embroidered face comfortably.
Color Variations
The cat planter is easy to customize.
Tabby Cat
Cream + warm brown + beige stripes
Gray Cat
Light gray body + charcoal base + darker gray stripes
Calico Inspired
Cream body + scattered orange and brown accents
Pastel Cat
Cream + dusty pink + sage
Black Cat
Charcoal or black body with gray stripes and pale embroidered features
Ginger Cat
Warm cream + burnt orange stripes + brown base
The simple cylindrical construction stays the same.
Use It as a Crochet Hook Holder
This project does not have to hold a plant.
Without the inner flower pot, it also works as a small crochet organizer.
Use it for:
- crochet hooks
- stitch markers
- scissors
- pens
- pencils
- makeup brushes
- small craft tools
For a tool holder, place a small rigid container inside if you want the sides to remain perfectly upright.
Tips for a Firm Planter
Use Cotton Yarn
Cotton or a firm cotton blend gives the cylinder more structure than a very soft, stretchy yarn.
Crochet Tightly
A dense single crochet fabric helps the planter stand upright.
Use a Smaller Hook if Necessary
If the fabric is floppy, moving down 0.5 mm in hook size can help.
Fit the Actual Pot
Do not rely entirely on finished measurements.
Try the crochet cover over your plant pot several times while working the sides.
Common Problems
The Base Will Not Lie Flat
If it cups upward before the side rounds begin, your gauge may be too tight.
Try a slightly larger hook.
If the base ripples, your gauge may be too loose.
Try a smaller hook.
The Cover Is Too Tight
A planter cover should fit closely but should still slide on and off the pot.
If necessary, add another increase round to the base and work the sides with the new stitch count.
The Cover Is Too Loose
Remove the final increase round or use a smaller hook.
The Top Edge Flares Out
Check that you still have exactly 48 stitches.
Accidental increases commonly happen when the first stitch of a round is difficult to identify.
Keep the stitch marker in place throughout the project.
The Ears Fall Forward
Sew across their bases twice.
You can also catch one or two stitches slightly above the base on the back of each ear for additional support.
The Face Looks Uneven
Mark all facial-feature positions with removable stitch markers before embroidering.
Start with the nose because it establishes the center of the face.
Cute Crochet Cat Planter Cover
The charm of this project comes from keeping the construction simple.
A basic single-crochet cylinder becomes instantly recognizable as a cat once you add two pointed ears, a tiny pink nose, and sleepy embroidered eyes.
The dark base and three slim sage stripes add just enough color without making the project complicated, while the small size makes it a quick and useful crochet project for home decor, gifts, desk organization, or plant lovers.



