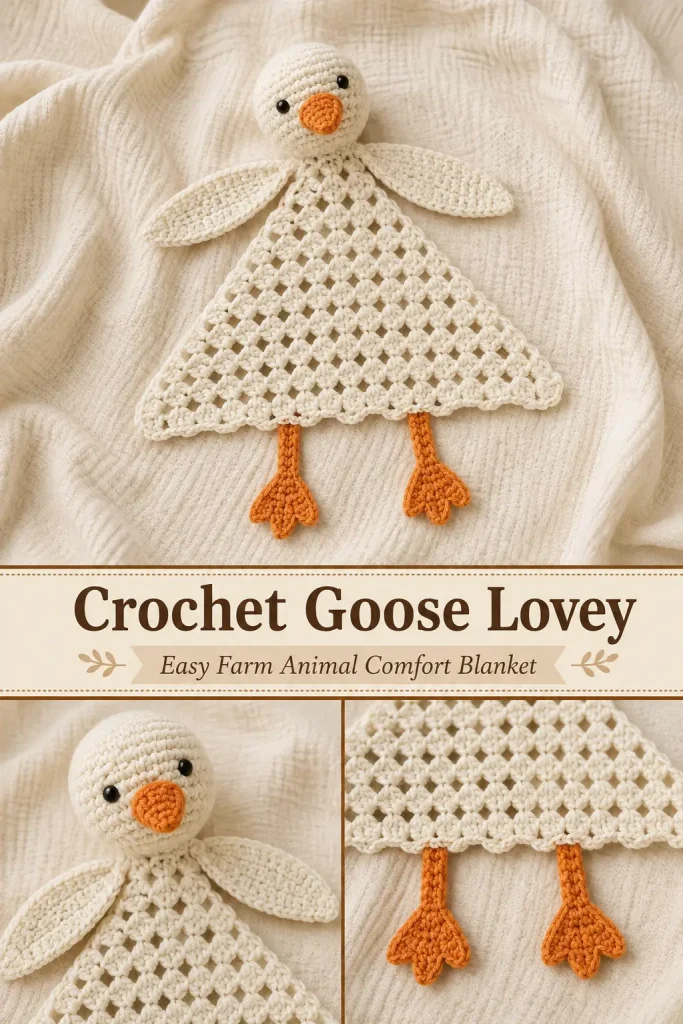
This sweet crochet goose lovey combines a soft little amigurumi head with a lightweight openwork comfort blanket, making it a lovely handmade baby gift or nursery project. The design is simple but full of character, with a creamy white goose, tiny black eyes, a bright orange beak, soft wings, and two dangling orange feet.
The body is not a stuffed toy. It is a flat triangular crochet comforter worked in an airy granny-style mesh, while the head is lightly stuffed to give the goose its rounded shape. Two flat wings sit near the shoulders, and the orange legs and webbed feet hang from the lower edge.
Description
The finished crochet goose lovey has a rounded white head attached at the narrow top of a triangular cream blanket. A small orange beak projects from the front of the face, with two small black eyes placed above it. Two elongated white wings lie flat along the upper sides of the blanket. The blanket gradually widens toward the bottom using open chain spaces and double crochet groups, creating the delicate lacy texture visible in the design. Two narrow orange legs ending in broad, slightly flared webbed feet extend from the lower edge.
Materials
- DK or light worsted yarn in cream or soft white
- DK or light worsted yarn in orange
- Small amount of black yarn for embroidered eyes, or baby-safe eyes if appropriate
- 3.5 mm crochet hook
- 4 mm crochet hook for the blanket if you prefer slightly softer drape
- Polyester fiberfill for the head
- Yarn needle
- Stitch markers
- Scissors
For an item intended for a baby, embroidered eyes are the safest option.
Abbreviations
- ch – chain
- sl st – slip stitch
- sc – single crochet
- hdc – half double crochet
- dc – double crochet
- inc – 2 sc in the same stitch
- dec – single crochet 2 together
- st – stitch
- sts – stitches
- sp – space
- rep – repeat
Pattern Notes
US crochet terminology is used.
The project is made in separate parts:
- triangular comfort blanket
- stuffed goose head
- beak
- 2 wings
- 2 legs and feet
The head is worked in continuous rounds.
The blanket is worked back and forth from the narrow neck edge toward the wider bottom edge.
The wings are worked flat and should remain unstuffed.
The finished lovey can be resized easily by adding or removing blanket rows.
Approximate finished size with DK yarn:
- blanket length: 35–40 cm
- bottom width: approximately 30–35 cm
- head diameter: approximately 8–9 cm
Step-by-Step Instructions
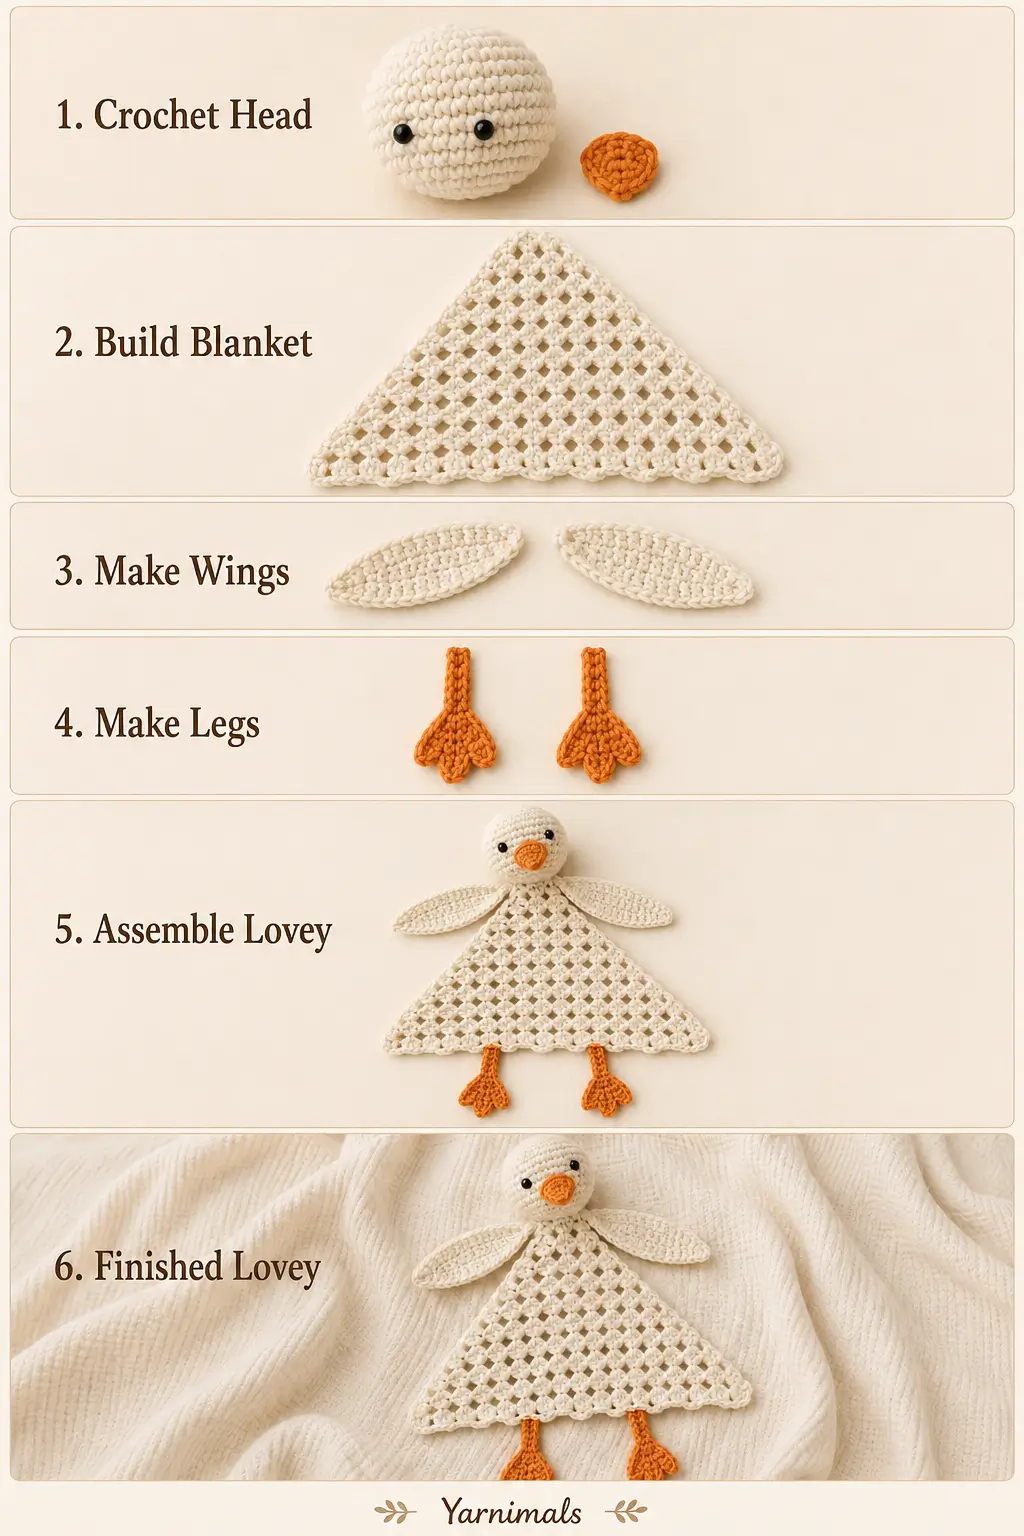
Goose Head
Using cream yarn and the 3.5 mm hook.
Round 1
Make a magic ring.
Work 6 sc into the ring.
6 sts.
Round 2
Inc in every st around.
12 sts.
Round 3
Rep sc in next st, inc in next st around.
18 sts.
Round 4
Rep sc in next 2 sts, inc around.
24 sts.
Round 5
Rep sc in next 3 sts, inc around.
30 sts.
Round 6
Rep sc in next 4 sts, inc around.
36 sts.
Rounds 7–13
Sc in every st around.
36 sts.
This creates the smooth rounded sides of the goose’s head.
Round 14
Rep sc in next 4 sts, dec around.
30 sts.
Round 15
Rep sc in next 3 sts, dec around.
24 sts.
Begin stuffing the head.
Keep the stuffing soft rather than extremely firm.
Round 16
Rep sc in next 2 sts, dec around.
18 sts.
Round 17
Rep sc in next st, dec around.
12 sts.
Add enough stuffing to maintain a smooth round shape.
Round 18
Dec around.
6 sts.
Fasten off, leaving a long tail for assembly.
Close the remaining opening.
Eyes
Position the eyes approximately between Rounds 8 and 10.
Leave approximately 5–6 stitches between them.
For the closest handmade baby-friendly finish, embroider each eye using several small black stitches to create a neat round dot.
Keep both eyes level.
Orange Beak
Using orange yarn.
The beak should be small, slightly triangular, and project gently from the lower front of the face.
Row 1
Ch 5.
Sc in second ch from hook and across.
4 sc.
Ch 1 and turn.
Row 2
Sc across.
4 sts.
Row 3
Dec, sc in next 2 sts.
3 sts.
Ch 1 and turn.
Row 4
Sc across.
3 sts.
Row 5
Dec, sc in final st.
2 sts.
Fasten off, leaving a long tail.
Fold the small piece slightly so it has a shallow three-dimensional shape rather than lying completely flat.
Attach the wider edge of the beak to the front of the head approximately between Rounds 10 and 13.
Add only a tiny amount of stuffing if needed.
The beak should point outward and slightly downward.
Triangular Lovey Blanket
Using cream yarn and the 4 mm hook.
This section creates the open granny-style triangle seen in the finished design.
The triangle begins at the top near the goose’s neck and becomes progressively wider toward the bottom.
Row 1
Ch 4.
Work 2 dc into the first ch.
Ch 1.
Work 3 dc into the same ch.
Turn.
You now have two small dc groups with a center ch-1 space.
Row 2
Ch 3.
Work 2 dc into the first st.
Ch 1.
Work 3 dc, ch 1, 3 dc into the center ch-1 sp.
Ch 1.
Work 3 dc into the final st.
Turn.
Row 3
Ch 3.
Work 2 dc in first st.
Ch 1.
Work 3 dc into next ch-1 sp.
Ch 1.
Into the center space work:
3 dc, ch 1, 3 dc
Ch 1.
Work 3 dc into next ch-1 sp.
Ch 1.
Work 3 dc in final st.
Turn.
Row 4 and Following Rows
Continue in the established pattern.
At the beginning of every row:
Ch 3 and work 2 dc into the first st.
In each ordinary ch-1 space:
Work 3 dc.
Ch 1 between groups.
In the center ch-1 space:
Work:
3 dc, ch 1, 3 dc
This center increase creates the triangular shape.
At the end of the row:
Ch 1.
Work 3 dc into the final st.
Continue until the triangle measures approximately 35–40 cm from the top to the lower point or until it reaches your preferred lovey size.
The repeated chain spaces create the open, airy texture visible throughout the blanket.
Blanket Border
The reference-style design has a simple, clean outer edge rather than a heavy decorative border.
When the triangle reaches the desired size, do not fasten off.
Ch 1.
Work sc evenly along the first side of the triangle.
At the lower point, work 3 sc into the point.
Continue sc evenly along the second side.
Work across the upper edge.
Join with sl st.
Fasten off.
Keep the border relaxed so the blanket remains flat.
Wings
Make 2.
Using cream yarn and 3.5 mm hook.
The wings should be long, narrow, slightly pointed, and completely flat.
Row 1
Ch 13.
Sc in second ch from hook.
Sc across.
12 sts.
Ch 1 and turn.
Row 2
Sc across.
12 sts.
Row 3
Dec, sc across.
11 sts.
Row 4
Sc across.
11 sts.
Row 5
Dec, sc across.
10 sts.
Row 6
Dec, sc across.
9 sts.
Row 7
Dec, sc across.
8 sts.
Row 8
Dec, sc across.
7 sts.
Row 9
Dec, sc across.
6 sts.
Row 10
Dec, sc across.
5 sts.
Row 11
Dec, sc across.
4 sts.
Row 12
Dec twice.
2 sts.
Fasten off.
The narrow end forms the wing tip.
Work sc evenly around the entire outer edge if you want a smoother finished shape.
Do not stuff.
Orange Legs and Feet
Make 2.
The visible design has short narrow orange legs with broader flattened feet.
Leg
Using orange yarn.
Ch 8.
Beginning in second ch from hook, sc across.
7 sts.
Fasten off temporarily or continue directly into the foot.
Foot
At the end of the leg, ch 4.
Row 1
Sc in second ch from hook and next 2 ch.
3 sts.
Ch 1 and turn.
Row 2
Inc, sc in next st, inc.
5 sts.
Ch 1 and turn.
Row 3
Inc, sc in next 3 sts, inc.
7 sts.
Ch 1 and turn.
Row 4
Sc across.
7 sts.
Row 5
Dec, sc in next 3 sts, dec.
5 sts.
Fasten off.
The result should be a small flattened foot that widens toward the end and resembles the softly flared orange feet visible on the goose.
Make the second leg and foot identically.
Assembly
Attach the Head
Position the head at the narrow upper section of the triangular blanket.
The face should point forward while the blanket hangs directly underneath.
Using the long cream yarn tail, firmly stitch the lower portion of the head to the upper few rows of the blanket.
Attach across a wide enough area that the head does not wobble excessively.
Attach the Wings
Place one wing on each side just below the head.
The wider wing ends should sit near the shoulders.
Angle each wing downward and slightly outward.
Allow the pointed ends to remain free so they lie naturally across the blanket.
Secure approximately the upper third of each wing to the blanket.
Do not attach the entire wing flat.
This allows the wings to have the soft overlapping appearance shown in the design.
Attach the Legs
Position both orange legs along the lower edge of the blanket.
Keep a small gap between them.
Secure the upper end of each leg firmly to the wrong side of the blanket.
The orange feet should extend completely beyond the edge.
Check that both legs are the same length.
Finishing
Weave in every yarn end securely.
Shape the head with your fingers until it is evenly rounded.
Gently flatten the wings.
Straighten the openwork blanket and lightly block it if necessary.
Shape the orange feet so they fan outward slightly.
Make sure every attached part is secure, especially if the lovey will be given to a baby.
Tips & Variations
For the soft cream appearance, choose an ivory, natural white, or warm off-white yarn rather than a bright optical white.
Cotton or cotton-acrylic yarn will give the triangular blanket good stitch definition while still remaining soft.
For a fluffier lovey, use a soft acrylic or baby yarn.
If you want a denser blanket, replace each ch-1 between the dc groups with no chain. The resulting fabric will have smaller openings, although it will look less like the airy reference design.
The blanket can also be enlarged simply by continuing the established triangle rows.
Keep the wings unstuffed. Their flat construction is important to the soft lovey appearance.
Avoid overstuffing the head because a very firm head will feel disproportionately heavy against the lightweight blanket.
FAQ
Is this crochet goose lovey an amigurumi toy?
It combines amigurumi and lovey construction. The head is stuffed like amigurumi, while the body is a flat openwork comfort blanket.
Can I make the blanket larger?
Yes. Continue repeating the triangular granny-style rows. Each new row increases the width while maintaining the same shape and openwork texture.
Can I use safety eyes?
For decorative projects, safety eyes may be used when securely installed. For a lovey intended for babies, embroidered black eyes are the safer choice.
Conclusion
This crochet goose lovey is a charming combination of simple amigurumi and an airy crochet comfort blanket. The creamy triangular body, soft wings, round little head, orange beak, and dangling webbed feet give the project plenty of personality without requiring complicated construction. Make it in classic cream and orange for the goose-inspired look, or customize the colors to create a special handmade baby gift.




Have you assembled the blanket goose lovey in two different ways? I don’t get it😅 in one phote the legs are attatched in the narrow end an on the oter along the longest side