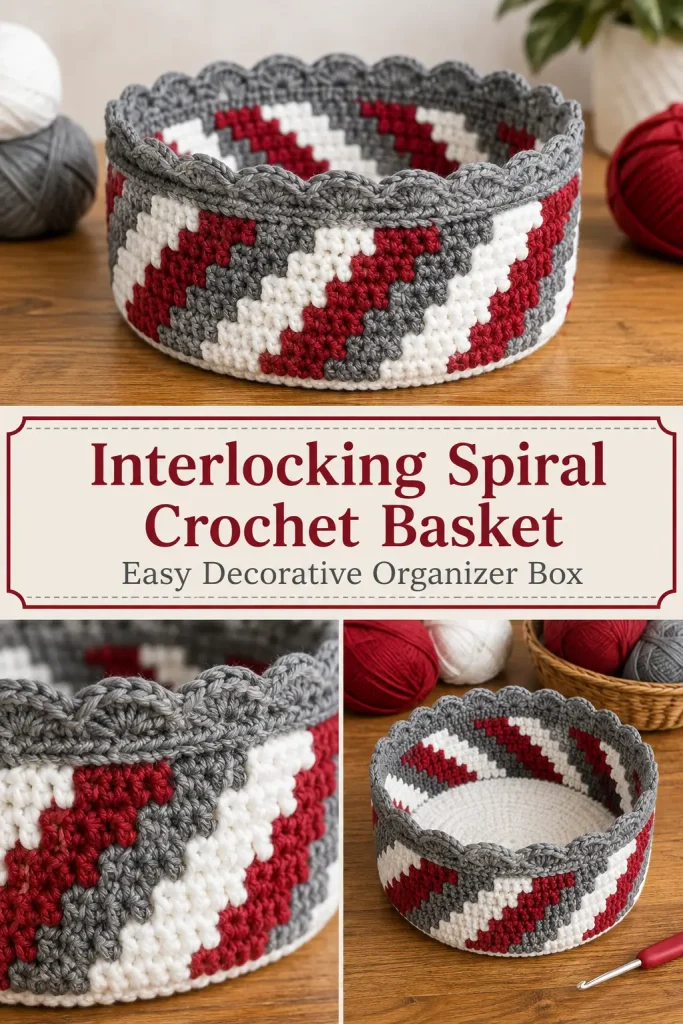
This colorful crochet basket combines a sturdy round base with dense red, white, and gray colorwork that travels diagonally around the sides. The shifting blocks create an interlocking spiral effect, while the raised gray scalloped rim gives the organizer its soft flower-like shape.
The basket is useful for yarn, hooks, toiletries, craft supplies, toys, or small household items. It is worked without separate side panels, and the three unused yarn colors are carried inside the stitches to create thick, supportive walls.
Description
The finished crochet organizer has a flat white circular base, straight rounded walls, diagonal blocks in deep red, white, and medium gray, and twelve gentle scallops around the opening. A final reverse single crochet border creates the thick braided-looking gray edge visible around the top. The dense center single crochet texture gives the side colorwork a neat, almost knitted appearance while helping the basket keep its shape.
Approximate finished size:
- Base diameter: 18–20 cm
- Height to valleys: 10–11 cm
- Height to scallop peaks: 12–13 cm
- Opening circumference: approximately 52–56 cm
The finished measurements depend on yarn thickness and tension.
Materials
- Medium-weight cotton or cotton-blend yarn
- Approximately 120 g white yarn
- Approximately 100 g deep red yarn
- Approximately 100 g medium gray yarn
- 4 mm crochet hook
- 4.5 mm hook for the colorwork if your center stitches are tight
- Yarn needle
- Scissors
- Stitch markers
- Measuring tape
Abbreviations
- BLO – back loop only
- ch – chain
- csc – center single crochet
- dc – double crochet
- hdc – half double crochet
- inc – work 2 stitches in the same stitch
- MR – magic ring
- sc – single crochet
- sl st – slip stitch
- st – stitch
- sts – stitches
Pattern Notes
- This pattern uses US crochet terminology.
- The base is worked in joined rounds of standard single crochet.
- The turning round is worked through the back loop to create a clear corner between the base and walls.
- The patterned walls use center single crochet, also called waistcoat stitch.
- Do not cut the yarn after every color section. Carry the two unused colors inside the stitches.
- Change color during the final yarn-over of the stitch before the new color begins.
- Keep carried strands relaxed. Tight floats will pull the basket inward.
- The color chart is built over 21 stitches and repeated four times around.
- Place a marker after every 21 stitches to divide the basket into four chart sections.
- The basket has 84 stitches around and twelve 7-stitch color blocks.
- Ch 1 at the beginning of a round does not count as a stitch.
- Join each round with a slip stitch unless otherwise stated.
- The seam should remain at the back of the basket.
Special Stitch: Center Single Crochet
Insert the hook between the two vertical legs of the V on the front of the next stitch rather than under the two top loops.
Yarn over and pull up a loop.
Yarn over and pull through both loops on the hook.
Center single crochet creates the small knitted V texture seen across the colored sections. Work with relaxed tension because the center of the stitch can become tight.
Step-by-Step Instructions
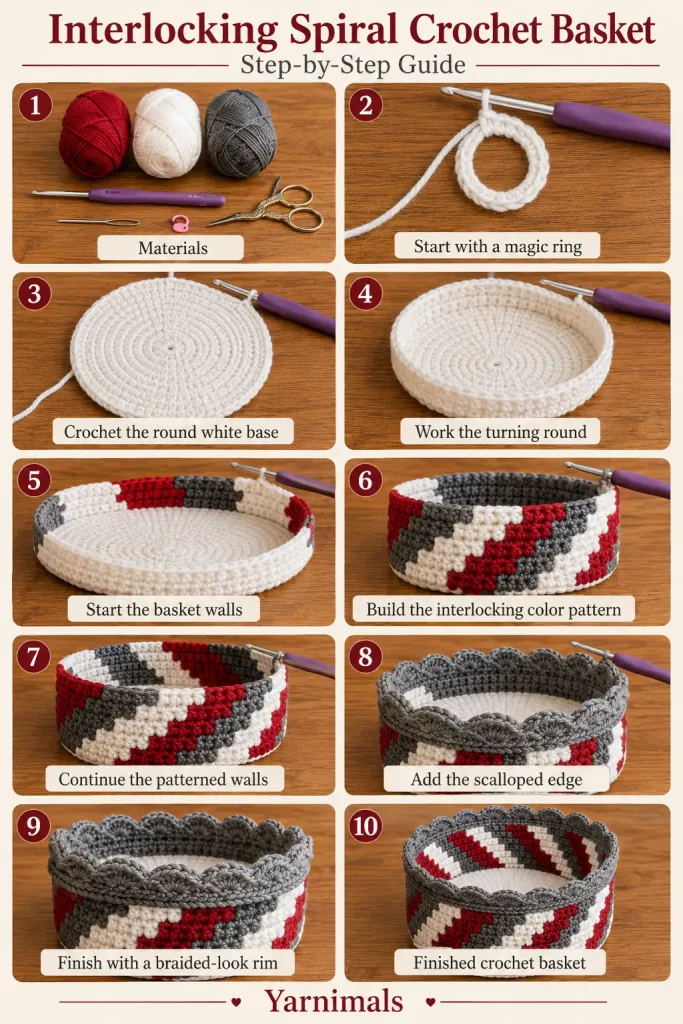
Make the White Circular Base
Using white yarn, make an MR.
Round 1
Ch 1.
Work 7 sc into the MR.
Pull the ring closed.
Join with a sl st in the first sc.
You should have 7 sts.
Round 2
Ch 1.
Work 2 sc in each st around.
Join.
You should have 14 sts.
Round 3
Ch 1.
Repeat around:
1 sc in the next st, 2 sc in the next st.
Join.
You should have 21 sts.
Round 4
Ch 1.
Repeat around:
1 sc in each of the next 2 sts, 2 sc in the next st.
Join.
You should have 28 sts.
Round 5
Ch 1.
Repeat around:
1 sc in each of the next 3 sts, 2 sc in the next st.
Join.
You should have 35 sts.
Round 6
Ch 1.
Repeat around:
1 sc in each of the next 4 sts, 2 sc in the next st.
Join.
You should have 42 sts.
Round 7
Ch 1.
Repeat around:
1 sc in each of the next 5 sts, 2 sc in the next st.
Join.
You should have 49 sts.
Round 8
Ch 1.
Repeat around:
1 sc in each of the next 6 sts, 2 sc in the next st.
Join.
You should have 56 sts.
Round 9
Ch 1.
Repeat around:
1 sc in each of the next 7 sts, 2 sc in the next st.
Join.
You should have 63 sts.
Round 10
Ch 1.
Repeat around:
1 sc in each of the next 8 sts, 2 sc in the next st.
Join.
You should have 70 sts.
Round 11
Ch 1.
Repeat around:
1 sc in each of the next 9 sts, 2 sc in the next st.
Join.
You should have 77 sts.
Round 12
Ch 1.
Repeat around:
1 sc in each of the next 10 sts, 2 sc in the next st.
Join.
You should have 84 sts.
Lay the base flat before continuing. If it ripples, use a smaller hook. If it cups, loosen your tension or use a slightly larger hook.
Form the Base Corner
Continue with white.
Turning Round
Ch 1.
Working in the BLO, sc in every st around.
Join with a sl st.
You should still have 84 sts.
Working through the back loop creates a visible ridge and turns the crochet upward to begin the basket walls.
Place a marker at the beginning of the round.
Count 21 sts and place another marker. Repeat until the basket is divided into four sections of 21 sts each.
Prepare the Three Colors
Use these color abbreviations in the wall chart:
- R – deep red
- W – white
- G – medium gray
Attach all three colors at the back seam.
Lay the two unused colors along the top of the previous round and crochet over them. This hides the carried strands inside the dense wall.
For every wall round:
- Ch 1.
- Work the chart using csc.
- Repeat the listed 21-stitch sequence four times.
- Join with a sl st in the first csc.
- Do not turn.
How to Read the Wall Chart
“R7” means work 7 csc with red.
“W7” means work 7 csc with white.
“G7” means work 7 csc with gray.
Each complete chart line contains 21 stitches. Repeat that line four times to complete the 84-stitch round.
At some section markers, the color at the end and beginning will be the same. Continue with that color without making an unnecessary change.
Interlocking Colorwork Walls
Wall Round 1
Repeat four times:
R7, W7, G7.
You should have 84 csc.
Wall Round 2
Repeat four times:
G1, R7, W7, G6.
Wall Round 3
Repeat four times:
G2, R7, W7, G5.
Wall Round 4
Repeat four times:
G3, R7, W7, G4.
Wall Round 5
Repeat four times:
G4, R7, W7, G3.
Wall Round 6
Repeat four times:
G5, R7, W7, G2.
Wall Round 7
Repeat four times:
G6, R7, W7, G1.
The first set of diagonal blocks is now complete.
Wall Round 8
Repeat four times:
G7, R7, W7.
Wall Round 9
Repeat four times:
W1, G7, R7, W6.
Wall Round 10
Repeat four times:
W2, G7, R7, W5.
Wall Round 11
Repeat four times:
W3, G7, R7, W4.
Wall Round 12
Repeat four times:
W4, G7, R7, W3.
Wall Round 13
Repeat four times:
W5, G7, R7, W2.
Wall Round 14
Repeat four times:
W6, G7, R7, W1.
The second set of diagonal blocks is now complete.
Wall Round 15
Repeat four times:
W7, G7, R7.
Wall Round 16
Repeat four times:
R1, W7, G7, R6.
Wall Round 17
Repeat four times:
R2, W7, G7, R5.
Wall Round 18
Repeat four times:
R3, W7, G7, R4.
Wall Round 19
Repeat four times:
R4, W7, G7, R3.
Wall Round 20
Repeat four times:
R5, W7, G7, R2.
Wall Round 21
Repeat four times:
R6, W7, G7, R1.
The three interlocking color sections are now complete. The red, white, and gray areas should travel diagonally upward around the basket.
Do not fasten off the gray yarn. Cut the red and white yarns, leaving tails long enough to weave securely into the inside wall.
Stabilize the Opening
Continue with gray.
Top Foundation Round
Ch 1.
Work 1 sc in every st around.
Join with a sl st.
You should have 84 sc.
This round stabilizes the opening before the scallops are added.
Crochet the Twelve Gray Scallops
Each scallop uses seven stitches. Repeat the scallop sequence twelve times.
Scallop Round
Repeat around:
- Sl st in the next st.
- Sc in the next st.
- Hdc in the next st.
- Work 3 dc in the next st.
- Hdc in the next st.
- Sc in the next st.
- Sl st in the next st.
After twelve repeats, join neatly at the first sl st.
The three double crochet stitches worked into the center stitch create the rounded peak of each scallop.
Add the Braided-Look Rim
The visible gray rope edge is created with reverse single crochet.
Reverse single crochet is worked from left to right rather than from right to left.
Reverse Single Crochet Edging
Do not turn the work.
Ch 1.
Working from left to right, insert the hook into the previous stitch.
Yarn over and pull up a loop.
Yarn over and pull through both loops.
Continue working 1 reverse sc in each visible stitch around the scalloped edge.
Skip the deepest slip stitch between two scallops if the edge begins to bunch or fold.
Join with a sl st.
Fasten off, leaving a long tail.
The reverse single crochet should create a firm, raised, twisted-looking gray line around the complete opening.
Finish the Basket
Turn the basket inside out.
Weave every yarn tail through stitches of the same color.
Secure the ends in several directions before trimming them.
Turn the basket right side out.
Shape the circular base with your hands and arrange the twelve scallops evenly around the opening.
Lightly dampen the basket and place it over an appropriately sized bowl or container.
Allow it to dry completely before removing it from the form.
Tips and Variations
Cotton yarn produces the firmest basket. A cotton-acrylic blend also works well, but very soft acrylic may create flexible walls.
Use a hook slightly smaller than the yarn label recommends. Dense stitches help the organizer stand without additional support.
The two carried colors add thickness to the walls. Keep them close to the top of the round and crochet over them completely.
When changing colors, make the final yarn-over of the previous stitch with the new color. This creates a cleaner diagonal line.
Do not pull the carried yarn tightly when moving around the basket. Stretch the last several stitches gently before beginning the next color section.
For a larger basket, continue increasing the base in multiples of seven. The final stitch count must be divisible by 21 to use the same three-color chart.
For a taller basket, repeat Wall Rounds 1–21 once more before adding the top edge.
For a lower storage bowl, stop after Wall Round 14 and add the gray foundation and scalloped border.
The pattern can also be worked in neutral colors such as cream, beige, and brown, or in three shades of the same color.
For extra stability, cut a circle of plastic canvas slightly smaller than the base and place it inside the finished basket. Cover it with a removable fabric circle if desired.
Frequently Asked Questions
Can I use regular single crochet for the walls?
Yes. Standard single crochet will produce a sturdy basket, but the stitches will look more horizontal. Center single crochet creates the small knitted V texture that better matches the visible design.
Why are three yarn colors carried inside the stitches?
Carrying the unused colors avoids cutting and joining yarn at every block. It also thickens the wall and helps the basket hold its shape.
Why does the color chart use 84 stitches?
The design contains twelve color blocks, each seven stitches wide. Eighty-four stitches also divide into four complete 21-stitch red, white, and gray chart sections.
What should I do if the basket flares outward?
Use a smaller hook for the side walls and check that the carried yarn is not stretching the stitches. Keep exactly 84 stitches in every wall round.
What should I do if the opening pulls inward?
Work the center single crochet more loosely or switch to a hook 0.5 mm larger for the walls. Make sure the unused yarn strands are carried without tension.
Conclusion
This interlocking spiral crochet basket brings together practical storage, bold colorwork, and a decorative scalloped rim. The circular white base keeps the organizer stable, while the carried-yarn walls create a thick fabric suitable for everyday use. Save this free crochet basket pattern and make it in red, white, and gray or choose three favorite colors to create a handmade organizer for any room.



