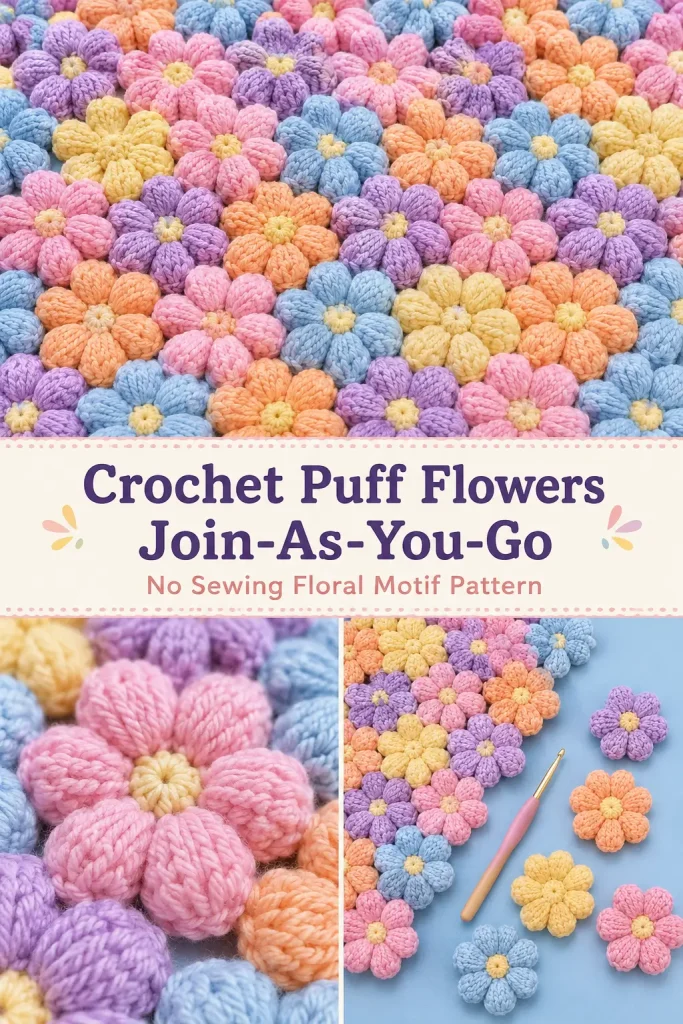
These soft crochet puff flowers are small, colorful, and wonderfully textured. Each flower has six rounded petals, and the motifs can be connected while you crochet, creating a flexible floral fabric without sewing every flower together afterward.
Use the finished puff flower fabric for blankets, cushions, scarves, bags, purses, table runners, or colorful crochet home decor. The join-as-you-go method may look detailed at first, but the same joining movement is repeated throughout the project.
Description
Each crochet flower begins with a small single crochet center surrounded by six thick puff petals. The petals are worked across pairs of center stitches, giving them a plump, rounded shape. The sample uses a cheerful mix of pastel yellow, orange, pink, lavender, and light blue yarn. Individual flowers can be used as appliqués, or they can be joined at two, three, four, or more points to build a continuous flower fabric.
Materials
- Medium-weight yarn in several colors
- 4 mm crochet hook
- Large-eye yarn needle
- Scissors
- Stitch marker, optional
Abbreviations
- ch – chain
- MR – magic ring
- sc – single crochet
- sl st – slip stitch
- st – stitch
- sts – stitches
- yo – yarn over
Pattern Notes
- This pattern uses US crochet terminology.
- Each flower has 12 single crochet stitches in the center.
- Each puff petal is worked across two neighboring single crochet stitches.
- Six petals are made around each flower.
- Pull every puff loop up to the same height for even petals.
- The beginning ch 1 does not count as a stitch.
- The ch 2 at the beginning and end of each petal helps shape the rounded edge.
- When joining flowers, complete the puff portion first and make the join before working the final ch 2.
- Join through the larger visible loop at the back top of an existing puff petal.
- Where flowers are already connected, join into the small gap at the existing connection point.
Step-by-Step Instructions
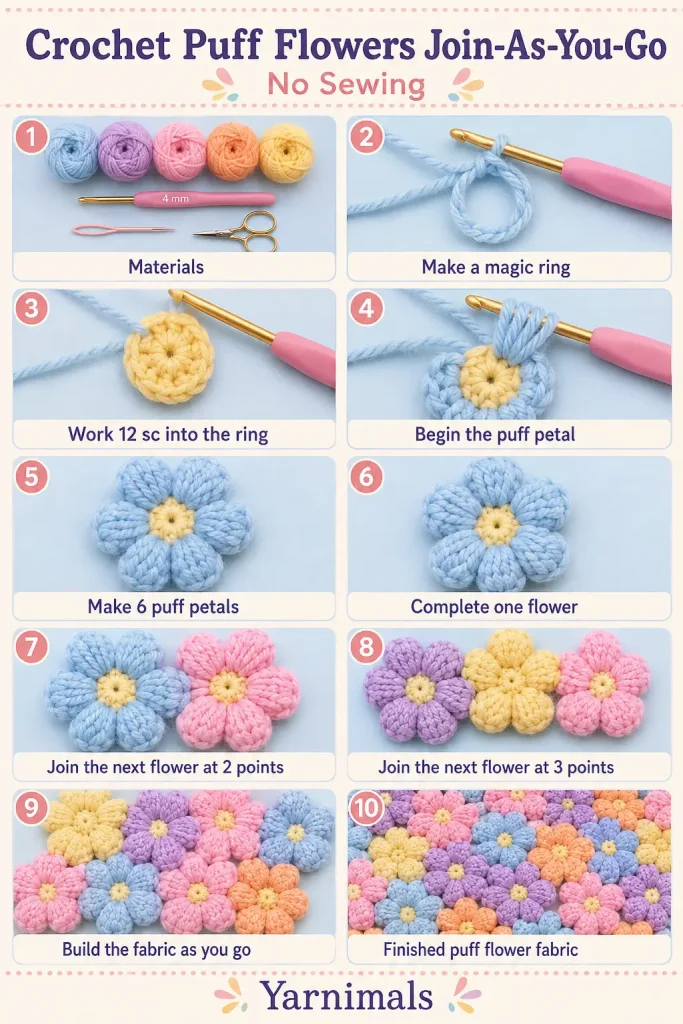
Crochet the Flower Center
Make an MR.
Ch 1. This chain does not count as a stitch.
Work 12 sc into the MR.
Find the first sc and join with a sl st.
Pull the tail to close the magic ring firmly.
You should have 12 sc around the center.
Understanding the Puff Petal
Each petal is worked across two neighboring sc stitches.
The first half of the petal is worked three times into the same stitch where the beginning ch 2 was made.
The second half is worked three times into the next sc.
After completing both halves, you should have 13 loops on the hook.
Petal 1
Ch 2.
Working into the same st where the ch 2 began:
Yo, insert the hook into the st, and pull up a tall loop.
Repeat this two more times in the same st.
You have worked three tall loops into the first st.
Move to the next sc.
Yo, insert the hook into the next sc, and pull up a tall loop.
Repeat this two more times in the same sc.
You should now have 13 loops on the hook.
Yo and carefully pull through the first 12 loops, leaving the final loop on the hook.
Yo and pull through the remaining two loops.
Ch 2.
Sl st into the next available sc.
Push the completed puff petal gently toward the front.
Petal 2
Ch 2.
Working into the same st where the ch 2 began, pull up three tall loops:
Yo, insert the hook, and pull up a tall loop three times.
Move to the next sc.
Yo, insert the hook, and pull up a tall loop three times.
You should have 13 loops on the hook.
Yo and pull through the first 12 loops.
Yo and pull through the final two loops.
Ch 2.
Sl st into the next available sc.
Push the petal toward the front.
Petals 3–6
Repeat the same petal instructions four more times.
For every petal:
- Ch 2.
- Pull up three tall loops in the same sc.
- Pull up three tall loops in the next sc.
- Yo and pull through the first 12 loops.
- Yo and pull through the final two loops.
- Ch 2.
- Sl st into the next available sc.
Continue until the flower has six puff petals.
Finish an Individual Flower
After completing the sixth puff petal, ch 2 if it has not already been worked.
Sl st into the beginning join or into the base of the first petal.
Ch 1.
Cut the yarn, leaving a tail long enough to weave in.
Pull the yarn through the final loop and tighten.
Pull the magic ring closed again if it loosened while making the petals.
Weave In the Ends
Thread the finishing tail onto a large-eye yarn needle.
On the back of the flower, weave the tail beneath the loops at the base of the petals. Avoid bringing the needle through to the front.
Thread the magic-ring tail through the back of the single crochet center.
Weave it under several stitches in different directions and trim the excess.
How to Join Two Puff Flowers
The first flower is completed normally.
For the second flower, crochet the center and complete the first puff petal.
The joining begins with the second petal.
First Joining Point
Ch 2 and make the second puff petal, stopping after the puff has been closed.
Do not work the final ch 2 yet.
Pull the working loop upward slightly and hold it with your fingers.
Remove the hook from the loop.
Turn the completed flower over so its back is facing you.
At the back top of one puff petal, locate the larger visible loop.
Insert the hook beneath that loop.
Place the working loop from the new flower back onto the hook.
Pull the working loop through the loop on the completed flower.
The flowers are now joined at the first point.
Ch 2.
Sl st into the next available sc on the new flower.
Second Joining Point
Make the next puff petal, stopping after closing the puff and before working the final ch 2.
Pull up the working loop and remove the hook.
On the completed flower, locate the petal directly below the first joined petal.
Insert the hook beneath the larger loop at the back top of that petal.
Place the working loop back onto the hook.
Pull it through the existing flower.
Ch 2.
Sl st into the next available sc on the new flower.
The two flowers are now joined at two neighboring points.
Finish the remaining petals of the new flower normally.
How to Join a Flower at Three Points
A flower added between two neighboring flowers is joined at three points:
- One petal joins the first existing flower.
- The following petal joins the space where the two existing flowers meet.
- The next petal joins the second existing flower.
Crochet the center and complete the first petal normally.
Join to the First Existing Flower
Make the second puff petal and stop before the final ch 2.
Pull up the working loop and remove the hook.
Turn the work so you can see the back of the first neighboring flower.
Insert the hook beneath the larger loop at the back top of the correct petal.
Replace the working loop on the hook and pull it through.
Ch 2.
Sl st into the next available sc on the new flower.
Join to the Middle Connection
Make the next puff petal and stop before the final ch 2.
Pull up the working loop and remove the hook.
Locate the small space where the two existing flowers are already joined.
Insert the hook into that connection space.
Replace the working loop on the hook.
Pull the loop through the connection space.
Ch 2.
Turn the work back into position and sl st into the next available sc.
Join to the Second Existing Flower
Make the following puff petal and stop before the final ch 2.
Pull up the working loop and remove the hook.
Locate the correct petal on the second neighboring flower.
Insert the hook beneath the larger loop at the back top of that petal.
Replace the working loop and pull it through.
Ch 2.
Sl st into the next available sc.
The new flower is now connected at three points.
Complete the remaining petals normally.
Joining at Four or More Points
Use the same two joining methods when a flower must connect at four or more points.
Petal-to-Petal Join
When connecting directly to an existing puff petal:
- Stop before the final ch 2.
- Remove the working loop from the hook.
- Insert the hook beneath the larger loop at the back top of the existing petal.
- Replace the working loop.
- Pull it through.
- Ch 2 and complete the petal with a sl st.
Join-to-Join Connection
When connecting where two flowers are already joined:
- Stop before the final ch 2.
- Remove the working loop from the hook.
- Insert the hook into the gap at the existing connection.
- Replace the working loop.
- Pull it through the gap.
- Ch 2 and complete the petal with a sl st.
Continue alternating petal-to-petal joins and join-to-join connections as required by the position of the flower.
Arranging the Flower Fabric
For a straight row, connect each new flower to the previous flower at two neighboring petals.
For the following row, position each new flower in the gap between two flowers from the previous row. Join it at three points so the motifs fit closely together.
Continue adding rows in the same way.
Lay the fabric flat regularly and check that the flowers are facing forward. The back should remain relatively flat, with the joining loops hidden behind the puff petals.
Tips and Variations
Use smooth yarn with good stitch definition so the puff petals remain rounded and visible.
Pull every loop to approximately the same height. Uneven loops can make one side of the petal look smaller.
Hold the loops on the hook with one finger while building the puff. This helps prevent the tall loops from slipping.
Rotate the hook slightly downward while pulling through the first 12 loops. This reduces the chance of catching or splitting individual loops.
Use one color for every flower to create a calm textured fabric, or alternate several pastel shades for the cheerful look shown in the reference design.
For smaller flowers, use thinner yarn and a smaller hook. For larger flowers, use thicker yarn and a suitable larger hook.
Make a few practice flowers before beginning a large joined project. The joining method becomes much easier after the first several motifs.
The individual flowers can also be used as appliqués on hats, bags, scarves, cardigans, and blankets.
Frequently Asked Questions
Why are the puff petals worked over two stitches?
Working each petal across two neighboring single crochet stitches creates a wider, fuller petal and divides the 12-stitch center evenly into six petals.
How many loops should be on the hook before closing the puff?
You should have 13 loops on the hook. Pull through the first 12 loops, then yarn over and pull through the final two loops.
Do I have to join the flowers while crocheting?
No. Individual flowers can be completed separately and sewn together later. The join-as-you-go method removes most of the sewing and creates a flexible, connected fabric as you work.
Conclusion
These colorful crochet puff flowers are a lovely way to create soft, textured fabric without sewing dozens of motifs together afterward. Once the two-point and three-point joins become familiar, the flowers can be arranged into blankets, cushions, scarves, bags, and many other handmade projects. Save the pattern and experiment with your favorite color combinations to create a unique field of crochet flowers.



